Table of contents:
- What is NPM?, go to canonical section
- Why React Custom Hooks?, go to canonical section
- Where does TypeScript fit in the equation?, go to canonical section
- The motivation, go to canonical section
- Putting all together with TSDX, go to canonical section
- Let’s try it then!, go to canonical section
- Building our Hook, go to canonical section
- The example app, go to canonical section
- Add a README file, go to canonical section
- Publishing our package, go to canonical section
- Conclusions, go to canonical section
What is NPM?
NPM stands for Node Package Manager and is the world’s largest software registry. NPM is used to share, borrow, develop packages that can be public or private to your organization. It’s also a command-line utility for interacting with packages and it’s hard to imagine a world without NPM.
Why React Custom Hooks?
As sharp and conscious developers that we all are, we find ourselves many times following the DRY (Don’t Repeat Yourself) principles, therefore building reusable pieces of code within our project. If we’re diving deep in React Hooks that share the same capabilities with cross functionalities, we should be taking advantage of Custom Hooks. Hooks, in nature, are plain JavaScript functions.
“Building your own Hooks lets you extract component logic into reusable functions.” - React documentation.
Where does TypeScript fit in the equation?
TypeScript is a superset of JavaScript and it’s created and maintained by Microsoft. As a language on its own, it has been designed to offer JavaScript the typing system it was missing. It provides compile-time type validation and will not allow our code to compile if there are any typing errors. It has a huge community support not only in the forms of “how-to”s and documentation but also with declaration files.
The motivation
Recently, at work, we’ve built a form that was making use of validations. Since the company I work at, has dozens of other React projects, our team thought that it could be useful to publish the Custom Hook as an NPM package so other teams could make use of it as well. Since the package is fully tested and maintained by us, other teams can enjoy the benefits of a package on these terms without having to worry about maintenance. As a plus, developers will be able to generate value in the form of pull-requests and contributions.
Putting all together with TSDX
I started by building the backbone, adding prettier, ESLint, TypeScript, Rollup, Jest and an example app that would make use of the Custom Hook. It was not as simple as I thought and I stepped on many rocks before I could even start typing any code. My goal was not to spend hours or days on the configuration. I wanted to be reliable, but able to move fast.
I then found TSDX, “a zero-config CLI that helps you develop, test, and publish modern TypeScript packages with ease--so you can focus on your awesome new library and not waste another afternoon on the configuration.”. It couldn’t sound better.
TSDX is another product from the team that built Formik and has dozens of contributors. Some of the shining features are:
- Bundles your code with Rollup and outputs multiple module formats (CJS & ESM by default, and also UMD if you want) plus development and production builds
- Live reload / watch-mode
- Works with React
- Jest test runner setup with sensible defaults via tsdx test
- Zero-config, single dependency
Let’s try it then!
Node and NPM
Make sure you’ve got Node and NPM latest versions installed on your machine.
Choose a name for your package
Picking a name can be burdensome, especially when it comes to Custom Hooks. As React docs say: “A custom Hook is a JavaScript function whose name starts with ”use” and that may call other Hooks.”. If you wanna build something like a “useCounter”, you’ll probably find a dozen of them already registered on https://www.npmjs.com/. I’d suggest something like “@/useCounter”.
But we are not going to build a useCounter. There are way too many in this world and there are other things that are not getting enough attention.
We are going to use theChuck Norris API because life it’s better when you know some Chuck Norris facts.
The goal of this tutorial is not to understand how to build a Custom Hook. If you’re not sure about it, have a look at the official documentation.
Run TSDX
On your terminal/command line, type the following:
npx tsdx create use-norris
The terminal will prompt a question and we’ll choose “react”
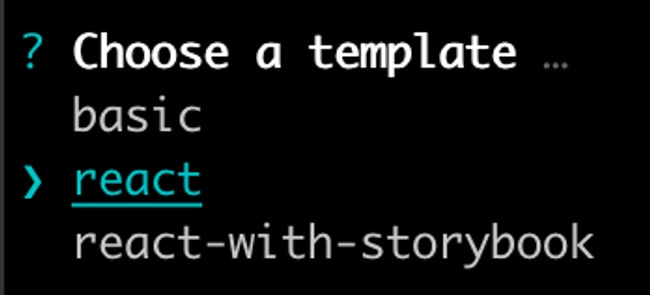
Dependencies will be generated and the boilerplate created.
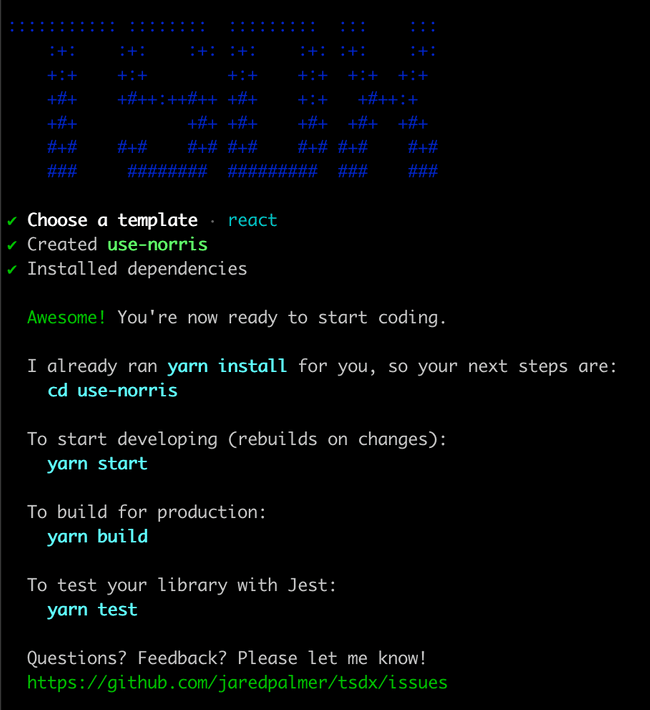
To start developing:
cd use-norris

yarn
Our project file tree will look like this:
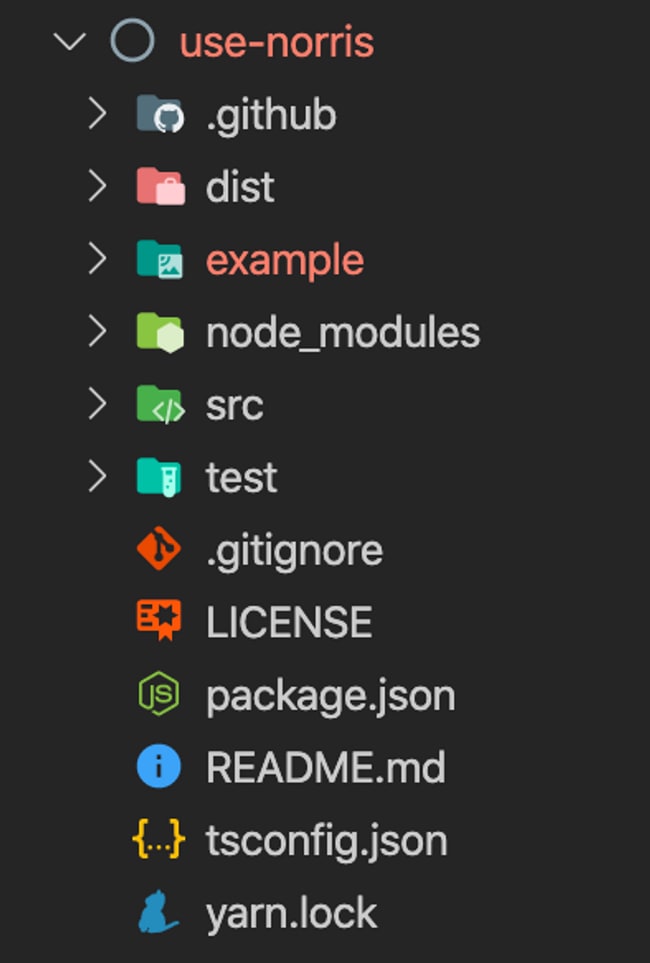
Things to note
package.json
I’m ok with the package.json for now but I’ll change the name value for what will be my package name to @franciscomcg/use-norris. Like so:
“name”: “@franciscomcg/use-norris”
Publishing on NPM and creating a git repository are separated tasks and one has nothing to do with another. We can publish and jump git completely but, as we know, is not a great idea. Therefore I’ll add my git repository in the package.json:
"repository": {
   "type": "git",
   "url": "https://github.com/FranciscoMCG/use-norris"
 },
tsconfig.json
All good for me but I’d like you to pay special attention to the ”declaration”: “true” field. This field would make it possible to generate corresponding declaration (*.d.ts) files for your code and ship them with our package. This would be used by our users to access type definitions.
ESLint and Prettier
The package runs with ESLint and Prettier out of the box. You can customize both by adding eslintConfig and prettier blocks to package.json or by creating .eslintrc.js and .prettierrc.js config files.
Building our Hook
Our Hook is going to be very straight forward, and it’s only functionality is to be able to randomly fetch Chuck Norris facts.
On our src/index.tsx we will replace the code for the following:
Initial config:
import { useEffect, useReducer } from 'react';

interface InitialState {
 response: any;
 isLoading: boolean;
 isError: boolean;
 errorMessage: string | null;
}

enum ActionType {
 FETCH_INIT = 'FETCH_INIT',
 FETCH_SUCCESS = 'FETCH_SUCCESS',
 FETCH_FAILURE = 'FETCH_FAILURE',
 DATA_NOT_FOUND = 'DATA_NOT_FOUND',
}

const { FETCH_FAILURE, FETCH_INIT, FETCH_SUCCESS, DATA_NOT_FOUND } = ActionType;
The actions types and initial state:
type UseNorrisAction =
 | { type: ActionType.FETCH_SUCCESS; payload: string }
 | {
     type: ActionType.FETCH_FAILURE;
     payload: { isError: boolean; errorMessage: string | null };
   }
 | { type: ActionType.FETCH_INIT }
 | { type: ActionType.DATA_NOT_FOUND; payload: string };

const initialState: InitialState = {
 response: '',
 errorMessage: null,
 isLoading: false,
 isError: false,
};
The reducer:
const useNorrisReducer = (
 state: InitialState = initialState,
 action: UseNorrisAction
) => {
 switch (action.type) {
   case FETCH_INIT:
     return {
       ...state,
       isLoading: true,
       isError: false,
     };
   case FETCH_SUCCESS:
     return {
       ...state,
       response: action.payload,
       isLoading: false,
       isError: false,
     };
   case FETCH_FAILURE:
     return {
       ...state,
       isLoading: false,
       isError: action.payload.isError,
       errorMessage: action.payload.errorMessage,
     };
   case DATA_NOT_FOUND:
     return {
       ...state,
       isLoading: false,
       isError: true,
       errorMessage: action.payload,
     };
   default:
     return { ...state };
 }
};
The hook:
const useNorris = (initialState: InitialState) => {
 const [state, dispatch] = useReducer(useNorrisReducer, initialState);
 const { response, errorMessage, isError, isLoading } = state;

 useEffect(() => {
   const fetchNorris = async () => {
     dispatch({ type: FETCH_INIT });
     try {
       const res = await fetch('https://api.chucknorris.io/jokes/random');
       const json = await res.json();

       if (json.error) {
         dispatch({ type: DATA_NOT_FOUND, payload: json.error });
       }
       if (json.value) {
         dispatch({ type: FETCH_SUCCESS, payload: json });
       }
     } catch (error) {
       dispatch({
         type: FETCH_FAILURE,
         payload: { isError: true, errorMessage: error },
       });
     }
   };
   fetchNorris();
 }, []);

 return { response, errorMessage, isLoading, isError };
};

export default useNorris;
Testing our Hook
Testing Custom Hooks can be a daunting task. Normally we’d use a React component to trigger the hook's various functionalities. But it happens that we don’t have a component. So how will we tackle this problem? We’ll use react-hooks-testing-library.
“Allows you to create a simple test harness for React hooks that handles running them within the body of a function component, as well as providing various useful utility functions for updating the inputs and retrieving the outputs of your amazing custom hook.”
By using this library we avoid rendering the React component to test our hook.
Install it as a dev dependency:
(We’ll need also react-test-renderer since it is a peer-dependency and the types for the libraries).
yarn add -D @testing-library/react-hooks react-test-renderer @types/jest @testing-library/react-hooks @testing-library/jest-dom
Now that we have react-hooks-testing-library installed, we’ll rename the file in the test folder to useNorris.test.ts and replace the code with the following:
import { renderHook } from '@testing-library/react-hooks';

import useNorris from '../';

const mockedValue = {
 value: 'this is a very good joke',
};

const initialState = {
 response: { value: '' },
 isLoading: false,
 errorMessage: '',
 isError: false,
};

(global.fetch as jest.Mock) = jest.fn(() =>
 Promise.resolve({
   json: () => Promise.resolve(mockedValue),
 })
);

describe('useNorris', () => {
 beforeEach(() => {
   (fetch as jest.Mock).mockClear();
 });

 it('should resolve', async () => {
   const { result, waitForNextUpdate } = renderHook(() =>
     useNorris(initialState)
   );
   await waitForNextUpdate();
   expect(fetch).toHaveBeenCalled();
   expect(result.current).toEqual({
     response: mockedValue,
     errorMessage: '',
     isLoading: false,
     isError: false,
   });
 });

 it('should return an error', async () => {
   (fetch as jest.Mock).mockImplementationOnce(() =>
     Promise.reject('There is an error')
   );
   const { result, waitForNextUpdate } = renderHook(() =>
     useNorris({
       response: { value: '' },
       isLoading: false,
       errorMessage: '',
       isError: false,
     })
   );
   await waitForNextUpdate();
   expect(fetch).toHaveBeenCalled();
   expect(result.current).toEqual({
     errorMessage: 'There is an error',
     isLoading: false,
     response: { value: '' },
     isError: true,
   });
 });
});
The example app
We wrote a basic test and we should build a usage example so users are able to understand it better.
In the example folder our ./index.ts will look like this:
import * as React from 'react';

import useNorris from '../../src';

const App = () => {
 const initialState = {
   response: '',
   isLoading: false,
   isError: false,
   errorMessage: null,
 };
 const { response, isLoading, isError, errorMessage } = useNorris(
   initialState
 );

 if (errorMessage) {
   return <p>{errorMessage}</p>;
 }

 if (isError) {
   return <p>Something went wrong</p>;
 }

 if (isLoading) {
   return <p>Loading...</p>;
 }

 if (response) {
   return <p>{response.value}</p>;
 }
 return <p>Something went wrong</p>;
};

export default App;
Go to the example folder and type:
yarn start
This would start the server and if we go to localhost:1234 we’ve got our app running!

Add a README file
Writing a good, concise and meaningful README file is super important. We want our users to enjoy the whole set of features we are providing and examining the code, line by line, it’s not the best use of their time.
Publishing our package
With TSDX, publishing is a simple and quick process:
Register on NPM
Running
yarn publish --access publicwill bundle our package to the dist folder and will try to access the NPM registry to publish our Hook. Private packages are a paid feature on NPM and we want our Hook to be available to everyone, hence the--access publicflag.Following the cli instructions, we’ll need to log in on NPM and type the version we want to use.
And that’s it, we receive a confirmation email and our amazing useNorris is now available to everyone.
Versioning
It’s worth noticing that versioning plays an important role in how we update packages. Following the correct semantic versioning will ensure other developers are able to know the extent of changes between versions and adjust if necessary. NPM semantic versioning will give you a good idea about this topic.
Conclusions
In this tutorial we’ve built a Custom Hook with TypeScript that fetches random Chuck Norris jokes. We’ve published it on NPM and now other developers will have the chance to use it as well.
Resources
Final repo - https://github.com/FranciscoMCG/use-norris
NPM package - https://www.npmjs.com/package/@franciscomcg/use-norris
Chuck Norris API - https://api.chucknorris.io
React Hooks Testing Library - https://github.com/testing-library/react-hooks-testing-library

Top comments (0)