Deprecation Notice
Yeah, yeah, I know. I hate it too when people abandon tutorial series mid-way. But, due to (exciting!) circumstances, I'm calling it quits for now.
I'm thinking of just dropping a link to the full repo here - it's a mess, but it's something you guys can chew on instead of my empty promises.
If you'd like me to drop it here - let me know at hey@redcaptom.com.
And, just sayin', I had a BLAST doing this. If you know something - anything - about technology, take the time to write it down as a tutorial series. You will get SO, SO much value out of it, you can't even believe it.
Until we meet again - RCT :)
The Video (Scroll down for the article)
Coming soon!
But I Don't Want To Draw Pictures, Tom...
All right, so we talked about getting set up with the tooling, the tech that we're going to use, how to get ideas, how to verify them and all the other nice things that come along with starting a Shopify app project. I think we're ready to dive into the coding, but before we actually write any lines of code, I think it's important to understand what we're going to build.
I, personally, never possessed the ability to actually jump right into the coding. I never could. I need to have some sort of visual aid to hold me responsible to the vision I wanted to build, or I make a mess of things. Really, really crappy spaghetti-unmaintainable-hellish-garbage code. The kind of code bad programmers - nay, bad people - write.
Solution? Mock it up! If I have a sketch of the screens in front of me in front-end projects (or a schema of the the flow in back-end projects) I tend to stay on track.
In the video I actually walk through the mental path of what I want to have on the page, and then build it piece by piece. Since I don't think the process translates well to the written medium (read: I'm lazy and doing this transcription after recording the video) I will just say a few words and show you the final product.
When thinking about a project, try to put yourself in the user's shoes. What buttons will they expect to see? Where on the page? What are they used to? What do they need to do? Remember that you are building a product for people who are intensely focused on creating more revenue and saving operations time. Is your app's value clear from the screens? Are they easy to understand, and easy to use?
Spend some time thinking before coding. It's surprisingly useful, and can save you literally hours in follow-up fixes. 100% would recommend.
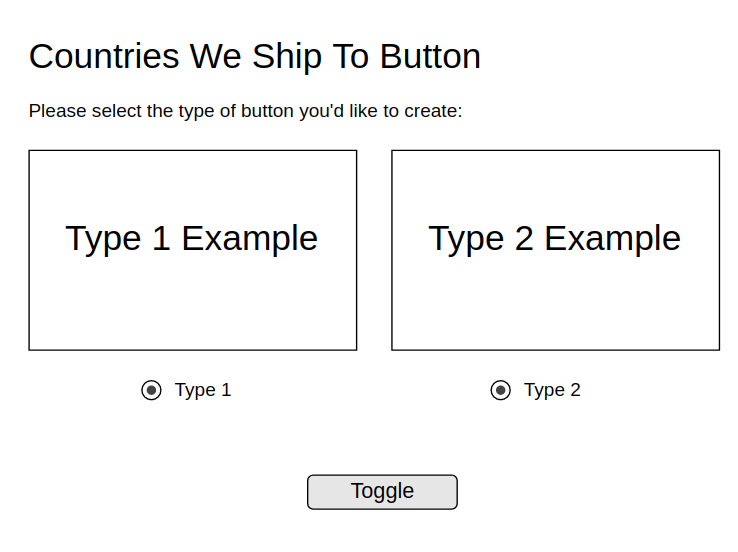
Anyways, here's a view of the final sketch:
Wiring It Up
Having just a sketch is nice, but we will eventually need to output some sort of HTML to our users, right? JSX - the thing that we're going to actually output from our React app - is just HTML on steroids (which is actually a completely false statement from its implementation perspective, but we'll talk about that later).
Anyways, to come closer to the final codeneeded, I like to wire things out in plain HTML. This gives me the barebones feel of a page before having to actually do all the styling logic, and allows me to catch any possible interface bugs (for example, wanting to put too many buttons in a row, which looks fine in my sketch but bad in the HTML wireframe).
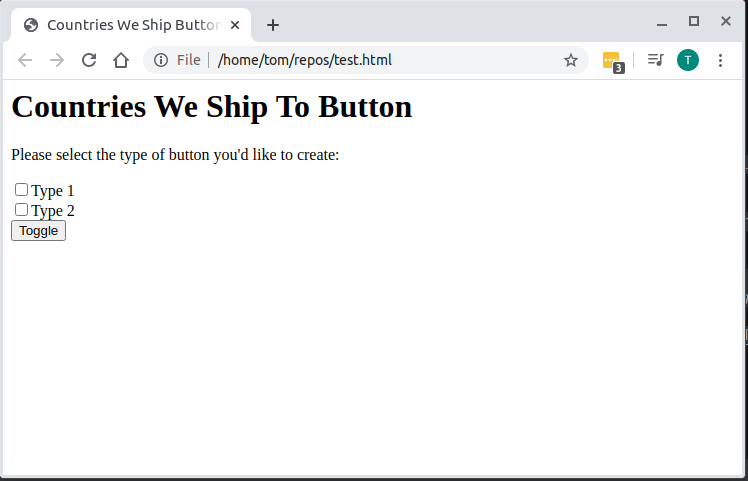
What I do, then, is create a preliminary sketch of how the HTML is going to look like, without any appended CSS. Here it is in all its glory:
And the final HTML:
<html>
    <head>
        <title>
            Countries We Ship Button
        </title>
    </head>
    <body>
        <div class="container">
            <div class="header">
                <h1>Countries We Ship To Button</h1>
            </div>
            <div class="prompt">
                <p>Please select the type of button you'd like to create:</p>
            </div>
            <div class="typeContainer">
                <div class="singleButtonType">
                    <div class="type1Example">
                    </div>
                    <input type="checkbox" value="type1">Type 1
                </div>
                <div class="singleButtonType">
                    <div class="type2Example">
                    </div>
                    <input type="checkbox" value="type2">Type 2
                </div>
            </div>
            <div class="toggleButton">
                <button>Toggle</button>
            </div>
        </div>
    </body>
</html>
And now we have a basic HTML wireframe of our application's main page.
In the next article, I'll deal with the CSS and making this resemble what the final, Polaris-based version will look like. In your own project, feel free to stop after this stage if you feel like you have enough inspiration to get coding!


Top comments (0)