
Snake is a simple game that is great for learning the basics of game development. It can be basic, like the classic Nokia cellphone Snake game, or it can be more complex with added features such as obstacles or making it a two-player game.
In this tutorial, we'll implement a simple version of Snake, using HTML, CSS, and JavaScript.
Getting started
We'll use the Replit web IDE to create our Snake game. This means that you can do this tutorial in the browser, and it will be easy to share your game online. If you don't already have a Replit account, create one now.
For the Snake game, we'll need to:
- Create a grid with cells - the game grid where the snake and food will be.
- Move the snake from cell to cell.
- Control the snake's direction.
- Randomly place food items.
- Detect when the snake's head touches the food.
- Detect when the snake hits the wall of the game grid.
- Detect when the snake hits itself.
- Keep track of the score - how many food items are eaten.
Let's get started and create a new project in Replit.
Creating a new project in Replit
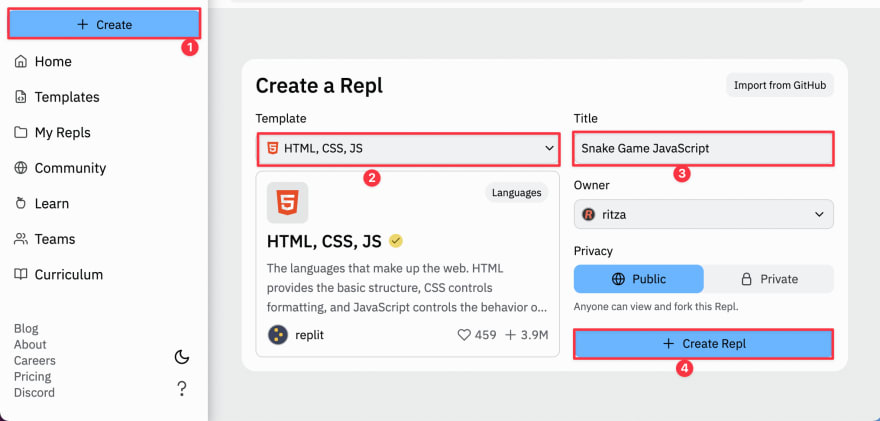
Head over to Replit and create a new repl. Choose HTML, CSS, JS as your project type.
Setting up the folder structure
Our main JavaScript module will be the script.js file. We'll have a utility module, utils.js for some utility functions. A utility function is a generic function that performs a task that we could reuse in another project. We'll create two utility functions: A wait function that pauses an async function for a defined amount of time and a function to get a random element from an array.
Create a utils.js file so that you have the following files in your project:
|__ index.html
|__ style.css
|__ script.js
|__ utils.js
Adding the HTML
Let's add the HTML needed for the Snake game. Replace the code in your index.html file with the following code:
<!DOCTYPE html>
<html lang="en">
  <head>
    <meta charset="UTF-8" />
    <meta http-equiv="X-UA-Compatible" content="IE=edge" />
    <meta name="viewport" content="width=device-width, initial-scale=1.0" />
    <link rel="stylesheet" href="style.css" />
    <script src="script.js" type="module" defer></script>
    <title>Snake - vanilla JavaScript</title>
  </head>
  <body>
    <button class="start-btn" data-content="Start">Start</button>
    <div class="score">Score: <span>0</span></div>
    <div class="grid"></div>
    <div class="keys-container">
      <button id="ArrowUp">
        <svg width="30" height="30" viewBox="0 0 10 10">
          <g transform="rotate(0, 5, 5)">
            <path d="M5,4 L7,6 L3,6 L5,4" />
          </g>
        </svg>
      </button>
      <button id="ArrowLeft">
        <svg width="30" height="30" viewBox="0 0 10 10">
          <g transform="rotate(-90, 5, 5)">
            <path d="M5,4 L7,6 L3,6 L5,4" />
          </g>
        </svg>
      </button>
      <button id="ArrowDown">
        <svg width="30" height="30" viewBox="0 0 10 10">
          <g transform="rotate(180, 5, 5)">
            <path d="M5,4 L7,6 L3,6 L5,4" />
          </g>
        </svg>
      </button>
      <button id="ArrowRight">
        <svg width="30" height="30" viewBox="0 0 10 10">
          <g transform="rotate(90, 5, 5)">
            <path d="M5,4 L7,6 L3,6 L5,4" />
          </g>
        </svg>
      </button>
    </div>
  </body>
</html>
The type=module attribute on the <script> tag for the script.js file allows us to use module features in our script. The <div> with a class of grid is the game grid. We'll create the cells of the game grid using JavaScript. The <div> with an id of keys contains the up, down, left, and right buttons that we'll use to change the snake's direction on a mobile device. The icons for the keys are created using SVGs.
Adding the CSS
Now let's add some basic styling. Replace the code in your style.css file with the following code:
:root {
  --color-button: #f78400;
  --color-button-after: #f5f5f5;
  --color-button: #424246;
  --color-border: #373737;
}
* {
  margin: 0;
}
html {
  font-family: 'Trebuchet MS', 'Lucida Sans Unicode', 'Lucida Grande',
    'Lucida Sans', Arial, sans-serif;
}
body {
  display: flex;
  flex-direction: column;
  align-items: center;
  justify-content: center;
  height: 100vh;
}
button {
  cursor: pointer;
}
.grid {
  display: flex;
  flex-wrap: wrap;
  border: 2px solid var(--color-border);
  min-height: 200px;
  min-width: 200px;
}
.start-btn {
  position: relative;
  font-size: 1.15rem;
  font-weight: bold;
  background: var(--color-button);
  padding: 0.6rem 1rem;
  margin: 1rem 0;
  border: 0;
}
.start-btn::after {
  position: absolute;
  content: attr(data-content);
  width: 100%;
  height: 100%;
  top: 0;
  left: 0;
  box-shadow: inset 0 0 2px var(--color-border);
  background-color: var(--color-button-after);
  display: flex;
  align-items: center;
  justify-content: center;
  transform: translate(-0.2rem, -0.2rem);
  transition: transform 0.3s cubic-bezier(0.34, 1.56, 0.64, 1);
}
.start-btn:hover::after,
.start-btn:focus::after {
  transform: translate(0);
}
.grid div {
  transition: transform 0.4s ease;
}
.food-item {
  transform: scale(1.15);
}
.keys-container {
  display: grid;
  grid-template-columns: 50px 50px 50px;
  grid-template-rows: auto;
  grid-template-areas:
    '.    up   .'
    'left down right';
  grid-gap: 10px;
  padding: 1rem;
}
.keys-container button {
  background-color: var(--color-button-after);
  border: none;
  padding: 0.5rem;
  box-shadow: 3px 3px 3px rgba(0, 0, 0, 0.3);
  transition: all 0.3s ease;
}
.keys-container button:focus {
  box-shadow: 1px 1px 1px rgba(0, 0, 0, 0.3);
}
#ArrowUp {
  grid-area: up;
}
#ArrowDown {
  grid-area: down;
}
#ArrowLeft {
  grid-area: left;
}
#ArrowRight {
  grid-area: right;
}
.shake {
  animation: shake 0.5s linear 1;
}
@keyframes shake {
  10%,
  90% {
    transform: translate3d(-1px, 0, 0);
  }
  20%,
  80% {
    transform: translate3d(2px, 0, 0);
  }
  30%,
  50%,
  70% {
    transform: translate3d(-4px, 0, 0);
  }
  40%,
  60% {
    transform: translate3d(4px, 0, 0);
  }
}
We use CSS variables to store the colors that we'll use. The body selector uses Flexbox to center the snake game grid on the screen. The start button, which has a class of start-btn, is styled using the ::after pseudo-element. This is done to give the button a layered effect. The ::after pseudo-element is on top of the button, the text is set using the content CSS property. We use a data attribute to label the button. The data attribute data-content was added to the start button in the index.html file. The shake keyframe animation will be used to shake the game grid when the snake hits the walls or itself.
Setting up the JavaScript structure
Replace the code in your script.js file with the following code:
import { randomElementFromArray, wait } from './utils.js';
const foodItemsArray = [
  '🐁',
  '🍇',
  '🍉',
  '🍈',
  '🍓',
  '🍍',
  '🍌',
  '🥝',
  '🍏',
  '🍎',
  '🍔',
  '🍅',
  '🥚',
];
We import the utility functions that we'll soon create. The foodItemsArray variable contains the food items that will be randomly selected and added to the game grid. You can change the food item emojis if you want to.
Adding utility functions
Add the following lines to the utils.js file:
export function wait(ms = 0) {
  return new Promise(resolve => setTimeout(resolve, ms));
}
export function randomElementFromArray(arr) {
  const element = arr[Math.floor(Math.random() * arr.length)];
  return element;
}
The wait function takes in a time, in milliseconds, as an argument. It returns a promise that resolves after the time passed in has elapsed. We'll use it to pause an async function that will be used in the game. The randomElementFromArray function takes in an array as an argument and returns a randomly selected element from the array. We'll use it to randomly select a food item from the foodItemsArray variable.
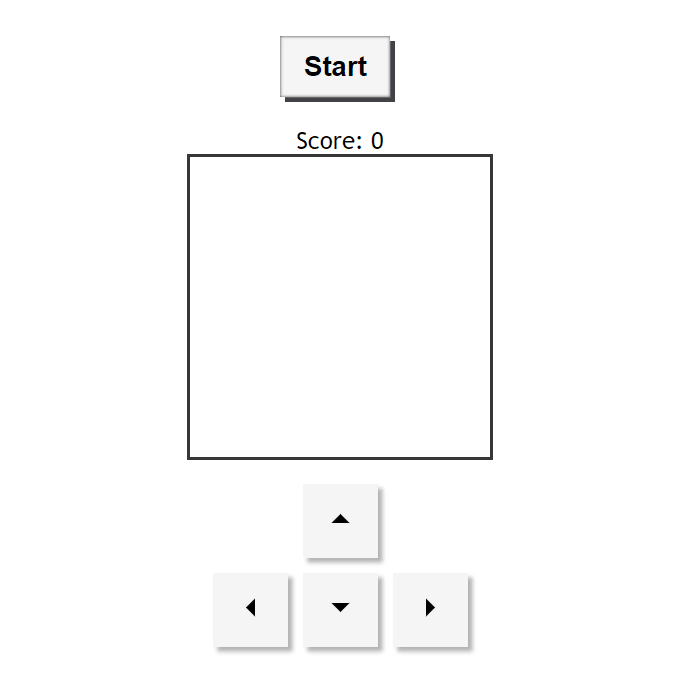
Now try running the code, by pushing the Run button at the top of the Replit window. You should see the start and arrow buttons:

Building the game logic
Before we start coding the game logic, let's look at an overview of how we'll design the game.
Game overview
There are four main functions we'll use to make the game:
startGamegameLoopcreateFoodmoveSnake
We'll run the startGame function when the user clicks start button. In this function, the game grid cells are cleared, the snake and a randomly positioned food item are added to the game grid, and the gameLoop function is run. We run gameLoop every x milliseconds by using setInterval. The snake moves one cell in each game loop.
In the gameLoop function, we check for collisions with the wall of the game grid or the snake itself. We also check if the snake head is in the same cell as a food item. If it is, we remove the food item and create a new randomly positioned food item using the createFood function. The snake length is increased by adding a new tail index to the currentSnake array. We also increase the score.
The snake's body, stored in the currentSnake variable, is represented as an array indicating the cell indexes of the snake. The first element in the array is the snake's head, and the last element in the array is the snake's tail. The game grid cells containing the snake are given a class of snake so that we can detect collisions. We use the cell index positions to style the snake: giving the snake cells a background color and giving the snake head two eyes.
The game grid cell containing the food item is given a class of food-item so that we can detect when the snake collides with this (and eats the food). The cell index of the food item is stored so that we can find the food item cell and place the food item emoji in it. When the game grid is cleared at the start of the game, these added classes are removed from each cell and the cell's inner text content is cleared.
The user can move the snake using the keyboard arrow keys or by clicking the arrow keys on the screen. We listen for the "keydown", "mousedown" or "touchstart" events on the arrow keys and use the moveSnake function to change the direction of the snake. These events change the direction variable value. This variable determines which direction the snake moves. In each game loop, the direction value will be added to the cell index position of the snake's head to give the snake a new head position. The snake's tail will be removed. The direction value indicates the change in index position required for the snake's head to move one cell in the current direction, The direction values are as follows:
- right: +1
- left: -1
- up: -10
- down: +10

Now let's create the game.
Creating the game grid
Add the following lines to the script.js file:
// game display elements
const grid = document.querySelector('.grid');
const scoreDisplay = document.querySelector('span');
const startBtn = document.querySelector('.start-btn');
const keyBtns = document.querySelectorAll('.keys-container button');
// game variables
const width = 10;
const numCells = width * width;
grid.style.width = `${width * 10 * 2}px`;
grid.style.height = `${width * 10 * 2}px`;
// create grid cells
for (let i = 0; i < width * width; i++) {
  const cell = document.createElement('div');
  cell.style.width = `${width * 2}px`;
  cell.style.height = `${width * 2}px`;
  grid.appendChild(cell);
}
const cells = document.querySelectorAll('.grid div');
We first get the game display HTML elements from the DOM. We'll only use the grid element now. We then create some of the game variables that we'll need. We set the width to 10 cells and set the game grid's width and height based on the width variable. The square grid is 200 px wide.
We then create the grid cells using a for loop. The number of cells is equal to the width squared. We create each cell using the createElement method. Each square cell is 20 px wide. We then append each cell to the grid. The grid is a flex container and the cells, which are flex items, wrap after each row, which is 10 cells long. We then select the cells using the querySelectorAll method for later use.
Run your code again and you should now be able to see our game grid as a square below the "Start" button.
Adding the snake
Add the following game variables in the // game variables section in the script.js file:
let currentSnake = [2, 1, 0];
let snakeColor = Math.floor(Math.random() * 360);
let snakeColorIncrement = 10;
Now add the following function and event listener to the bottom of the script.js file:
function startGame() {
  currentSnake = [2, 1, 0];
  currentSnake.forEach(i => {
    snakeColor += snakeColorIncrement % 360;
    cells[i].style.background = `hsl(${snakeColor}, 100%, 50%)`;
    cells[i].classList.add('snake');
  });
}
startBtn.addEventListener('click', startGame);
We define the snake's position on the game grid as an array called currentSnake. This indicates the index position of the snake's head [2], body [1] and tail [0] in the game grid. All of the middle elements are the snake's body. At the start of the game, the snake only has one body segment. We also style the snake's body segments using hsla()functional notation. This is done to give our snake a "rainbow" color that changes as it moves. We create a random color value for the hue called snakeColor. This has a value between 0 degrees to 360 degrees. It represents an angle of the color circle: Red = 0 degrees = 360 degrees, green = 120 degrees, blue = 240 degrees, etc.
We loop through the snake segments and give each cell that contains the snake a color. The color changes for each segment as the snakeColor increases in each loop. We also add the class of snake to the game grid cells containing the snake.
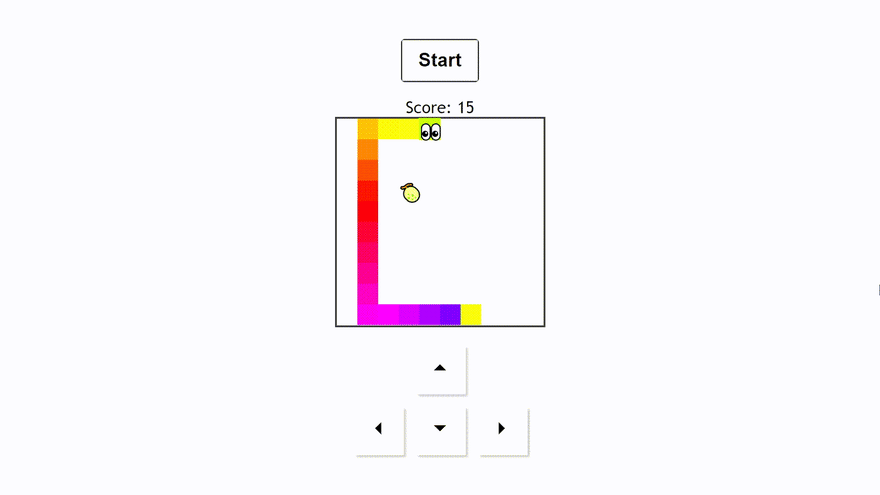
Now run the code again and then press the "Start" button in the game UI to see the snake on the game grid:
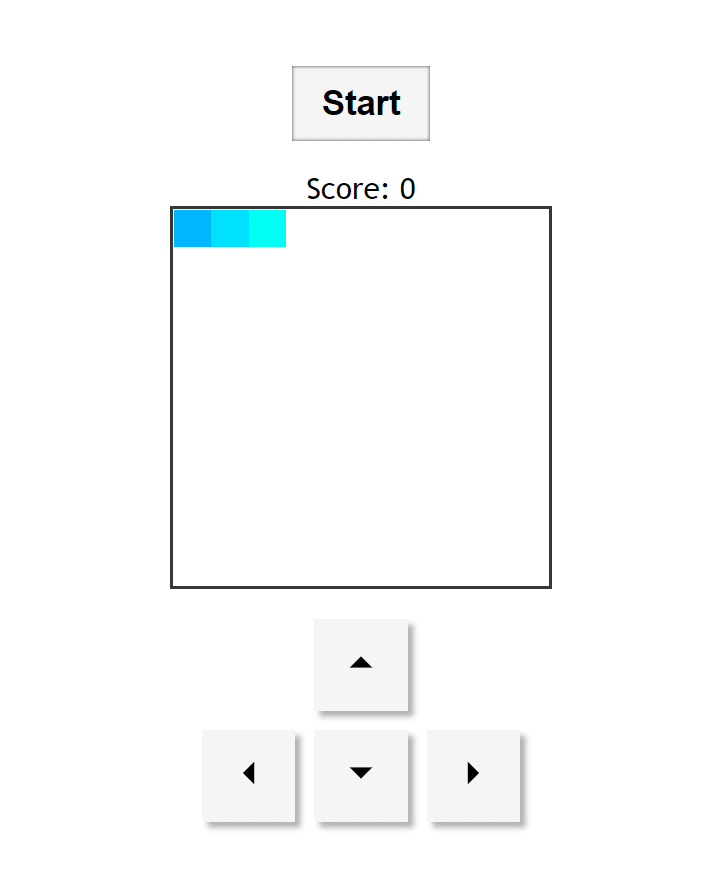
Each time you press the "Start" button, the snake's color will change. Inspect the snake cells in your browser dev tools. You will see the added snake class and the added background color.
Moving the snake
Let's get the snake moving by adding the gameLoop function. Add the following game variables in the // game variables section in the script.js file:
let direction = 1;
let intervalTime = 200; // determines speed - frequency of game loop calls
let interval = 0;
We set the initial direction to one. In each game loop, the snake's index position in the game grid will increase by one, so the snake will move to the right. The game loop will run five times per second as the interval time is set to 200 ms. The interval variable will be the returned intervalID from the setInterval function that we'll use to run the game loop continuously. The interval variable will be used to cancel the interval so that the game loop is stopped when there is a collision.
Add the following code inside the startGame function, at the top:
  currentSnake.forEach(i => {
    cells[i].style.background = 'none';
    cells[i].classList.remove('snake');
    cells[i].innerText = '';
  });
  clearInterval(interval);
  direction = 1;
At the start of a game, we remove the snake from the game grid cells. We clear the interval to remove any previous interval and set the direction to it's initial value.
Now add the gameLoop function below the startGame function:
function gameLoop() {
  cells[currentSnake[0]].innerText = '';
  const tail = currentSnake.pop();
  cells[tail].classList.remove('snake');
  cells[tail].style.background = 'none';
  currentSnake.unshift(currentSnake[0] + direction); // gives direction to the head
  cells[currentSnake[0]].classList.add('snake');
  cells[currentSnake[0]].innerText = '👀';
  snakeColor += snakeColorIncrement % 360;
  cells[currentSnake[0]].style.background = `hsl(${snakeColor}, 100%, 50%)`;
}
We first clear the innerText of the current snake head to remove the emoji eyes from the current snake head. We then remove the tail and add a new head. To get the index of the new head position in the game grid, we add a new head that has an index of the current snake head plus the current direction. We then style the new head by giving it emoji eyes and a background color.
We also need to call the game loop at the start of the game. Add the following to the startGame function, at the bottom:
interval = setInterval(gameLoop, intervalTime);
Now press the start button to see the snake move along the game grid:

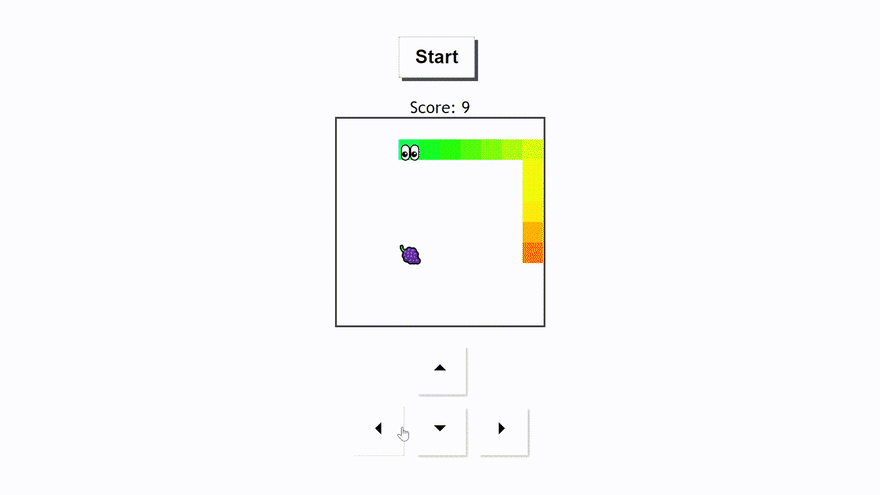
The snake moves from index 0 to 99, incrementing its position by one in each game loop.
Controlling the snake
We'll add a "keydown" event listener and an event handler function to control the snake movement with our keyboard arrow keys. Add the following code below the gameLoop function:
function moveSnake(moveDirection) {
  if (moveDirection === 'ArrowRight') {
    direction = 1;
  }
  if (moveDirection === 'ArrowLeft') {
    direction = -1;
  }
  if (moveDirection === 'ArrowUp') {
    direction = -width;
  }
  if (moveDirection === 'ArrowDown') {
    direction = width;
  }
}
function handleKeyMove(e) {
  if (!['ArrowRight', 'ArrowLeft', 'ArrowUp', 'ArrowDown'].includes(e.key))
    return;
  moveSnake(e.key);
}
document.addEventListener('keydown', handleKeyMove);
We added a "keydown" event listener that is handled by the handleKeyMove function. The handleKeyMove function calls the moveSnake function if one of the arrow keys is pressed down.
The moveSnake function changes the snake's direction, depending on which arrow key was pressed.
You will now be able to change the snake's direction using the arrow keys on your keyboard. However, the snake will be able to move through the walls and move through self. You will also get an error in your console if you go outside of the bounds of the grid by hitting the top or bottom wall. We'll fix this by detecting collisions.
Detecting collisions with the walls and itself
In the gameLoop function, add the following code below the cells[currentSnake[0]].innerText = ''; line:
if (
    (currentSnake[0] + width >= width * width && direction === width) || // hits bottom wall
    (currentSnake[0] % width === width - 1 && direction === 1) || // hits right wall
    (currentSnake[0] % width === 0 && direction === -1) || // hits left wall
    (currentSnake[0] - width < 0 && direction === -width) || // hits the top wall
    cells[currentSnake[0] + direction].classList.contains('snake') // hits itself
  ) {
    grid.classList.add('shake');
    clearInterval(interval);
    return;
  }
This if statement checks if the current snake index is outside the bounds of the game grid. It also checks if the snake hit itself by checking if the next cell that the snake head will move to has the snake class. If there is a collision, the game loop is stopped by clearing the interval and a shake animation is added by adding the shake class to the game grid. This will make the game grid shake when there is a collision. This uses the shake keyframe animation that defined earlier in our style.css file.
For the shake animation to work each time we restart a game, we need to remove the shake class from the game grid at the start of each game. Do this by adding the following line inside of the startGame() function, at the top:
grid.classList.remove('shake');
Now, if your snake hits the wall or itself, it will stop the game loop and the game grid will shake. There are two bugs with the snake direction changes. If you are moving in one direction, then press the arrow key to move in the opposite direction, the snake will hit itself. Also, if your snake is going in one direction and then you make two quick 90-degree turns so that the snake moves in the opposite direction, the snake will hit itself. Let's change the moveSnake function to fix these issues. Replace your moveSnake function with the following:
function moveSnake(moveDirection) {
  let directionVal;
  if (moveDirection === 'ArrowRight' && direction !== -1) {
    directionVal = 1;
    if (currentSnake[0] + directionVal === currentSnake[1]) return;
    direction = directionVal;
  }
  if (moveDirection === 'ArrowLeft' && direction !== 1) {
    directionVal = -1;
    if (currentSnake[0] + directionVal === currentSnake[1]) return;
    direction = directionVal;
  }
  if (moveDirection === 'ArrowUp' && direction !== width) {
    directionVal = -width;
    if (currentSnake[0] + directionVal === currentSnake[1]) return;
    direction = directionVal;
  }
  if (moveDirection === 'ArrowDown' && direction !== -width) {
    directionVal = width;
    if (currentSnake[0] + directionVal === currentSnake[1]) return;
    direction = directionVal;
  }
}
For each direction change, we now check that the direction change is not the opposite of the current direction. We also check that the direction change does not cause the snake's head to hit the first segment of its body.
Adding and eating food
Let's add food items to the game grid. When the snake eats a food item, the score will be increased by one and a new food item will be created. Add the following game variables in the // game variables section:
let foodItemIndex = 0; // first cell
let score = 0;
The foodItemIndex is the cell index in the game grid that the food item will be added to. We'll randomly position it.
Now let's define the createFood function that we'll use to randomly add food items to our game grid. Add the following createFood function above the startGame function:
async function createFood() {
  foodItemIndex = Math.floor(Math.random() * numCells);
  if (currentSnake.includes(foodItemIndex)) {
    await wait(100);
    createFood();
  } else {
    cells[foodItemIndex].classList.add('food-item');
    cells[foodItemIndex].innerText = randomElementFromArray(foodItemsArray);
  }
}
In this recursive async function, we create a random food item index position and add the food item to the game grid. This function is recursive to prevent the food item from being added in a position occupied by the snake. If the random index is on the snake, the createFood function is called again to get another random index position. Our wait utility function prevents the recursive function from being called too often by pausing the function for 100 ms before each recursive function call.
Let's modify our startGame function so that the food items are cleared at the start of the game, the score is reset and a food item is created. Add the following lines to the startGame function, above the interval = setInterval(gameLoop, intervalTime); line:
  cells[foodItemIndex].classList.remove('food-item');
  cells[foodItemIndex].innerText = '';
  createFood();
  score = 0;
  scoreDisplay.innerHTML = score;
Now we need to detect if the food item is eaten and if so, add a new food item to the game grid. Add the following lines to the gameLoop function, above the cells[currentSnake[0]].classList.add('snake'); line:
  if (cells[currentSnake[0]].classList.contains('food-item')) {
    cells[currentSnake[0]].classList.remove('food-item');
    cells[tail].classList.add('snake');
    snakeColor += snakeColorIncrement % 360;
    cells[tail].style.background = `hsl(${snakeColor}, 100%, 50%)`;
    currentSnake.push(tail);
    score++;
    scoreDisplay.textContent = score;
    createFood();
  }
The food item is 'eaten' by checking if the snakes head position cell contains the food item. If it does, we remove the 'food-item' class to remove the food item. We increase the snake's length by adding a new segment to the tail end of the snake. Then we increase the score, and create a new randomly positioned food item.
The food items increase in size when they are added as we added a scale transform to the food-item class in the style.css file.
Our snake game is almost complete! The last thing we need to do is make it mobile-friendly by making the on-screen arrow buttons functional.
Making the game mobile-friendly
Add the following lines near the bottom of the script.js file, just above the existing event listeners.
function handleButtonKeyMove(e) {
  const { id } = e.currentTarget;
  moveSnake(id);
}
keyBtns.forEach(keyBtn => {
  keyBtn.addEventListener('mousedown', handleButtonKeyMove);
  keyBtn.addEventListener('touchstart', handleButtonKeyMove);
});
For each key button, we add two event listeners: "mousedown" and "touchstart". We use the handleButtonKeyMove function to handle these events. We get the id attributes of the on-screen buttons from the HTML id attributes that we added in the index.html file. These id attributes match the corresponding event key strings of the arrow keys on a keyboard. This makes it easy to pass the id string to the moveSnake function to handle the direction change.
Run your project. Our game is now complete. See how high you can get your score using either your keyboard or the on-screen buttons.
Next steps
Now that you have built a simple snake game with some basic styling, you might want to improve it or add extra features.
You can build your own by copying the code above, or by forking our example repl at replit.com/@ritza/snake-game-vanilla-javascript.
Here are some suggestions:
- Make the snake transition from cell to cell a smooth animation.
- Persist the top five highest scores by storing them in local storage. Create a pop dialog menu to view these high scores.
- Increase the speed of the snake as the game progresses to make it harder.
- Add obstacles.
- Add sound effects.
- Make different food items have different points.
You can also learn how to make Snake with Kaboom. Kaboom.js is a JavaScript game programming library that makes creating games like this easy.

Top comments (0)