If you need a bot for your personal home automation, then this post describes how to achieve what is perceived as a private bot on Facebook's Messenger platform.
Not exactly a private bot
With private, I'm referring to bots that are not possible to be found by others or won't interact with others. These sort of bots are meant usually for some personal automation, where the bot act as the delivery entity to you or your family.
On my previous post Creating a private Telegram chatbot, a comment was raised about the "private" nature of Telegram's bots. With private, I'm referring to a bot that though not private can help establish your very own private communication channel. You control who can interact with the bot and who not. If the bot is discoverable, then there is no functionality supported to others and most importantly, your communication is only visible to yourself or others you have invited.
Creating a Facebook page
On Facebook, everything is driven by a page. Organizations will create an organization page but as many do, we can also create own small pages. A page is always required for a Messenger bot to work. The page serves its purpose to establish an entry point of interaction with other parties of interest but it is also the entry point for any chat related communication and this is where the bot needs to plug-in. So for the purpose of this post, the page needs to be something very simple.
- Navigate to Facebook Pages.
- Click on
Create a pageandCommunity or Public FigureandGet Started. - Name the page
Example Private Messenger Botand as category choose something appropriate e.g.Personal Blog. - You can upload pictures for the page if you want to but it is not necessary.
- The page should be ready like this Example Private Messenger Bot. Notice that the page can be discovered by others. Confirm this by navigating to your page with an incognito tab.
- Go to
Setting->General->Page Visibilityand selectPage unpublishedand choseOtherfor reason with e.g.Personal Bot. Notice that the page is not available any longer on the incognito tab. - From
Setting->Messaginguse theYour Messenger URLto initiate a chat session with your page. This is the private session we need with our chatbot.
Creating the bot
Developing an actual bot on Messenger is quite complicated. You would need to create an application, submit policies to be able to get keys and tokens that would allow you to integrate with the page's application. For this reason, we'll keep this simple and use a service that makes things very simple. There are three options in order of complexity:
Given that the purpose here is to create a simple private Messenger bot, I'll choose chatfuel for the purpose of this post. Just select Add blank bot on chatfuel and let's name it Example Private Messenger Bot as well.
The bot is now available and you can try a test chat with it by activating the Test Your Bot from the Automate panel within the bot's configuration.
Connecting the bot to your page
This is not necessary, but it helps that you can discover your bot from Messenger or Facebook through the page we just created. If this is your first time in chatfuel then this is straight forward when connecting first time chatfuel with Facebook. The trickier flow that I will explain is when you've already made this connection and you need to find the new page. I've chosen this flow because I ran into this problem when writing this post. I've already have another bot connected with another Facebook page and I couldn't find how to connect the Example Private Messenger Bot to its respected page.
- Navigate to Facebook's Business Integration.
- Select
View and editof theChatfuelapplication. - Scroll down and select the
Example Private Messenger Boton each of the following sections:-
Manage your Pages. Manage and access Page conversations in MessengerSend messages from Pages you manage at any time after the first user interactionShow a list of the Pages you manageLog events on your Page's behalf and send those events to Facebook
-
- Save.
- Wait for a short time and then refresh chatfuel. If this doesn't work try to logout and login again.
- Enter the
Example Private Messenger Botand select theConfigurationpanel from the left. - Notice that the
Example Private Messenger Botis listed with aConnect to Pagebutton to the right which you activate.
That's it.
Integrating with Zapier
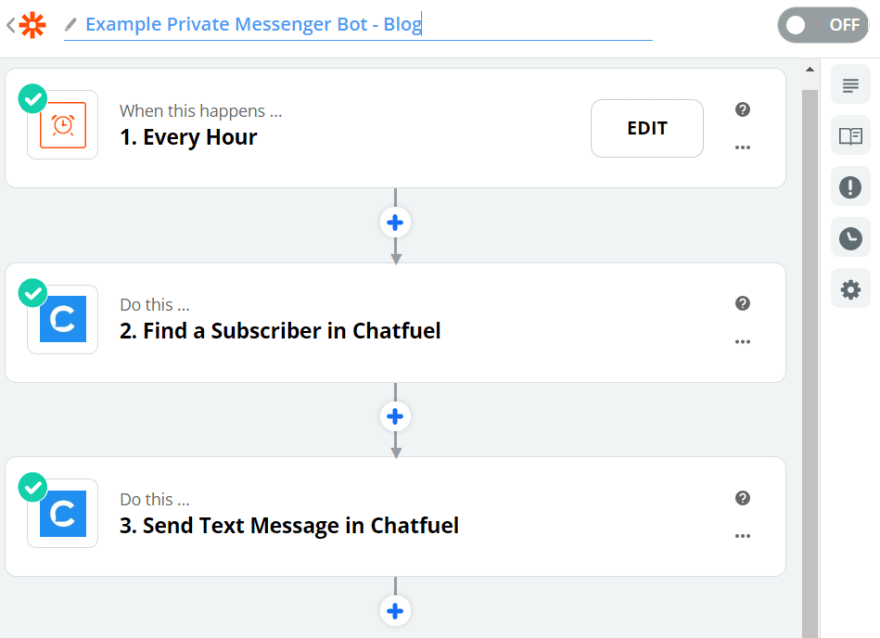
On my previous post Creating a private Telegram chatbot I've explained how to send messages to the bot. This allows for any integration with e.g. Zapier or Integromat. To demonstrate the ability to send messages to the Example Private Messenger Bot I'll show how to hook it up with Zapier which offers an integration. To keep it simple and focused on chatfuel and this post, I'll use a two-step zap.
-
Schedule by Zapierconfigured to activate every hour. -
chatfuelconfigured to target a session with theExample Private Messenger Bot.
The Schedule by Zapier configuration is very easy and straightforward. Zapier is good at helping configuration with UI navigation. The chatfuel configuration is the trickier one and it compromises by two activities in the overall zap flow.
- Find a Subscriber in Chatfuel
- Send Text Message in Chatfuel
It will look like this:
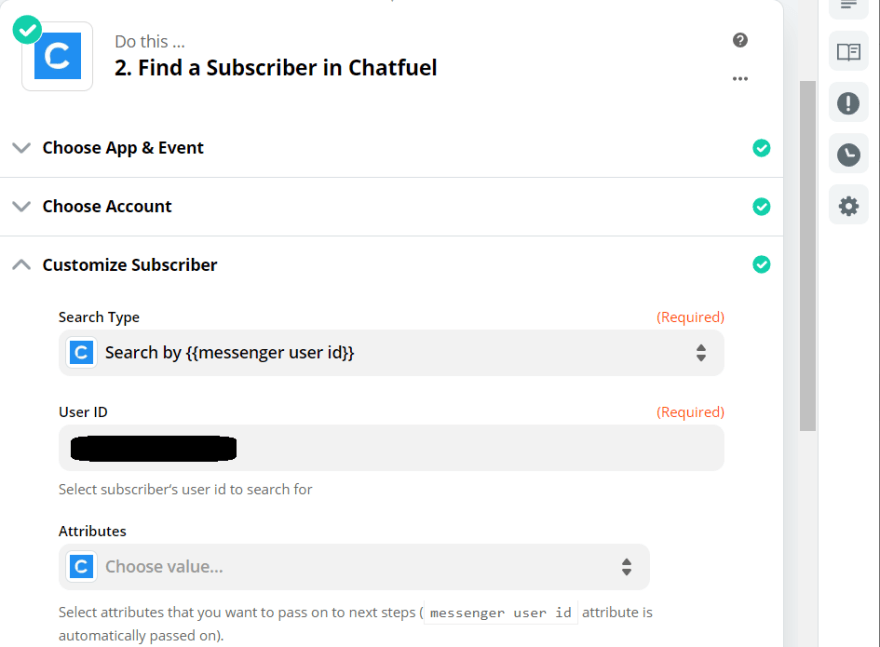
To configure the Find a Subscriber in Chatfuel follow these steps:
- Type or select
chatfuel. - For the
Choose Action Event, scroll down and selectFind a Subscriber. This step is important and retrieves a value that helps target the session to send the message later on. In more advanced flow, this value is driven as a reaction to an incoming trigger. - For the
Chatfuel accountselectAdd a New Accountwhich will open a page and there select theExample Private Messenger Botto connect with. - For the
Search Typethere are multiple options. Let's choose theSearch by {{messenger user id}}which is the user page-scoped ID (PSID). - For the
User IDfollow these steps to retrieve it:- Make sure you have exchanged one or two messages with the bot.
- Navigate to chatfuel's
Example Private Messenger Bot's page. - Open the
Peoplepanel and you should see your name on the list. - Open your entry and scroll down to get the value from
messenger user idwhich is the value to fill in theUser IDon Zapier
- Activate the
TEST & REVIEWto confirm.
It will look like this:
To configure the Send Text Message in Chatfuel follow these steps:
- Type or select
chatfuel. - For the
Choose Action Eventfield, selectSend Text Message. - For the
Chatfuel accountfield select the account that was createdChatfuel Example Private Messenger Bot. - For the
Subscriberfield select from the previous activity theChatfuel User ID. - For the
Message Tagfield, just chooseUpdate. - For the "Message Text
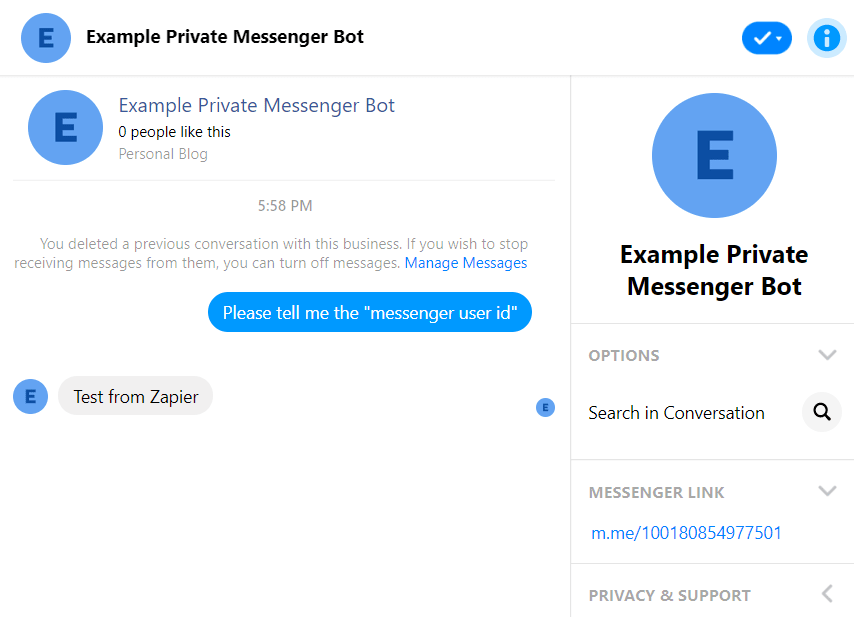
field, just enterTest from Zapier`. - Activate the
TEST & REVIEWto confirm.
It will look like this:
And on Messenger it will look like this:


Top comments (0)