
A content management system (CMS) is a way for you to handle or manage the content that is being displayed on your website. In the traditional sense, a CMS is a service where all the content and code running the website are stored together in a single location. An example is WordPress. The design of a traditional CMS makes reusing your content, code, and assets impossible since they’re stored in a single location and tightly coupled together. However, this is where a headless CMS can help.
The key difference between a traditional CMS and a headless one is that a headless one is decoupled from the presentation of the website or what is referred to as the head. It presents the content to be displayed via APIs for the frontend to consume and display to the user. This means that the content can be used in several places at once and is controlled from one source, creating a much more flexible method of managing content.
In this article, you’ll learn what a headless CMS is and how to build a video streaming application using Next.js as your frontend, Strapi as your headless CMS, and a service called Mux that allows you to serve up videos via an API to your application.
Prerequisites
Before you begin this tutorial, you need to have npm or yarn installed and Node.js set up on your machine. If you don’t have these installed, you can follow this guide to install them.
Setting Up Strapi
To get started setting up Strapi, you need to create a new local Strapi project using the command below:
npx create-strapi-app@latest my-project --quickstart
You can replace my-project with whatever you want the name of your project to be.
Once you’ve created a new project, the server will automatically start, and a browser window will open to http://localhost:1337. From there, you need to create an account on your local server so that you can manage content and set up Mux.
Once you’ve created your account and logged in, you should see an admin page like this:

Before Strapi is ready to be used with Next.js and Mux, you need to install a GraphQL plugin so that you can query Strapi from Next.js.
There is also a REST API you can use with Strapi if you prefer.
To install the GraphQL plugin, run the following command from your terminal in your Strapi project directory:
npm run strapi install graphql
This will install the GraphQL plugin and let you access the GraphQL API at the /graphql route on your Strapi project. You can find out more about the GraphQL plugin in their documentation.
The GraphQL plugin is ready for development environments as soon as it’s installed, but for it to work on production environments, you need to customize it. Once you’ve added the customizations below to your Strapi GraphQL plugin, it’s ready to work with Mux in production.
Inside of your favorite IDE, create a new file at ./config/plugins.js and add the following code:
    module.exports = {

        graphql: {

            config: {

            endpoint: '/graphql',

            shadowCRUD: true,

            playgroundAlways: true,

            depthLimit: 7,

            amountLimit: 100,

            introspection: true,

            apolloServer: {

                tracing: false,

            },

            },

        },

    };
This code allows the GraphQL API to run on production and finishes the setup of the GraphQL plugin.
After installing GraphQL, you’ll need to install the Mux plugin for Strapi so it’s ready to configure in the next section. To install, run the following command just like you did for GraphQL:
npm i strapi-plugin-mux-video-uploader@latest
For Strapi to work with Mux correctly, you need to deploy it. This article doesn’t get into the details of deploying Strapi to a hosting provider, but you can find out more about deploying Strapi to a hosting provider in the documentation.
Because Mux needs to communicate with Strapi using webhooks in order to share updates on the content it is processing and hosting, you need to deploy Strapi so it is publicly available. For the webhook to function correctly, the Strapi URL you provide Mux must be a publicly available domain.
Without this webhook, Mux won’t be able to notify Strapi with updates on the content uploaded and give Strapi the required information to play/stream the videos it hosts.
Finally, before moving on to setting up Mux, you need to create an API key in your Strapi admin dashboard. This lets you query the GraphQL API from Next.js later on when you’ve configured it.
Visit the URL you received after deploying Strapi and create a new account following the prompts on the screen. Then you need to generate a new API key. Use the menu bar on the left and select the Settings page and then API Tokens. After that, you’ll be presented with a screen like this:

As you can see, you currently don’t have any API keys, so you need to create one. Click on the Create new API Token option on the top right, name the API key whatever you wish, and then ensure that the Token type is set to Full access. This will let you query the data from Mux. Next, press Save and copy the API key generated and save it somewhere safe.
Setting Up Mux
To set up Mux, you need to create a Mux account or log in to a preexisting one. Once you’ve logged in, navigate to the Settings page and then API Access Tokens. This is where you’ll create your API keys to update the Strapi plugin.
To create a new API key in Mux from the API Access Tokens page, click on the Generate new token button on the right-hand side of the page. Then you can leave the environment drop-down as Development, select the Mux Video option, and ensure both Read and Write options are selected. After that, you can name the token whatever you wish.
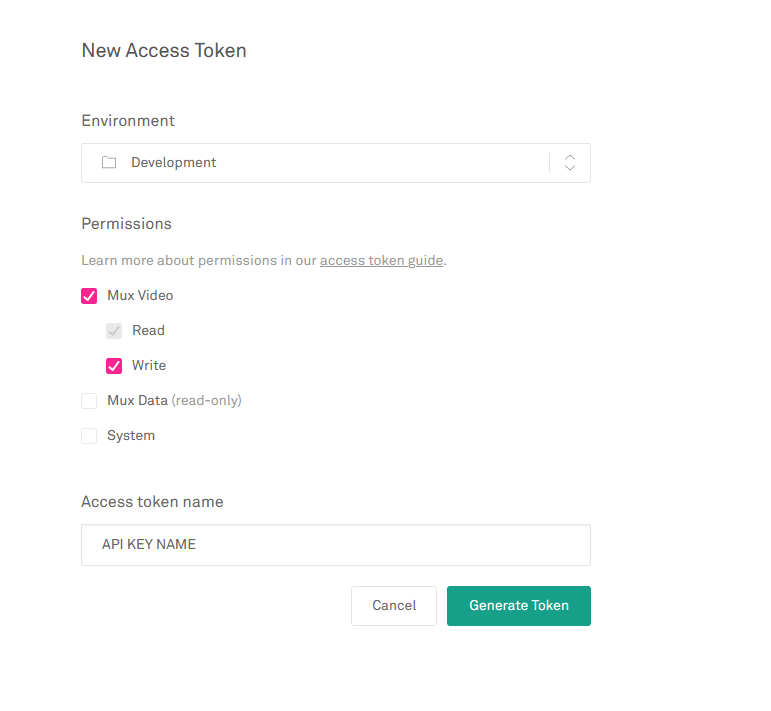
Then select Generate Token and make sure to copy the Access Token ID and Secret Key presented to you. You’ll need those in order to set up the plugin in Strapi.
After you’ve generated your token, press Continue, and this will bring you back to the API Access Tokens page you navigated to earlier. From here, you need to find the Webhooks option at the top of the page and select Create new webhook, which will show you a screen like this:
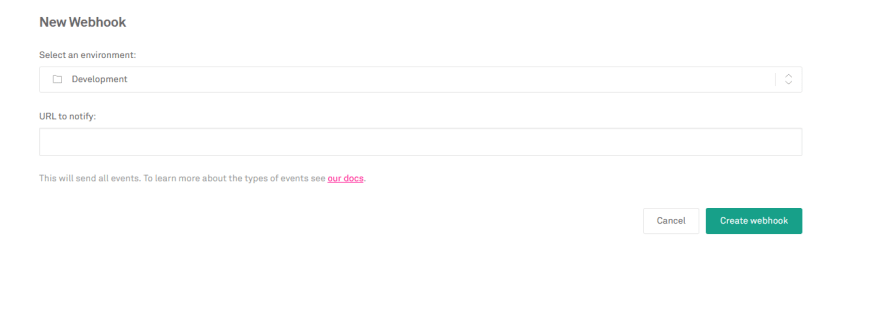
In the URL to notify field, insert the URL below but replace <YOUR_STRAPI_PUBLIC_URL> with the public URL of your Strapi installation, which you deployed earlier:
<YOUR_STRAPI_PUBLIC_URL>/mux-video-uploader/webhook-handler
After selecting Create webhook, you’ll be redirected back to the Webhooks page. Next to the webhook you just created, you’ll see a button titled Show Signing Secret. Select it and copy the value it presents you.
Now you should have all the values that are required by Mux to configure your Strapi installation. Head back over to the Admin page of the Strapi installation you deployed earlier (by going to <YOUR_STRAPI_PUBLIC_URL>/admin) and log in with the account you created earlier.
Once logged in, navigate to the Settings page and select the Settings option under MUX VIDEO UPLOADER. It should be the last option available.

From there, paste in the corresponding values you retrieved from Mux and select Save.
You’ve now completed setting up Strapi and Mux.
Using the menu, navigate to mux-video-uploader. You’ll be able to upload new videos in Strapi, and they’ll appear in Mux.
Now it’s time to configure your Next.js installation to consume the videos from Strapi and display them for users to watch.
Setting Up Next.js
To get started with Next.js, create a new Next.js application locally on your machine by running the following command in your terminal:
npx create-next-app@latest
Once it’s finished installing, run the command below in your terminal to install the Apollo Client that you’ll use for querying the GraphQL API you configured earlier in Strapi:
npm install @apollo/client graphql
From there, you need to add a new file to the root of the project called apollo-client.js. This will create the client you’ll use to query the GraphQL API. It lets you add headers into the request to pass to your API and authenticate.
In this file, paste in the following code and replace <YOUR_STRAPI_PUBLIC_URL> with your public URL just like you did earlier:
    import { ApolloClient, createHttpLink, InMemoryCache } from '@apollo/client';

    import { setContext } from '@apollo/client/link/context';


    const httpLink = createHttpLink({

      uri: '<YOUR_STRAPI_PUBLIC_URL>/graphql',

    });


    const authLink = setContext((_, { headers }) => {

      const token = process.env.STRAPI_API_KEY;


      return {

        headers: {

          ...headers,

          Authorization: `Bearer ${token}`,

        },

      };

    });


    const client = new ApolloClient({

      link: authLink.concat(httpLink),

      cache: new InMemoryCache(),

    });


    export default client;
Now, all you need to do is create a new .env.local file in the root of your Next.js project and add the code below. Make sure you replace the <STRAPI_API_KEY> with the API key you got from Strapi earlier:
STRAPI_API_KEY=<STRAPI_API_KEY>
After configuring the Apollo Client, you can query data from your Strapi GraphQL API to consume the videos hosted on Mux. But before you do this, you need to create a new Player component to handle the displaying/streaming of the videos from Mux. Because Mux gives you your videos in the .m3u8 file format, you need to install the video-js package. This package will help display the videos since many browsers can’t do this natively.
To install this package, run npm i video.js in your terminal.
Then create a new directory in the root of your project called components, and within that directory, create a new file called Player.js and paste the code below into it:
    import { useCallback, useEffect, useState } from 'react';

    import videojs from 'video.js';

    import "video.js/dist/video-js.css";


    const Player = (props) => {

      const [videoEl, setVideoEl] = useState(null);

      const onVideo = useCallback((el) => {

        setVideoEl(el);

      }, []);


      useEffect(() => {

        if (videoEl == null) return;

        const player = videojs(videoEl, props);

        return () => {

          player.dispose();

        };

      }, [props, videoEl]);


      return (

        <div data-vjs-player>

          <video ref={onVideo} className="video-js" playsInline />

        </div>

      );

    };


    export default Player;
This component displays and controls your videos. All you need to do is pass into it the required info that you will set up in your ./pages/index.js file, along with querying the data from Strapi.
Inside of your ./pages/index.js, paste in the following code:
    import { gql } from '@apollo/client';

    import styles from '../styles/Home.module.css';

    import client from '../apollo-client';

    import Player from '../components/Player';


    export default function Home({ videos }) {

      return (

        <div className={styles.container}>

          <main className={styles.main}>

            <h1 className={styles.title}>Strapi MUX Video App</h1>

            <h2>Current Uploaded Videos</h2>


            {videos.data.map(({ attributes }) => {

              const videoJsOptions = {

                autoplay: false,

                controls: true,

                sources: {

                  src: `https://stream.mux.com/${attributes.playback_id}.m3u8`,

                  type: 'application/x-mpegURL',

                },

              };

              return <Player {...videoJsOptions} key={attributes.playback_id} />;

            })}

          </main>

        </div>

      );

    }


    export async function getStaticProps() {

      const { data } = await client.query({

        query: gql`

          query {

            muxVideoUploaderMuxAssets {

              data {

                attributes {

                  playback_id

                }

              }

            }

          }

        `,

      });


      return {

        props: {

          videos: data.muxVideoUploaderMuxAssets,

        },

      };

    }
This code queries the Strapi API using the Apollo Client when the page is built using SSG via the getStaticProps() function Next.js provides you with. Then you pass this data into your Home function, which displays the page and, within this function, maps over the data returned and creates a new instance of the Player component for each of the video IDs returned from the API.
You’ve successfully installed everything and finished your application. Now you need to upload a video in Strapi and see it displayed on your Next.js frontend.
Implementing the Video Streaming App
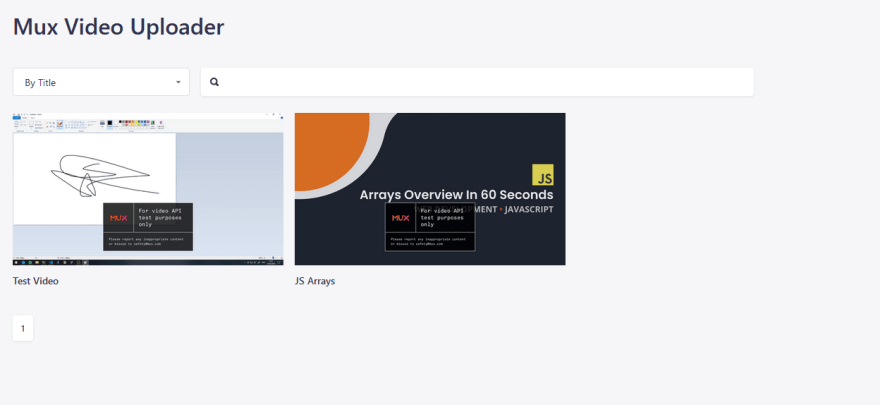
To upload a new video, head back to the mux-video-uploader tab in your deployed Strapi instance. From there, click on the New Upload button in the top right of your screen. Then name the new video you’re uploading and use the Browse button to navigate to the file you wish to upload. Once you’ve selected your video, press Save to start the upload to Mux.
When the Upload Complete screen appears, select Finish, and you should see the video appear on your screen. Depending on the size of the video, this could be instantaneous or take a few minutes. Below is an example of two videos that have been successfully uploaded:
To confirm the video has been uploaded to Mux, you need to navigate to your Mux dashboard and find Assets under the /VIDEO tab on the left. Within this page, you should see the videos you’ve uploaded.

Now, start up your Next.js application using npm run dev, and you should see the two videos appear on the page in front of you with controls for the video.
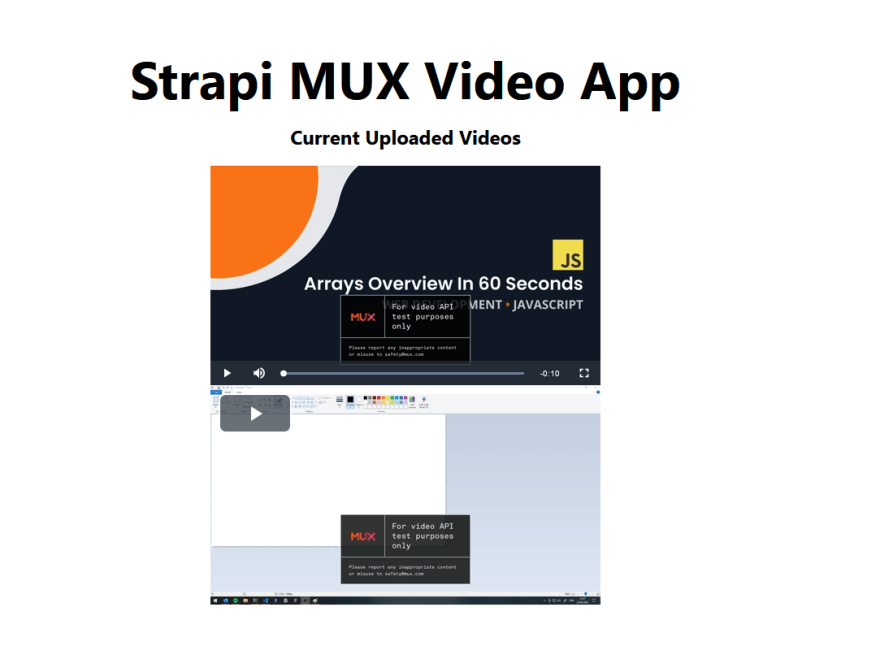
Note: It can sometimes take a few minutes for the Strapi API to update and for the new data to be pulled into Next.js. If after a few minutes, the new video hasn’t been pulled in automatically, try restarting your development server.
The application is now complete, and you can upload as many videos as you wish to Strapi, and they will automatically be pulled through and displayed on Next.js. If you delete any from Strapi, they will also be removed from Mux and Next.js.
Conclusion
In this tutorial, you learned what a headless CMS is, how to configure a Strapi installation to work with Mux, and how to present data via a GraphQL API for a Next.js application to consume and display to users.
This tutorial is a good example of how headless CMSs are helpful. It highlights why they’re becoming increasingly popular. With a headless CMS, you’re able to reuse the same instances of Strapi and Mux, and just switch out or have multiple frontends to consume it, reducing duplication and work required.
If you want to display the same videos on a different Next.js installation, you can create a new Next.js application and configure it using the steps above to query the data and display it.

Top comments (0)