
Excel templates are spreadsheets that have predesigned formats. Data exported to such spreadsheets will be formatted according to the template files. In this blog, we are going to see how to export data to a predefined Excel template in C# using a template marker in Essential XlsIO.
Template marker
A template marker is a special marker symbol used in the worksheet cells of an Excel template file. It binds to the class objects and fills multiple records from various data sources such as data tables, collection objects, arrays, and nested data into a worksheet.
For example, the following screenshot shows how to use the marker variable. The symbol “%” is used as marker for the class SalesList and its properties SalesPerson and SalesJulyDec. The template file has some cell formatting.

Syntax
Each marker starts with a prefix character (by default, “%”). The marker is followed by a variable name and then properties, which are delimited by a character (by default, “;”.)

For the previous Excel template with markers applied, the exported data will be as shown in this screenshot.

It is that simple to export data to a predefined Excel template. In this sample, I just read an XML file, prepared a data table, and exported the data with three lines of code. Of course, you need to write a few lines of other code to create an Excel workbook. The code example is given here.
using Syncfusion.XlsIO;
using System.Data;
using System.IO;
using System.Reflection;

namespace TemplateMarker
{
    class Program
    {
        static void Main(string[] args)
        {
            //Code to read XML data to create a DataTable
            Assembly assembly = typeof(Program).GetTypeInfo().Assembly;
            Stream dataStream = assembly.GetManifestResourceStream("TemplateMarker.Data.customers.xml");
            DataSet customersDataSet = new DataSet();
            customersDataSet.ReadXml(dataStream, XmlReadMode.ReadSchema);
            DataTable northwindDt = customersDataSet.Tables[0];

            using (ExcelEngine excelEngine = new ExcelEngine())
            {
                IApplication application = excelEngine.Excel;
                application.DefaultVersion = ExcelVersion.Excel2016;

                //Open an existing spreadsheet, which will be used as a template for generating the new spreadsheet.
                //After opening, the workbook object represents the complete in-memory object model of the template spreadsheet.
                IWorkbook workbook;

                //Open existing Excel template
                Stream cfFileStream = assembly.GetManifestResourceStream("TemplateMarker.Data.TemplateMarker.xlsx");
                workbook = excelEngine.Excel.Workbooks.Open(cfFileStream);

                //The first worksheet in the workbook is accessed.
                IWorksheet worksheet = workbook.Worksheets[0];

                //Create Template Marker processor.
                //Apply the marker to export data from datatable to worksheet.
                ITemplateMarkersProcessor marker = workbook.CreateTemplateMarkersProcessor();
                marker.AddVariable("SalesList", northwindDt);
                marker.ApplyMarkers();

                //Saving and closing the workbook
                workbook.SaveAs("TemplateMarkerOutput.xlsx");

                //Close the workbook
                workbook.Close();
            }
        }
    }
}
Note: You can change the marker prefix and delimiter characters with the MarkerPrefix and ArgumentSeparator properties of the ITemplateMarkersProcessor instance respectively.
How does a template marker work?
Markers are applied in an Excel template to the required cells. This includes the data source name and the field name of interest. During data binding, a search is conducted for the data source name and the field name in the Excel workbook and the corresponding data from the data source is bound to the marker. Cells in the worksheet can be filled with a single data source or with multiple records. The format of this data can be changed using the arguments of the markers. Let me explain what I mean when I say arguments, and what types there are.
What is an argument in a template marker?
The syntax of a template marker has three parts: marker variable, property, and arguments. Arguments are separated by semi colon (;). The following are the arguments are supported in template markers:
Let’s see these arguments in brief with screenshots that illustrate the output.
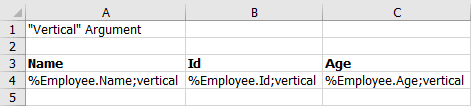
vertical
The vertical argument specified in a template marker fills data in vertically. By default, the data-fill direction is vertical. So, it is not necessary to give a vertical argument.
The following screenshot shows the input template with a vertical argument.
The next screenshot shows the output with a vertical argument.

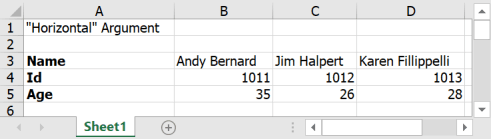
horizontal
The horizontal argument specified in a template marker fills data in horizontally. The following screenshot shows the input template with a horizontal argument.

The next screenshot shows the output with a horizontal argument.
insert
The insert argument inserts new rows or columns while exporting. This option is useful if data is to be exported between other rows.
For example, in the following screenshot there is content in the seventh row. But we need to export data from the fifth row. Without the insert argument, if data is exported, the content in the seventh row will overlap. To avoid that, the insert argument exports data by inserting new rows, which moves the content from the seventh row to the bottom. By default, rows will be inserted vertically.

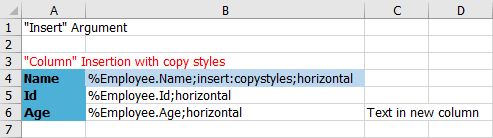
In addition, the insert argument enables two parameters copystyles and copymerges. These parameters will copy existing cells styles and merged cells into the new rows that are being inserted while exporting.
The following screenshot shows the output after export with the insert argument along with the copystyles and copymerges parameters.

Export data horizontally with column insertion
You can also insert columns if data is being exported horizontally. The following screenshot shows the input template with insert and horizontal arguments.

jump
If you want to export data to alternative rows or columns, or by skipping certain rows or columns, the jump argument will be useful.
In this case, the cell references must be added to the jump argument, and can be a relative reference or an absolute reference. You must know the differences between these references, because we will be using a relative reference in the following sections of the article.

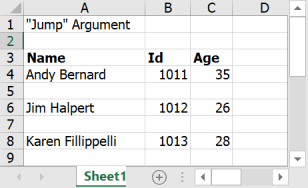
The following screenshot shows the input template with the jump argument and with relative reference, which exports data into alternative rows. Initially, the data will be exported to the fourth row, then to the sixth row, and then to the eighth row, etc. There won’t be any change in the column level, as there is no index given to the jump.

The output of data export with the jump argument.
Note: It is mandatory to provide a jump argument to all the rows and columns. If not provided, data in that row or column will be exported as usual.
copyrange
The copyrange argument copies specified cells into all other rows while exporting. In this case, the data in the cells to be copied can be added in the template itself. So, while exporting the data, these cells will be copied to the rows that are exported.
The next screenshot shows the input template with data in the cells D4 and E4. The copyrange argument at cell A4 has the relative reference to copy the fourth and fifth column values of the current row into other rows.
Note: To learn more about relative and absolute references, you can refer to the table mentioned in the jump argument section.

The following screenshot shows the output, where the data in the cells D4 and E4 are copied to all the rows.

size, position, and fittocell
There are ways to export data with images. While exporting with images, set the image size to fit to the cell, to a specified size, or at a position. To fulfill that requirement, XlsIO provides these arguments:
- size
- position
- fittocell
size
The size argument specified in a template marker applies to images that are exported to worksheets. The actual size of images that are exported may differ. To export them into cells to fit for clear visualization, this argument helps in setting the height and width of images.
Here, the height parameter is optional. The value of width is applied when height is not specified.
The following screenshot shows the input template with the size argument at the cell A4.

The next screenshot shows the output with images exported in column A with the specified size.

position
The position _argument sets alignment of images to the _left, center, right, top, middle, or bottom while exporting. If a position is not given to the images column, it will be considered top-left by default.
The following screenshot shows the input template with the position argument at the cell A4.

The next screenshot shows the output with images exported in column A as right aligned.

fittocell
The fittocell argument fits images within cells while exporting. Here, the image height and width are not necessary to include.
The following screenshot shows the input template with the fittocell argument.

The next screenshot shows the output with images fit to the cells.

Advanced features of template markers
We have seen how to use template markers and their arguments to customize data export to any desired layout. This is not all template markers can do. Template markers have more advanced features to highlight, where you can export data with:
Let’s see these advanced features one by one with code examples.
Export data to Excel template with formulas
Be it the simple addition of a long row of numbers, a sales quote, or complex financial modeling, formulas play a vital role in computing data. You can also use formulas to build columns with your exported data.
I am going to have a column that will add two of my exported columns. Let’s see the steps to achieve this.
Step 1: Add the following argument to any column that is a part of the computation. The RC4 here refers to the range (current row and fourth column) where the formula is given and to be repeated in subsequent rows.
%NumbersTable.Column2;copyrange:RC4

Step 2: All set! Now export the data.
//Create Template Marker Processor
ITemplateMarkersProcessor marker = workbook.CreateTemplateMarkersProcessor();

//Add marker variable
marker.AddVariable("NumbersTable", GetTable());

//Process the markers in the template
marker.ApplyMarkers();
Now, after exporting, the final output will be like this one.

A complete working example along with the input file can be downloaded from export-data-with-formulas.zip.
If you are interested in learning more about how to work with formulas using XlsIO, you can go through the working with formulas documentation.
Export data to Excel template with images
You can bind image data from your data sources. You can not only import images but their specified sizes and positions, too.
Let’s see the steps to achieve this.
Step 1: Add a marker variable with a bit of additional information, like size and position of image.

Step 2: Now export the data.
//Create Template Marker Processor
ITemplateMarkersProcessor marker = workbook.CreateTemplateMarkersProcessor();

//Get first 5 items in the collection and bind them to the marker
marker.AddVariable("SalesList", GetCustomerAsObjects().Take<Customer>(5).ToArray());

//Process the markers in the template
marker.ApplyMarkers();
Here is the exported data in a neatly formatted Excel worksheet using a template marker.

A complete working example along with the input file can be downloaded from export-data-with-images.zip.
Go through the documentation to learn more on importing data with images using template markers in XlsIO.
Export data to Excel template with conditional formatting
Conditional formatting provides another way to figure out patterns in data, which is difficult from examining the raw information, similar to charts or sparklines.
For example, I have a sales report with two sets of six-months’ sales figures, Jan-June and July-Dec, in two different columns. It would be difficult to compare the sales for different sales reps without analysis. We can add conditional formatting to show the data variance in the sales.
Let’s see the steps to achieve this.
Step 1: Add marker variable to bind columns.

Step 2: Apply conditional formatting to the marker variable rows and export.
//Create Template Marker Processor
ITemplateMarkersProcessor marker = workbook.CreateTemplateMarkersProcessor();

//Applying conditional formats
#region Data Bar
IConditionalFormats conditions = marker.CreateConditionalFormats(worksheet["C5"]);
IConditionalFormat condition = conditions.AddCondition();

//Set data bar and icon set for the same cell
//Set the format type
condition.FormatType = ExcelCFType.DataBar;
IDataBar dataBar = condition.DataBar;

//Set the constraint
dataBar.MinPoint.Type = ConditionValueType.LowestValue;
dataBar.MaxPoint.Type = ConditionValueType.HighestValue;

//Set color for Bar
dataBar.BarColor = Color.FromArgb(156, 208, 243);

//Hide the value in data bar
dataBar.ShowValue = false;
#endregion

#region Color Scale
conditions = marker.CreateConditionalFormats(worksheet["D5"]);
condition = conditions.AddCondition();

condition.FormatType = ExcelCFType.ColorScale;
IColorScale colorScale = condition.ColorScale;

//Sets 3 - color scale
colorScale.SetConditionCount(3);

colorScale.Criteria[1].FormatColorRGB = Color.FromArgb(244, 210, 178);
colorScale.Criteria[1].Type = ConditionValueType.Percentile;
colorScale.Criteria[1].Value = "50";

colorScale.Criteria[2].FormatColorRGB = Color.FromArgb(245, 247, 171);
colorScale.Criteria[2].Type = ConditionValueType.Percentile;
colorScale.Criteria[2].Value = "100";
#endregion

//Add marker variable
marker.AddVariable("SalesList", GetCustomerAsObjects());

//Process the markers in the template
marker.ApplyMarkers();
Here is how the data would look after the export.

A complete working example along with the input file can be downloaded from export-data-with-conditional-formats.zip.
To learn more about applying other advanced conditional formats, please go through the template marker with conditional formatting documentation.
Export data to Excel template with nested collection objects
You may handle hierarchical data in nested collection objects but may not be able to view the data in its structure to analyze it. Syncfusion Excel Library lets you export data from nested collections to an Excel worksheet with more flexible options to analyze data in its hierarchical structure. Here, the template marker plays a grand role in exporting such nested data in different layouts and grouping the exported data.
Data import can be done with these layout options:
- Default : Parent records imported in the first row of its collection.
- Merge : Parent records imported in merged rows.
- Repeat : Parent records imported in all the rows.
The following steps shows how to export in these layout options.
Step 1 : Opens the input Excel template.
Step 2 : Reads the XML data to get the hierarchical data.
Step 3 : Assigns the values read from XML file to respective collection objects.
Step 4 : Applies the marker to the Excel worksheet.
Step 5 : Saves the workbook.
using Syncfusion.XlsIO;using System.Collections.Generic;using System.IO;using System.Xml.Serialization;namespace Template\_Marker\_Nested\_Collection{ class Program { static void Main(string[] args) { ApplyLayout(); } static void ApplyLayout() { using (ExcelEngine excelEngine = new ExcelEngine()) { IApplication application = excelEngine.Excel; application.DefaultVersion = ExcelVersion.Excel2016; IWorkbook workbook = excelEngine.Excel.Workbooks.Open("../../Data/NestedColl-Template-Default.xlsx"); IWorksheet worksheet = workbook.Worksheets[0]; //Create Template Marker Processor ITemplateMarkersProcessor marker = workbook.CreateTemplateMarkersProcessor(); //Add collection to the marker variables where the name should match with input template marker.AddVariable("BrandObject", GetVehicleDetails()); //Process the markers in the template marker.ApplyMarkers(); string fileName = @"ExportData-DefaultLayout.xlsx"; workbook.SaveAs(fileName); workbook.Close(); } } #region Helper Methods //Helper Method static private IList<Brand> GetVehicleDetails() { XmlSerializer deserializer = new XmlSerializer(typeof(BrandObjects)); //Read data from XML file. TextReader textReader = new StreamReader(@"..\..\Data\ExportData.xml"); BrandObjects brands = (BrandObjects)deserializer.Deserialize(textReader); //Initialize parent collection to add data from XML file. List<Brand> list = new List<Brand>(); string brandName = brands.BrandObject[0].BrandName; string vehicleType = brands.BrandObject[0].VahicleType; string modelName = brands.BrandObject[0].ModelName; //Parent class Brand brand = new Brand(brandName); brand.VehicleTypes = new List<VehicleType>(); VehicleType vehicle = new VehicleType(vehicleType); vehicle.Models = new List<Model>(); Model model = new Model(modelName); brand.VehicleTypes.Add(vehicle); list.Add(brand); foreach (BrandObject brandObj in brands.BrandObject) { if (brandName == brandObj.BrandName) { if (vehicleType == brandObj.VahicleType) { vehicle.Models.Add(new Model(brandObj.ModelName)); continue; } else { vehicle = new VehicleType(brandObj.VahicleType); vehicle.Models = new List<Model>(); vehicle.Models.Add(new Model(brandObj.ModelName)); brand.VehicleTypes.Add(vehicle); vehicleType = brandObj.VahicleType; } continue; } else { brand = new Brand(brandObj.BrandName); vehicle = new VehicleType(brandObj.VahicleType); vehicle.Models = new List<Model>(); vehicle.Models.Add(new Model(brandObj.ModelName)); brand.VehicleTypes = new List<VehicleType>(); brand.VehicleTypes.Add(vehicle); vehicleType = brandObj.VahicleType; list.Add(brand); brandName = brandObj.BrandName; } } textReader.Close(); return list; } #endregion }}
Let’s see these options in detail along with input templates and output screenshots.
Layout options
Default layout option
This option exports parent records in the first row of its collection.

The following screenshot represents the output document with the default layout option.

Merge layout option
This option exports parent records with merged rows.

The following screenshot represents the output document with the merge layout option.

Repeat layout option
This option repeats the parent records exported in all the rows.

The following screenshot represents the output document with the repeat layout option.

Grouping options
Import data with grouping option
Hierarchical data imported into Excel worksheets must be shown in its structure to be analyzed more flexibly. In addition, if the data is grouped according to its level, it is easier to analyze. XlsIO lets you import hierarchical data from nested collections and group them while exporting data using template markers.
The following are the options supported to group on import:
Expand : Imported data will be grouped and expanded.
Collapse : Imported data will be grouped and collapsed at first level, by default.
In addition, CollapseLevel will group and collapse the levels, up to the maximum of eight levels.

The following screenshot represents the output document of grouped data imported from a nested collection and collapsed at level two.

GitHub samples
You can download the examples of exporting data to Excel in C# here.
Conclusion
As you can see, Syncfusion Excel Library (XlsIO) provides various features to export data to a predefined Excel template using template markers in C#. Use them effectively to generate Excel reports with high performance and to process large data. Take a moment to peruse the documentation, where you’ll find other options and features, all with accompanying code samples. Using the library, you can also export Excel data to PDFs, images, data tables, CSV, TSV, HTML, collections of objects, ODS file format, and more.
If you are new to our Excel Library, it is highly recommended that you follow our Getting Started guide.
Are you already a Syncfusion user? You can download the product setup here. If you’re not yet a Syncfusion user, you can download a free, 30-day trial here.
If you have any questions about these features, please let us know in the comments below. You can also contact us through our support forum or Direct-Trac or feedback portal. We are happy to assist you!
Related blogs
- 6 Easy Ways to Export Data to Excel in C#
- How to Export Data SQL Server to Excel Table in C#
- Export Data from a Collection to Excel and Group It in C#
The post Export Data to a Predefined Excel Template in C# appeared first on Syncfusion Blogs.

Top comments (0)