
Microsoft’s Azure Blob Storage is a cloud storage service designed for modern data storage scenarios. Azure Blob Storage offers highly available, massively scalable, durable, and secure storage for various data objects in the cloud.
In this article, I will explain how to download files from the Azure Blob Storage using Blazor WebAssembly and ASP.NET Core.
I will be using the Syncfusion Blazor Card component to visualize the images in the Blazor WebAssembly application.
Creating the ASP.NET Core Web API application with Azure Blob Storage
First, create the server-side app using the ASP.NET Core Web API project.
1. Create the Azure Blob Storage.
Create the Azure Blob Storage to store the files. For this, we need to have an Azure subscription.
First, create a storage account in the Azure portal.
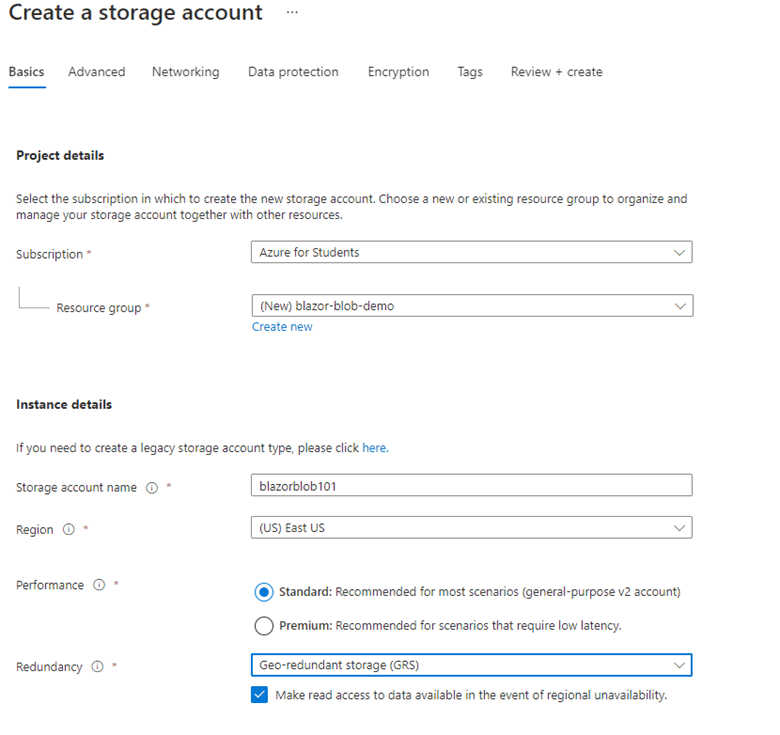 When creating the storage account, add the resource group, storage account name, region, and other details. Next, navigate to the storage account, and you can see the blob service as follows.
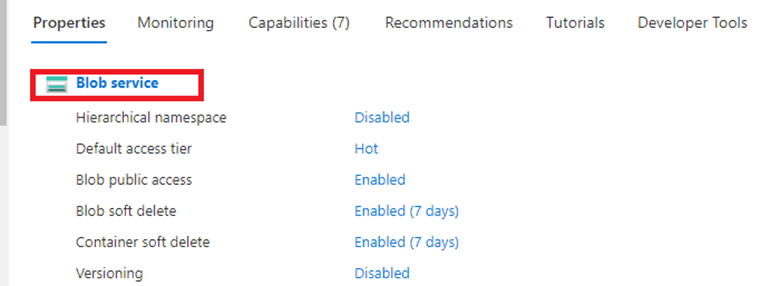 Navigate to the blob service and create a container to upload the files. Enter the container’s name and select the public access level as follows.
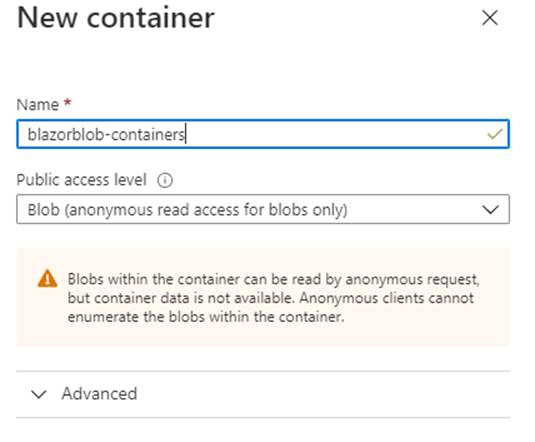 After that, upload a few images as files in the container.

2. Create an ASP.NET Core Web API project and connect it to the Azure Blob Storage.
Create an ASP.NET Core Web API project. Implement the endpoint to deal with blob storage.
After creating the Web API project, add a blob storage connection string into the ASP.NET Core Web API project using the appsettings.json file. Then, get the blob storage connection string from the storage account that we created.
 Then, add the connection string to the appsettings.json file to connect with the Azure Blob Storage.

3. Implement the endpoints in the ASP.NET Core Web API project.
First, create a DTO class to transfer data to the client-side app from the server-side app. Then, create the Models folder and add the Dtos folder inside the Models directory. Inside the Dtos folder add class BlobDto as follows.
public class BlobDto
{
    public string Name { get; set; }
    public string FileUrl { get; set; }
    public string ContentType { get; set; }
}
This BlobDto class is used to transfer the blob properties. Next, create the Dto class ContentDto as follows. This class is used to return a specific file’s content details to download it.
public class ContentDto
{
    public Stream Content { get; set; }
    public string Name { get; set; }
    public string ContentType { get; set; }
}
Then, create blob services to deal with the Azure Blob Storage. In this case, create a services folder in the root directory and then create an interface named IBlobService inside the services folder. Refer to the following code.
public interface IBlobService
{
    Task<List<BlobDto>> GetBlobFiles();

    Task<ContentDto> GetBlobFile(string name);
}
Create a BlobService class that implements the IBlobService interface.
public class BlobService : IBlobService
{
    private readonly string _blobConnectionString;
    private const string _blobContainer = "blazorblob-container";

    public BlobService(IConfiguration configuration)
    {
        _blobConnectionString = configuration.GetConnectionString("BlobConnectionString");
    }

    public async Task<List<BlobDto>> GetBlobFiles()
    {
        var blobs = new List<BlobDto>();
        var container = new BlobContainerClient(_blobConnectionString, _blobContainer);

        await foreach (var blob in container.GetBlobsAsync())
        {
            var blobDto = new BlobDto()
            {
                Name = blob.Name,
                FileUrl = container.Uri.AbsoluteUri + "/" + blob.Name,
                ContentType = blob.Properties.ContentType
            };
            blobs.Add(blobDto);
        }
        return blobs;
    }

    public async Task<ContentDto> GetBlobFile(string name)
    {
        var container = new BlobContainerClient(_blobConnectionString, _blobContainer);
        var blob = container.GetBlobClient(name);

        if (await blob.ExistsAsync())
        {
            var a = await blob.DownloadAsync();
            var contentDto = new ContentDto()
            {
                Content = a.Value.Content,
                ContentType = a.Value.ContentType,
                Name = name
            };

            return contentDto;
        }

        return null;
    }

}
This GetBlobFiles method gets all the files inside the blob container we created. Then, it references the Azure Blob Storage and container using the connection string and connection name. The GetBlobFile method is used to download specific files by providing the name as a parameter.
Then, register the blob service in the Program.cs file, as follows.
builder.Services.AddScoped<IBlobService, BlobService>();
After that, create the endpoint to get all files using the IblobService interface. For which, implement the controller named FileController inside the controllers’ folder, as follows.
[ApiController]
[Route("api/[controller]")]
public class FilesController : Controller
{

    private readonly IBlobService _blobService;

    public FilesController(IBlobService blobService)
    {
        _blobService = blobService;
    }

    [HttpGet]
    public async Task<IActionResult> Get()
    {
        var result = await _blobService.GetBlobFiles();

        return Ok(result);
    }

    [HttpGet("{name}")]
    public async Task<IActionResult> Get(string name)
    {
        var result = await _blobService.GetBlobFile(name);

        if (result == null)
            return BadRequest();

        return File(result.Content,result.ContentType, result.Name);
    }

}
We have implemented two endpoints to deal with the Azure Blob Storage. The first one is to get all the files, and the second one is to download the specific file from the Azure Blob Storage.
Enable the CORS on the server-side project. Refer to the following code.
var builder = WebApplication.CreateBuilder(args);

// Add services to the container.

builder.Services.AddCors(options =>
{
    options.AddPolicy(name: "AllowedCorsOrigins",
        builder =>
        {
            builder
                .SetIsOriginAllowed((_) => true)
                .AllowAnyHeader()
                .AllowAnyMethod()
                .AllowCredentials();
        });
});

var app = builder.Build();

// Configure the HTTP request pipeline.
if (app.Environment.IsDevelopment())
{
    app.UseSwagger();
    app.UseSwaggerUI();
}
app.UseCors("AllowedCorsOrigins");
//..

app.Run();
Create the Blazor WebAssembly application
Next, we have to create the client-side app using the Blazor WebAssembly project.
1. Create and configure the Blazor WebAssembly app.
First, create a new Blazor WebAssembly application. Second, configure the app to deal with the server-side app.
For which, remove the following code line in the Program.cs file.
builder.Services.AddScoped(sp => new HttpClient {BaseAddress = new Uri(builder.HostEnvironment.BaseAddress)});
We will then inject the HttpClient, creating the service to call the APIs.
2. Create the services to connect with the server-side application.
First, create the folder named services in the root directory. Then, create the interface named IFileService inside the service folder as follows.
public interface IFileService
{
    Task<List<BlobDto>> GetFiles();
    Task<ContentDto> DownloadFile(string name);
}
Next, create a class named FileService that implements the IFileService , as follows.
public class FileService : IFileService
{
    private readonly HttpClient _client;
    private const string _baseUrl = "https://localhost:7174/api/";

    public FileService()
    {
        _client = new HttpClient();
        _client.DefaultRequestHeaders.Accept.Clear();
        _client.DefaultRequestHeaders.Accept.Add(
            new MediaTypeWithQualityHeaderValue("application/json"));
    }

    public async Task<List<BlobDto>> GetFiles()
    {
        var response = await _client.GetAsync(_baseUrl+"files");
        var result = response.Content.ReadAsStringAsync().Result;
        var blobList = JsonSerializer.Deserialize<List<BlobDto>>(result);

        return blobList;
    }

    public async Task<ContentDto> DownloadFile(string name)
    {
        var response = await _client.GetByteArrayAsync(_baseUrl+"files/"+name);

        var content = new ContentDto()
        {
            Content = response,
            Name = name
        };

        return content;
    }
}
The FileService class deals with the server side of the app. We use the two endpoints to deal with the Azure Blob Storage. This service class calls those endpoints, injecting HttpClient to return the required content and details.
Then, register the service in the Program.cs file, as follows.
builder.Services.AddScoped<IFileService, FileService>();
3. Install and configure the Syncfusion Blazor Card component.
Add the following three NuGet packages to your app to add the Syncfusion Blazor Card component:
- Syncfusion.Blazor.Cards 20.2.0.36 : This package provides the functionality and features for the Syncfusion Blazor Card component.
- Syncfusion.Blazor.Themes 20.2.0.36 : This package adds and configures Blazor component themes as static web assets in the application.
- Syncfusion.Blazor.Core 20.2.0.36 : This package includes the base component, standard classes, and interfaces utilized in other Syncfusion Blazor UI components.
Then, add the required Syncfusion Blazor component to the _import.razor file as follows.
@using Syncfusion.Blazor
@using Syncfusion.Blazor.Cards
After that, register the Syncfusion Blazor component in the Program.cs file.
var builder = WebAssemblyHostBuilder.CreateDefault(args);
//..
builder.Services.AddSyncfusionBlazor();
//..
await builder.Build().RunAsync();
Next, add a style theme to the Blazor app. Open the index.html file in the wwwroot directory and then edit the file, as shown.
<head>
  <link href="_content/Syncfusion.Blazor.Themes/bootstrap5.css" rel="stylesheet" />
</head>
Open the index.html and add the script reference that the Syncfusion component requires.
<head><link href="_content/Syncfusion.Blazor.Themes/bootstrap5.css" rel="stylesheet" /><script src="_content/Syncfusion.Blazor.Core/scripts/syncfusion-blazor.min.js" type="text/javascript"></script>
</head>
4. Implement the logic to download files from Azure.
Create a folder named scripts inside the wwwroot directory. Then, create the script.js inside the scripts folder as follows.
export function download(options) {
    var bytes = new Uint8Array(options.byteArray);
    var blob=new Blob([bytes], {type: options.contentType});

    var link=document.createElement('a');
    link.href=window.URL.createObjectURL(blob);
    link.download=options.fileName;
    link.click();
}
This code example is the JavaScript function we are using to download the files in the Blazor WebAssembly app. We also isolate our JavaScript code as a separate JavaScript module using the export keyword. The options parameter is an object parameter that contains three properties: byte array, file name, and file content type.
5. Create the UI and add the Syncfusion Blazor Card component.
Create the UI for listing the retrieved files from the server-side app. Modify the Index.razor file inside the page folder as follows.
@page "/"
@using BlazorBlobDemo.Models
@using BlazorBlobDemo.Services

@inject IFileService _fileService;
@inject IJSRuntime JSRuntime;

<h1>Comic SuperHeroes</h1>

@if (blobs == null)
{
    <p><em>Loading...</em></p>
}
else
{
    foreach (var blob in blobs)
    {
        <div style="border:1px solid gray; margin-bottom:10px; width: 202px;">
          <SfCard ><CardImage><img src="@blob.FileUrl" alt="@blob.Name" @onclick="() => Download(blob.Name, blob.ContentType)" width="200" height="200"/>
             </CardImage>
          </SfCard></div>
    }
}

@code {
    private IJSObjectReference _module;
    private List<BlobDto> blobs;

    protected override async Task OnInitializedAsync()
    {
        _module = await JSRuntime.InvokeAsync<IJSObjectReference>("import", "./scripts/script.js");
        blobs = await _fileService.GetFiles();
    }

    private async Task Download(string name, string contentType)
    {
        var response = await _fileService.DownloadFile(name);

        await _module.InvokeVoidAsync("download", new
        {
            ByteArray = response.Content,
            FileName = name,
            ContentType = contentType
        });
    }
}
We inject the file service interface to retrieve all files and download the selected file. Then, we inject the IJSRuntime interface and create the private IJSObjectReference variable for the JavaScript function process.
The download method returns the file content as a byte array, calling the Web API from the server-side app. After that, it passes the required parameters as the object to the JavaScript download function as in the previous code.
Run and test the application
Run the server-side and client-side applications to test their functionalities.
 Now, you can see the list of images from the Azure Blob Storage. Next, download a specific file by clicking the file thumbnail.
 We can download the file successfully from the Azure Blob Storage using the Blazor WebAssembly and ASP.Net Core applications.
Resource
For more information, refer to the complete project, Azure Blob Storage with Blazor WebAssembly and ASP.NET Web API.
Conclusion
This article has demonstrated how to download files from the Azure Blob Storage using a Blazor WebAssembly application and ASP.NET Core Web API application.
You also saw how to create an Azure Blob Storage and add the Syncfusion Blazor Card component to the Blazor WebAssembly application.
Don’t forget to share your thoughts in the comments section. Thank you for reading!
Syncfusion’s Blazor component suite offers over 70 UI components that work with both server-side and client-side (WebAssembly) hosting models seamlessly. Use them to build marvelous apps!
If you have any questions or comments, you can contact us through our support forums, support portal, or feedback portal. We are always happy to assist you!

Top comments (0)