
The Syncfusion JavaSript DataGrid control is a high-performance grid component that helps display and manipulate large amounts of data in a tabular format. Its feature set includes rich functionalities: data binding, sorting, grouping, editing, filtering, swiping, dragging, resizing, loading more items, pull-to-refresh, and exporting to Excel and PDF file formats. In this blog, we are going to walk you through the procedure to implement column bulk-edit support for the JavaScript DataGrid (ES5 platform) through the context menu event, also known as a right-click event.
Column bulk editing is a feature that helps us easily edit multiple cells in a column at once in JavaScript DataGrid. It saves a lot of time and reduces the workload. We’ll start this blog by creating a sample of a simple JavaScript DataGrid project with remote data binding. Then, I’ll show you the edit dialog with the desired column type when right-clicking on a grid column.
Let’s see about them along with code examples!
Create JS DataGrid sample
Please follow these steps to render the DataGrid in the JavaScript platform (ES5).
Step 1: First, let’s create the index.html file with a JS CDN (content delivery network) script reference like in the following code.
<html>

<head>
    <meta name="viewport" content="width=device-width, initial-scale=1.0" charset="utf-8" />
    <script src="https://cdn.syncfusion.com/ej2/dist/ej2.min.js" type="text/javascript"></script>
    <link href="https://cdn.syncfusion.com/ej2/material.css" rel="stylesheet">

    <style>
        body {
            touch-action: none;
        }

        .e-grid {
            margin: 30px;
        }

        .title {
            text-align: center;
        }
    </style>
</head>

<body>
    <div class="stackblitz-container material">
        <div class="control-section">
            <div class="content-wrapper">
                <h4 class="title">Multi Column Update</h4>
                <div id="sample"></div>
            </div>

        </div>
    </div>
</body>

</html>
Step 2: Here, we will use the DataGrid to display employees’ details. So, let’s create the employee.js file and add the following basic grid rendering codes to it.
function renderGrid() {

    gridInstance = new ej.grids.Grid({
        columns: [
            { field: "EmpID", isPrimaryKey: true, allowEditing: false },
            {
                field: "Name",
                headerText: "Employee Name",
                validationRules: { required: true }
            },


        ],
        dataSource: [],
        height: "auto",
        allowPaging: true,
        pageSettings: { pageSize: 15 },
        selectionSettings: { type: "Multiple", persistSelection: true }

    });
    document.body.appendChild(ej.base.createElement("div", { id: "sample" }));
    gridInstance.appendTo("#sample");
}

// event triggered when DOM load complete.
document.addEventListener('DOMContentLoaded', (event) => {
    //Render grid
    renderGrid();
});
Step 3 : Then, add this Employee.js file as the source in the index.html.

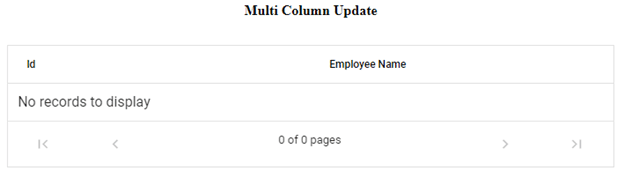
Step 4: Now, open the index.html file . It will display the created grid sample with two columns, Id and Employee Name, like in the following screenshot.
Note: Please refer to the Getting Started documentation to render the DataGrid in the JavaScript platform (ES5).
API implementation and data binding
Here, I have created an ASP.NET Core application for the API implementation.
Install the necessary NuGet packages
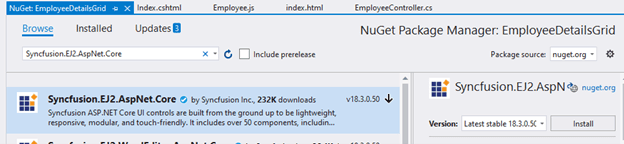
Step 1: Right-click on the project and choose the Manage NuGet Packages option like in the following screenshot.

Step 2: Now, switch to the Browse tab and search for the Syncfusion.EJ2.AspNet.Core NuGet package. Then, install it in your application.
Employee list Get API
In the ASP.NET Core application sample, no database connection is used. Employee records are stored in the static property and returned as an API response.
Refer to the following code.
public static List<EmployeeDetails> GetAllRecords()
  {
      List<EmployeeDetails> empList = new List<EmployeeDetails>();
      empList.Add(new EmployeeDetails() { EmpID = 1, PhoneNumber = 412134, Name = "Raja", Designation = "Software Engineer", Reporter = "Selva", BranchLocation = "Eymard", TeamName = "Consulting", DateOfJoin = new DateTime(2018, 06, 01), EmpStatus = "Confirmed" });
      empList.Add(new EmployeeDetails() { EmpID = 2, PhoneNumber = 333111, Name = "Suresh", Designation = "Software Engineer", Reporter = "Selva", BranchLocation = "Eymard", TeamName = "Consulting", DateOfJoin = new DateTime(2020, 02, 01), EmpStatus = "Probation" });
      empList.Add(new EmployeeDetails() { EmpID = 3, PhoneNumber = 431891, Name = "Selva", Designation = "Team Lead", Reporter = "Karthik", BranchLocation = "Eymard", TeamName = "Consulting", DateOfJoin = new DateTime(2013, 02, 01), EmpStatus = "Confirmed" });
      empList.Add(new EmployeeDetails() { EmpID = 4, PhoneNumber = 312211, Name = "Guna", Designation = "Software Engineer", Reporter = "Selva", BranchLocation = "Eymard", TeamName = "Consulting", DateOfJoin = new DateTime(2015, 01, 01), EmpStatus = "Confirmed" });
      empList.Add(new EmployeeDetails() { EmpID = 5, PhoneNumber = 412134, Name = "Ravi", Designation = "Software Engineer", Reporter = "Selva", BranchLocation = "Eymard", TeamName = "Consulting", DateOfJoin = new DateTime(2019, 03, 01), EmpStatus = "Confirmed" });
      empList.Add(new EmployeeDetails() { EmpID = 6, PhoneNumber = 412135, Name = "Priya", Designation = "Software Engineer", Reporter = "Selva", BranchLocation = "Eymard", TeamName = "Consulting", DateOfJoin = new DateTime(2015, 07, 01), EmpStatus = "Confirmed" });
      empList.Add(new EmployeeDetails() { EmpID = 7, PhoneNumber = 412136, Name = "Dhana", Designation = "Software Engineer", Reporter = "Vino", BranchLocation = "Mathura", TeamName = "Consulting", DateOfJoin = new DateTime(2015, 09, 01), EmpStatus = "Confirmed" });
      empList.Add(new EmployeeDetails() { EmpID = 8, PhoneNumber = 412137, Name = "Karthik", Designation = "Manager", Reporter = "", BranchLocation = "Mathura", TeamName = "Consulting", DateOfJoin = new DateTime(2010, 02, 01), EmpStatus = "Confirmed" });
      empList.Add(new EmployeeDetails() { EmpID = 9, PhoneNumber = 411138, Name = "Vino", Designation = "Team Lead", Reporter = "Raj", BranchLocation = "Mathura", TeamName = "Consulting", DateOfJoin = new DateTime(2014, 02, 01), EmpStatus = "Confirmed" });
      empList.Add(new EmployeeDetails() { EmpID = 10,PhoneNumber = 412139, Name = "Raji", Designation = "Software Engineer", Reporter = "Vino", BranchLocation = "Mathura", TeamName = "Consulting", DateOfJoin = new DateTime(2015, 05, 01), EmpStatus = "Probation" });
      empList.Add(new EmployeeDetails() { EmpID = 11,PhoneNumber = 412140, Name = "Vijay", Designation = "Software Engineer", Reporter = "Vino", BranchLocation = "Mathura", TeamName = "Consulting", DateOfJoin = new DateTime(2020, 02, 01), EmpStatus = "Confirmed" });
      empList.Add(new EmployeeDetails() { EmpID = 12,PhoneNumber = 412141, Name = "Raj", Designation = "Manager", Reporter = "", BranchLocation = "Mathura", TeamName = "Consulting", DateOfJoin = new DateTime(2010, 02, 01), EmpStatus = "Confirmed" });
      return empList;
  }
Implement the Get API to return all the employee records.
public IActionResult GetEmployees([FromBody]DataManagerRequest dm)
 {
      IEnumerable DataSource = Employees;
      DataOperations operation = new DataOperations();

      int count = DataSource.Cast<EmployeeDetails>().Count();
      if (dm.Skip != 0)
      {
         DataSource = operation.PerformSkip(DataSource, dm.Skip); //Paging
      }
      if (dm.Take != 0)
      {
         DataSource = operation.PerformTake(DataSource, dm.Take);
      }
      return dm.RequiresCounts ? Json(new { result = DataSource, count = count }) : Json(DataSource);
 }
Note:
The modal object class DataManagerRequest is referenced from the library using Syncfusion. EJ2.Base;
 Employee Update API
Implement the bulk-record update logic like in the following code example.
public IActionResult UpdateEmployeeDetails([FromBody]CRUDModel<EmployeeDetails> batchmodel)
  {
     if (batchmodel != null && batchmodel.Changed != null)
     {
         for (var i = 0; i < batchmodel.Changed.Count(); i++)
         {
              var ord = batchmodel.Changed[i];
              EmployeeDetails val = Employees.Where(or => or.EmpID == ord.EmpID).FirstOrDefault();
              val.EmpID = ord.EmpID;
              val.Name = ord.Name;
              val.Designation = ord.Designation;
              val.BranchLocation = ord.BranchLocation;
              val.Reporter = ord.Reporter;
              val.EmpStatus = ord.EmpStatus;
              val.DateOfJoin = ord.DateOfJoin;
              val.TeamName = ord.TeamName;
              val.PhoneNumber = ord.PhoneNumber;
          }
      }
      var data = Employees.ToList();
      return Json(data);
  }
Note:
The modal object class CRUDModal is referenced from the library using Syncfusion. EJ2.Base;
 Remote data binding
Now, follow these steps to bind the Get and Update APIs to the grid.
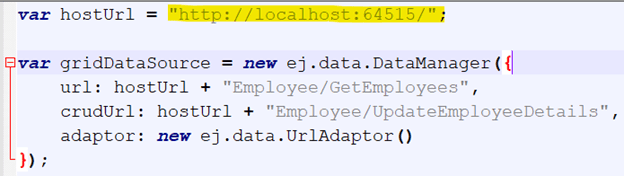
Step 1: Switch to the Employee.js file and create an instance of DataManager with both the Get ( url ) and Update ( crudUrl ) URLs.
var hostUrl = "http://localhost:64515/";

var gridDataSource = new ej.data.DataManager({
    url: hostUrl + "Employee/GetEmployees",
    crudUrl: hostUrl + "Employee/UpdateEmployeeDetails",
    adaptor: new ej.data.UrlAdaptor()
});
Note: We should provide the server API running the URL as the hostUrl in the js file.
Step 2: Then, assign the DataManager instance to the grid’s dataSource property.

Sample code
function renderGrid() {

    gridInstance = new ej.grids.Grid({
        columns: [
            { field: "EmpID", isPrimaryKey: true, allowEditing: false },
            {
                field: "Name",
                headerText: "Employee Name",
                validationRules: { required: true }
            },

        ],
        dataSource: gridDataSource,
        height: "auto",
        allowPaging: true,
        pageSettings: { pageSize: 15 },
        selectionSettings: { type: "Multiple", persistSelection: true }

    });
    document.body.appendChild(ej.base.createElement("div", { id: "sample" }));
    gridInstance.appendTo("#sample");
}
Step 3: Now, configure the grid column settings to display the employee details in the grid.
function renderGrid() {

    gridInstance = new ej.grids.Grid({
        columns: [
            { field: "EmpID", isPrimaryKey: true, allowEditing: false },
            {
                field: "Name",
                headerText: "Employee Name",
                validationRules: { required: true }
            },
            {
                field: "Designation",
                headerText: "Designation"
            },
            {
                field: "TeamName",
                headerText: "Team"
            },
            {
                field: "PhoneNumber",
                headerText: "Phone",
                type: "number"
            },
            {
                field: "Reporter",
                headerText: "Reporter",
                editType: "dropdownedit",
                foreignKeyField: "ReporterId",
                foreignKeyValue: "Reporter",
                dataSource: Reporters
            },
            {
                field: "BranchLocation",
                headerText: "Branch"
            },
            {
                field: "DateOfJoin",
                headerText: "Date Of Joined",
                type: "date",
                format: { type: "date", format: "MMM dd yyyy" },
                editType: "datepickeredit",
                edit: { params: { format: "MMM dd yyyy" } }
            },
            {
                field: "EmpStatus",
                headerText: "Status",
                editType: "dropdownedit",
                foreignKeyField: "EmpStatusId",
                foreignKeyValue: "EmpStatus",
                dataSource: StatusList
            }

        ],
        dataSource: gridDataSource,
        height: "auto",
        allowPaging: true,
        pageSettings: { pageSize: 15 },
        selectionSettings: { type: "Multiple", persistSelection: true }

    });
    document.body.appendChild(ej.base.createElement("div", { id: "sample" }));
    gridInstance.appendTo("#sample");
}
Step 4: Then, save all the files and run the server API.
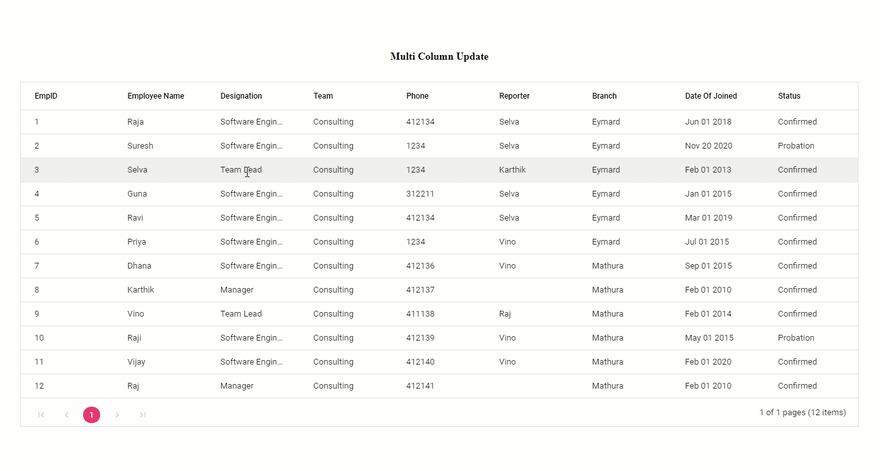
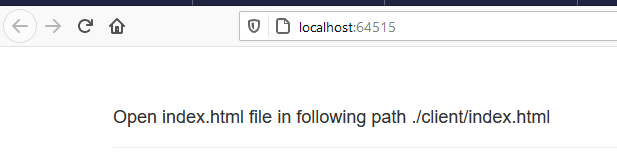 Step 5: After successfully running the API host, open the index.html file. It will show you the grid with the given static employee data.

Now, we have finished the API implementation and bound the remote data to the DataGrid.
Display edit dialog in the context menu
Now, add a reference to Ej2GridExtendedFeature.js in the grid page (Index.html) like in the following screenshot.

Note: You can download the script file.
Enable bulk-edit feature
Now, we are going to invoke the enableBulkColumnEdit() method from the created event of the JavaScript DataGrid to enable the column bulk-edit feature.
Refer to the following screenshot.

Sample code
function renderGrid() {

    gridInstance = new ej.grids.Grid({
        columns: [
            { field: "EmpID", isPrimaryKey: true, allowEditing: false },
            {
                field: "Name",
                headerText: "Employee Name",
                validationRules: { required: true }
            },
            {
                field: "Designation",
                headerText: "Designation"
            },
            {
                field: "TeamName",
                headerText: "Team"
            },
            {
                field: "PhoneNumber",
                headerText: "Phone",
                type: "number"
            },
            {
                field: "Reporter",
                headerText: "Reporter",
                editType: "dropdownedit",
                foreignKeyField: "ReporterId",
                foreignKeyValue: "Reporter",
                dataSource: Reporters
            },
            {
                field: "BranchLocation",
                headerText: "Branch"
            },
            {
                field: "DateOfJoin",
                headerText: "Date Of Joined",
                type: "date",
                format: { type: "date", format: "MMM dd yyyy" },
                editType: "datepickeredit",
                edit: { params: { format: "MMM dd yyyy" } }
            },
            {
                field: "EmpStatus",
                headerText: "Status",
                editType: "dropdownedit",
                foreignKeyField: "EmpStatusId",
                foreignKeyValue: "EmpStatus",
                dataSource: StatusList
            }

        ],
        dataSource: gridDataSource,
        height: "auto",
        created: onCreated,
        allowPaging: true,
        pageSettings: { pageSize: 15 },
        selectionSettings: { type: "Multiple", persistSelection: true }

    });
    document.body.appendChild(ej.base.createElement("div", { id: "sample" }));
    gridInstance.appendTo("#sample");
}

function onCreated(args) {
    //Enable multicolumn edit.
    try {
        // pass grid instance and Data-manager instance as parameters to enable column bulk-edit feature.
        enableBulkColumnEdit(this, gridDataSource);
    }
    catch (ex) {
        console.log("Refer Ej2GridExtendedFeature.js to enable Column bulk edit. InnerException "+ ex);
    }
}
Note: Enabling the column bulk-edit feature will override the Context Menu event and selection setting of the grid.
Logic behind the detailed view of Ej2GridExtendedFeature.js file
In this section, we are going to see the implementation logic used in the script file Ej2GridExtendedFeature.js, which helps developers customize the column bulk-edit feature in JavaScript DataGrid if needed.
Create dialog
Create the edit dialog dynamically during the page rendering. This dialog will show the desired editor when right-clicking on the grid column.
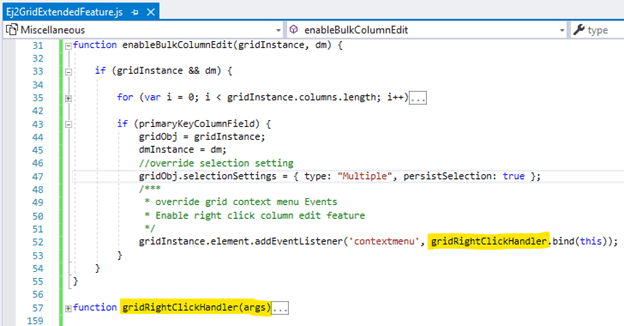
Please find the logic in the create_InitializeEditModal() method in the Ej2GridExtendedFeature.js file.
Sample code
 function create_InitializeEditModal() {
    var modalContainerEle = document.createElement("div");
    modalContainerEle.id = "BulkEdit-dialog-container";
    var modalEle = document.createElement("div");
    modalEle.id = "dialogBulkEdit";
    var inputContainerEle = document.createElement("div");
    inputContainerEle.id = "modal-editor-container";

    modalEle.appendChild(inputContainerEle);
    modalContainerEle.appendChild(modalEle);
    document.body.appendChild(modalContainerEle);

    editDialogInstance = new ej.popups.Dialog({
        target: document.getElementById("BulkEdit-dialog-container"),
        width: '350px',
        showCloseIcon: true,
        position: { X: 'center', Y: 'center' },
        visible: false,
        buttons: [
            {
                'click': onClickSaveBtn,
                buttonModel: {
                    isPrimary: true,
                    content: 'Save'
                }
            },
            {
                'click': onClickCancelBtn,
                buttonModel: {
                    content: 'Cancel'
                }
            }
        ]

    });

    // Render/initialized Dialog
    editDialogInstance.appendTo('#dialogBulkEdit');
    modalEle.style.top = '100px';
}
Bind context menu event to custom function
Here we bind the customer gridRightClickHandler() to the contextmenu event of the grid.
Create dynamic editor
Right-click on the DataGrid column, create the editor element dynamically, and append it to the bulk edit modal, based on the current column data type.
Please find the dynamic editor creation logic in the gridRightClickHandler() method definition.
Sample code
if (editColumnType === DATA_TYPE.STRING && editType === EDIT_TYPE.DROPDOWN_EDIT) {
                var dataSource = [];

                if (curRowInfo.column.dataSource) {
                    dataSource = curRowInfo.column.dataSource;
                }
                inputEditorInstance = new ej.dropdowns.DropDownList({
                    placeholder: "Select " + editFieldName,
                    popupHeight: "200px",
                    dataSource: dataSource,
                    fields: { text: currentEditColumn, value: currentEditColumn }
                });
            }
            else if (editColumnType === DATA_TYPE.STRING) {
                inputEditorInstance = new ej.inputs.TextBox({
                    placeholder: editFieldName
                });
            }
            else if (editColumnType === DATA_TYPE.DATE) {
                var format = "dd/MMM/yyyy";

                if (curRowInfo.column.format && curRowInfo.column.format.format) {
                    format = curRowInfo.column.format.format;
                }
                else if (curRowInfo.column.format) {
                    format = curRowInfo.column.format;
                }

                inputEditorInstance = new ej.calendars.DatePicker({
                    format: format,
                    placeholder: "Select " + editFieldName
                });
            }
            else if (editColumnType === DATA_TYPE.NUMBER) {

                inputEditorInstance = new ej.inputs.NumericTextBox({
                    placeholder: editFieldName
                });
            }
The editor will be displayed based on the column setting. Refer to the following table.
| Column Setting | Result Screenshot |
| Type: Numeric
Example:
 gridInstance = new ej.grids.Grid({

columns: [

…

{

field: "PhoneNumber",

headerText: "Phone",

type: "number"

},

…

]

});
| Numeric text box will be displayed.  |
|
| Type : string
Example:
gridInstance = new ej.grids.Grid({

columns: [

…

{

field: "Name",

headerText: "Employee Name",

validationRules: { required: true }

}

…

]

});
| Text box will be displayed. 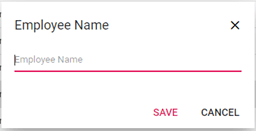 |
|
Note: If the type is not specified, then it will automatically set the first record value type as the column data type.
Column validation
The bulk-edit dialog will always be created with form. If the current right-clicked column has a validation rule, then it will be added to the edit form. (If there is no validation rule, then the validation will not be applied.)
Please find the validation rule add logic in the gridRightClickHandler() method definition. Refer to the following sample code.
if (inputEditorInstance) {
                setTimeout(function () {
                    inputEditorInstance.appendTo("#input-element");
                    /**
                     * Add validation rule to edit modal input field
                     */
                    if (curRowInfo.column.validationRules) {
                        var validationOptions = {
                            rules: {}
                        };
                        validationOptions.rules[currentEditColumn] = curRowInfo.column.validationRules;

                        formInstance = new ej.inputs.FormValidator('#' + editFormId, validationOptions);
                    }
                    // Edit dialog is displayed
                    editDialogInstance.show();
                }, 100);
            }
So, whenever you click on the Save button, the data will be validated (if form has any validation rule).
Format and save dialog data
After successful form validation, the save object will be formatted for all the selected records and then saved using the DataManager instance.
Refer to the following code.
function onClickSaveBtn() {
    var editableRows = gridInstance.getSelectedRecords();
    var changes = { changedRecords: [], addedRecords: [], deletedRecords: [] };

    if ((formInstance && formInstance.validate()) || (formInstance === null)) {

        if (currentEditColumn) {
            for (var k = 0; k < editableRows.length; k++) {
                var updateObj = {};
                var newValue = "";
                newValue = inputEditorInstance.value;

                updateObj = editableRows[k];
                updateObj[currentEditColumn] = newValue;
                changes.changedRecords.push(updateObj);
            }

            gridDataSource.saveChanges(changes, primaryKeyColumnField).then(e => {
                // Grid is refreshed with updated data
                gridInstance.refreshColumns();
            });

            // Previous changes are removed and dialog is hidden
            changes = { changedRecords: [], addedRecords: [], deletedRecords: [] };
            currentEditColumn = "";
            editDialogInstance.hide();
        }
    }
}
Supported column edit types
In this blog, the Ej2GridExtendedFeature.js file has support for the following grid column edit types:
- NumericTextBox
- TextBox
- DropDownList
- DatePicker
- DateTimePicker
Note: Please refer to Cell edit type and its params documentation.
Points to remember
- DataGrid should contain at least one *Primary Key * column.
- We should pass the DataGrid instance and Data Manager instance as arguments to enable the column bulk edit feature.
Reference
You can download the demo video on our website.
For further reference, you can checkout Bulk Edit Columns in JavaScript DataGrid sample.
How to run the sample
Follow these steps to run the sample:
- Extract the previously attached source given in the reference section.
- Run the server source by opening EmployeeDetailsGrid.** sln.** Refer to the following screenshot.

- Navigate to the path ../client/Employee.js and ensure the hosted server URL.
- Open the index.html file. Now, you can enjoy the column bulk edit feature in the JavaScript DataGrid.
Conclusion
In this blog, we have learned how to implement the column bulk edit feature in the Syncfusion JavaScript DataGrid. With this, you can easily update multiple cells in a column at once, which saves a lot of time and reduces your workload. I hope you found this blog useful. Try out the steps given in this blog and leave your feedback in the comments section below.
Syncfusion DataGrid is also available in the Blazor, ASP.NET (Core, MVC, WebForms), Angular, React , Vue, Xamarin, Flutter, UWP, WinForms, WPF, and WinUI platforms. For existing customers, the new version is available for download from the License and Downloads page. If you are not yet a Syncfusion customer, you can try our 30-day free trial to check out our available features.
For questions, you can contact us through our support forum, Direct-Trac, or feedback portal. We are always happy to assist you!
If you liked this blog post, we think you’ll also like the following articles:

Oldest comments (0)