This guide is written for first time users of Git. My goal is to help you understand the basics of Git and to provide a reference for when you inevitably forget if you were supposed to add before committing... Or was it the other way around? Don't worry, this has happened to everyone, I promise.
In this guide I will be using Github repo to walk through how to do some common Git workflows but the steps will be the same for any repository hosted on other platforms based on Git (GitLab, BitBucket, etc).
What is Git and why should I use it?
Git is a distributed version control system (VCS). The point of version control is to provide a history of changes to a file or a set of files so that you can revert back to any previous version.
Since Git is distributed, it does not require a central server for storage, you have a copy of the entire code base and its history on your machine. This lets you modify file(s) or revert to a previous version if you mess up without affecting anyone else's work! Also, git blame is your friend whenever you ask yourself "who wrote this??".
The Git Workflow
There are 4 states in your Git workflow: Working Directory, Staging Area, Local Repo and Remote Repo.
Working Directory
All modifications to files are initially saved to the working directory. Changes here are considered "unsaved" by Git and can be freely altered without affecting your local main copy.
Staging Area
The staging area holds all of the file edits that will be included in your next commit. You can "stage" any file you have added or made modifications to from your Working Directory.
Local Repository
This is your local main copy of the repository. Your local repository is your source of truth and can be used to recover any files you accidentally deleted or made unwanted modifications to. This is also the place where you can push your changes to a remote repository.
Remote Repository
Like the Local Repo, this is the main copy of the repository but is hosted on a server somewhere (such as on Github, GitLab, etc.) instead of being on your local machine. Multiple developers can pull from the remote repository and it serves as the source of truth for everyone working together on the same code base.
Here is a diagram of the 4 states, we will go this in detail in later sections:
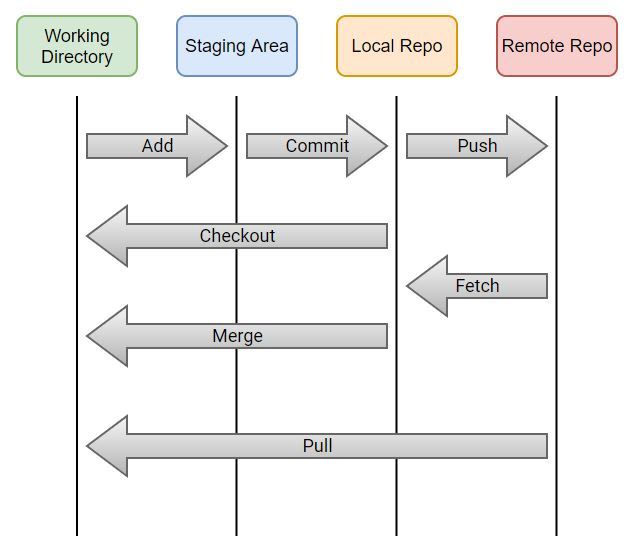
Git Workflow Diagram
How do I get a Local Repository?
There are two main ways of getting a local repo:
- There already exists some remote repository and you clone it to your machine.
- You make your own local directory and turn it into a Git repo.
Cloning a Repository
If there is an existing Git repository that you would like to clone, such as an open source project you want to contribute to or if your job uses Git, then you can simply clone it.
git clone https://github.com/Tauag/git-sample.git
This will create a git-sample directory with a .git file inside of it. It will also have all of the files contained in the remote repo and the complete commit history.
You can also name the folder something different by adding target directory to the command:
git clone https://github.com/Tauag/git-sample.git other-directory-name
It does the same thing as the previous command but the repo will be saved to other-directory-name folder.
Initializing a Repository
You can convert an existing directory on your machine into a Git repo. First you want to navigate to the root of the folder that you want to convert (usually the command is cd).
Now you want to run
git init
This will create a .git subdirectory in your folder. You may want to tell git to start tracking some of the files in your folder with git add and git commit commands. I will go over these commands do in the next section.
But what about saving to the Remote Repository?
Now that you have your local repository set up lets move on to pushing your changes up to a remote. For the following examples I will be using the git-sample repo from the previous section.
First you want to make some edits; write some code, add much needed documentation, done yet? Great!
Stage Your Changes
Use git status to see what files you have changed on your Working Directory. I added a couple of lines to my README file and this is what I see:
$ git status
On branch main
Your branch is up to date with 'origin/main'.

Changes not staged for commit:
  (use "git add <file>..." to update what will be committed)
  (use "git checkout -- <file>..." to discard changes in working directory)

    modified:   README.md

no changes added to commit (use "git add" and/or "git commit -a")
To stage README.md do
git add README.md
This will save the current edits to the Staging Area (also called staging your edits) and make it available for commits. If you git status again you should now see:
$ git status
On branch main
Your branch is up to date with 'origin/main'.

Changes to be committed:
  (use "git reset HEAD <file>..." to unstage)

    modified:   README.md
Keep in mind that if you now make additional changes to README.md the new edits will not be staged. git add only stages the edits that it could see at the time the command was called.
Commit Your Changes
Now that you have made all the changes you want and put them in the Staging Area, you can now commit to your Local Repository. Go ahead and so the following:
git commit -m "Modified my README"
Lets break down this command. git commit tells Git to pack up all of the staged files into one commit and add it to the end of your Local Repository's history log. -m is a message flag that tells Git to use the next string as the commit message. "Modified my README" is the string that is passed as an argument for the message flag. You generally want your commit message to concisely describe what you changed.
If you do git status now you should see:
On branch main
Your branch is ahead of 'origin/main' by 1 commit.
  (use "git push" to publish your local commits)

nothing to commit, working tree clean
This indicates that your Local Repository has 1 more commit in its history log compared to the Remote Repository's history.
Push!
Now that you have successfully committed changes to your Local Repo you probably want to push to the Remote so that your code can be shared to other developers. At this point you want to push your changes.
git push
Congratulations! You have now pushed your code to the Remote Repo and it is now available for all with access to see.
But Git Rejected My Push
Someone else probably pushed some commits up to your branch and you need to pull it down so that your Local Repo is in sync with the Remote Repo.
git fetch
Will download the new commit history and edits.
git merge
Will merge the new files that you fetched into your Working Directory, if there are any merge conflicts you will need to resolve those in your preferred IDE/text editor and do git merge --continue.
Alternatively you can just do git pull which is just a shorthand command that combines both git fetch and git merge. It is recommended to use this command regularly if there are a lot of contributors or if the Remote Repo gets a lot of commit traffic.
That's Basically It
There are many advanced uses for git but add, commit, pull and push will be the commands you use the most. The next thing you want to look into is branching.

Top comments (0)