Not sure which Tencent Cloud GPU instance is right for you? Still fumbling a way to elegantly install the driver and other underlying development tools? These are common questions that bother deep learning researchers and developers. No worries. This document shares all you need to know through the best practices of Tencent Cloud GPU instance.
Environment and objective
The mainstream Tencent Cloud GPU Computing GN7 model with an NVIDIA Tesla T4 GPU is selected as an example, to be more specific, GN7.5XLARGE80. This model features a high comprehensive performance offered by 20 CPU cores and 80 GB memory, making it suitable for general deep neural network training. In addition, it is the most cost-effective GPU T4 model in the world.
Purchase here. Pay-as-you-go models are even more flexible for experiments.
Instance in this tutorial: GPU models like GN7 (recommended) or GN10X
Recommended system image: Ubuntu 18.04 (note that you don't need to select Automatically install GPU driver on the backend.)
Other information: Beijing Zone 5, 1 Mbps public network bandwidth, and 100 GB system disk, which can be selected as needed.
Installing CUDA Driver/Toolkit
Install the DEB package from the official website

Download CUDA Toolkit 10.2 from NVIDIA's official website.
https://developer.nvidia.com/cuda-downloads
Select the download method based on your environment. Here, DEB package installation is selected as shown below:
Run the following command as prompted:
wget https://developer.download.nvidia.com/compute/cuda/repos/ubuntu1804/x86_64/cuda-ubuntu1804.pin sudo mv cuda-ubuntu1804.pin /etc/apt/preferences.d/cuda-repository-pin-600 sudo apt-key adv --fetch-keys https://developer.download.nvidia.com/compute/cuda/repos/ubuntu1804/x86_64/7fa2af80.pub sudo add-apt-repository "deb http://developer.download.nvidia.com/compute/cuda/repos/ubuntu1804/x86_64/ /" sudo apt-get update sudo apt-get -y install cuda
You can see that the official APT repository source of NVIDIA is installed in the system and apt install cuda is executed. Note that the last step of installation takes about five minutes and may be interrupted due to network and other issues, which can be fixed after a retry or two.
Note: The server needs to be restarted here.
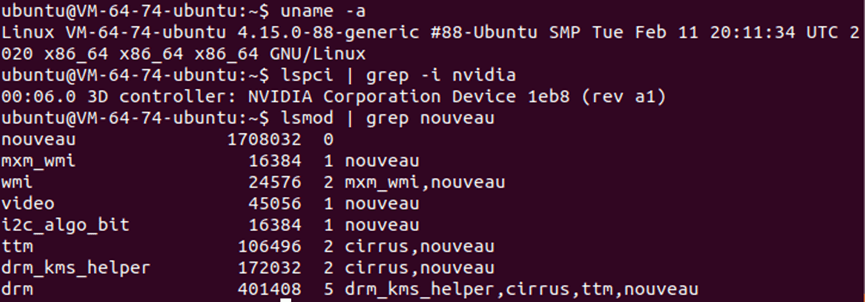
Then how to know what is installed and verify the installation?
Verify GPU driver installation - view the device information
The NVIDIA GPU driver is a kernel module supporting CUDA programming. In the above steps, the driver is installed in the form of Dynamic Kernel Module Support (DKMS). This type of kernel module is not in the kernel source tree, but it can be automatically recompiled every time the kernel is updated and upgraded to generate a new initramfs. In addition, it is dynamically loaded as the system starts. In short, the driver only needs to be installed once, which is very convenient.
Log in after the restart and verify whether the driver module has been dynamically loaded.

As can be seen, the NVIDIA instead of Nouveau driver is loaded.
Read more at: https://www.tencentcloud.com/dynamic/insights/sample-article/100331

Top comments (0)