
I recently started building a full-stack clone of the Quora web app as part of my portfolio projects. I'm using Golang and VueJS for this and one of the more challenging parts of the front-end was the custom WYSIWYG editor, so I decided to share my thoughts on how I was able to scale this huddle.
Content
Comparison
A suitable editor
Features
Challenges
Implementation
Comparison with the Original
It's not uncommon for companies in the tech space to develop their own in-house tools. After doing some research, I discovered the rich text editor you see in quora was developed in-house and it's not open-source. Of course, this makes it a tad bit difficult to replicate. I was left with the option of using picking from the plethora of open-source editors (boy are there so much...) and customizing it to look and behave like quora's. Challenge Accepted
After two days of slapping my keyboard and constant headache, I finally pulled it off, and dare I say it makes the original look like the clone (a very bold claim I know).
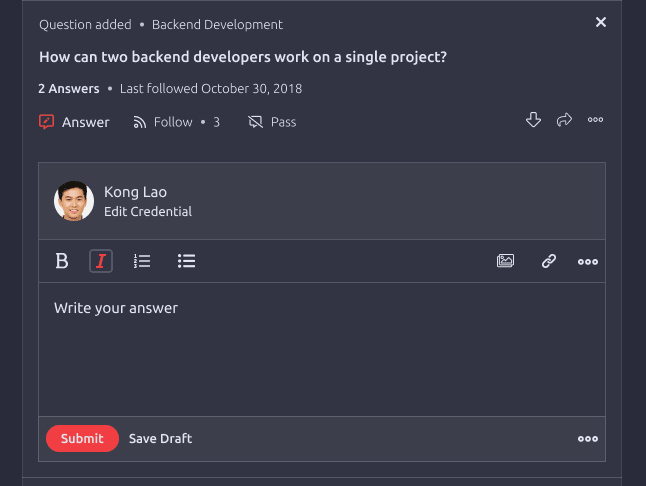
The original vs the clone:

Picking a Suitable Editor
If you're familiar with WYSIWYG editors, you'll know that they're notoriously known to be difficult to customize to your needs. Now, you can write your own editor from scratch but that is a long dark road that's mostly not worth the torment especially for a one-off portfolio project.
After considering a handful of the more popular editors out there (ckeditor, tinymce, froala, quilljs, editorjs), I figured quilljs was the best fit for a couple of reasons:
- It has a nice, clean API
- It's well documented
- It's reasonably customizable
- Extensible through custom modules
Features of Quora's Editor
The editor in itself is not entirely complex, only a couple of things make it unique. It has most of the common formatting options like bold text, italic, ordered and unordered lists, blockquotes, code-blocks, embedded media, HTML links, and edit history. What is less common tho is a mention feature where you can type the @ symbol to select from a list of users, spaces, or topics. Also, the toolbar has 3 layers that slide up and down to ensure only 1 is visible at a time. Not too complex huh.
Challenges
Some of the challenges I faced include:
- Implementing the sliding toolbar
- Overriding Quill's default image handler
- Implementing the mention feature
- Handling multiple editors
Implementation
I started by drawing out the UI in Figma with a little improvement of my own in the colors and icons.
Since I'm building the front-end with Vue, I figured using a component library will make my life easier. I found two popular ones (vue-quill-editor and vue2-editor). Both are very good but I went with vue-quill-editor because it provided better customization for the toolbar. However, that came at the cost of implementing my own image handler to override the default behavior of quilljs converting images to blobs. More on that later.
Setting up the editor is easy:
// register globally
// [main.js]
import VueQuill from "vue-quill-editor";
import 'quill/dist/quill.core.css' // import styles
import 'quill/dist/quill.snow.css' // for snow theme

//---
Vue.use(VueQuill);
//---


// [Editor.vue]
<template>
   <quill-editor
      class="editor"
      v-model="content"
      :options="editorConfig['options']"
      @ready="onEditorReady($event)"
      ref="editor"
   >
      <div :id="'toolbar'+toolbarId" slot="toolbar">
      // toolbar markup
         <button class="ql-bold" type="button"><button/>
      </div>
   </quill-editor/>
</template>
<script>
export default {
   //---
   name: "Editor",
   data: () => ({
      content: ""
   }),
   computed: {
      editorConfig: function() {
         return {
            options: {
               placeholder: "Write your answer...",
               modules: {
                  toolbar: "#toolbar"
               }
            }
         }
      }
   }
}
</script>
That's a basic setup for the editor. Quill lets us customize the look of the editor by overriding some css styles. As shown above, the <quill-editor> component takes a named slot toolbar. This is where we can write our own toolbar markup, while also letting quill handle the logic.
For example, quill looks for any button element with specific class names (e.g ql-bold) that define the functionality of that toolbar element. However, you see even though we can define our own toolbar markup and style it conveniently, quill injects some default styles at runtime to the document <head>. This makes it difficult to style other parts of the editor where we don't control the markup because the injected styles will take precedence.
So how do we tackle this? we programmatically inject our own styles too!. By injecting our own css styles to the document head using the same selectors, we can override whatever styles quill injects. So technically we override their own overrides. * evil grin *
There're a couple of ways to inject styles with javascript. A very simple one is to create a style element with document.createElement() and set the innerHTML to your styles like so:
const injectStyles = () => {
   const style = document.createElement("style");
   style.innerHTML = `
   selector {
      property: value
   }
   `
}

// call injectStyles in the `mounted` lifecycle hook
We can then take advantage of Vue's lifecycle hooks to call this method every time the editor component is mounted. I found this to be very powerful as I could bend the editor to my will just by opening my inspector tab and finding the selectors quill uses for each element I want to override. Let's say we want to change the background color of the editor container, we can simply target the element with its class .ql-container.ql-snow.
I won't be able to write all the code for the editor in this post but here's a link to the GitHub repo for your perusal.
Back to the toolbar. Looking at quora's editor you'll see that the toolbar has 3 layers. A very simple way to implement this is to give the toolbar a specified height (say 44px), have a container inside the toolbar that wraps three other containers each having the same height as the toolbar and serving as a layer. The idea is to make the elements above and below the toolbar sit in front using z-index so that they cover the overflow from the toolbar. We can programmatically pull the toolbar up and down (using top or transform: translate-y) by values equal to the height of the toolbar while adding a nice transition effect. This way, only one layer is visible at a time.
We could have given the toolbar a negative
z-indexbut that will hinder pointer events so we give the elements above and below a higher z-index instead.
I think you get the gist by now. You can just place each button however you want in the toolbar and style them accordingly.
Handling Images
The next feature of the editor is handling images. By default, when you upload an image, quill converts it to a blob. But that's not what we want. We want to get fancy and save the image to a platform like Cloudinary or amazon s3, return a URL and embed that URL in the editor. We can do this by defining our own image handler like so:
// quill - quill instance, can be gotten from the editor ref
const quill = this.$refs['editor']

const handleImageUpload = () => {
   const fileInput = document.createElement("input");
   fileInput.setAttribute("type", "file");
   fileInput.click();

   fileInput.onchange = () => { // Listen for image upload
      const file = fileInput.files[0];
      const formData = new FormData();
      formData.append('image', file);

      if (/^image\//.test(file.type)) {
         // handle server request and return url
         const url = await serverRequest(formData);
         // embed url in editor
         const range = quill.getSelection();
         quill.insertEmbed(range.index, "image", url);
      } else {
         console.warn("[WARNING]: You can only upload images")
      }

   }
}
The function above creates an input of type="file", listens for an upload event (i.e when you select a file from your local system), sends the image to your server, and returns a URL which is embedded in the editor. You can then register this function as a quill module like so:
// ---
onEditorReady: function(quill) {
   quill.getModule("toolbar").addHandler("image", () => {
      this.handleImageUpload();
   });
}
//---
onEditorReady is a function that is called when the ready event is emitted from the quill-editor component.
Mentions feature
The mentions feature was another tricky part. Basically, when you type @ or click the @ button, it shows a list of users, spaces, and topics with a search bar. I found a 3rd party module that implements this and I just had to customize the appearance.
<script>
import "quill-mention";
import { suggestions } from "../constants/suggestions";

//---
handleEditorMention: function(searchTerm, renderList, mentionChar) {
   let values;

   if (mentionChar === "@") {
      values = suggestions;
   }

   if (searchTerm.length === 0) {
      renderList(values, searchTerm);
   } else {
      const matches = [];
      for (let i = 0; i < values.length; i++)
         if (
         ~values[i].value.toLowerCase().indexOf(searchTerm.toLowerCase())
         )
         matches.push(values[i]);
      renderList(matches, searchTerm);
   }
},
//---
</script>
This module registers itself once you import it. Basically, you have a list of suggestions (ideally, you want to make a
request to the server and fetch this list) this module checks for a match as you type @.... Again, it's easy to write your styles for the dropdown list in your injectedStyles function.
Multiple Editors
This was another stumbling block I came across. I discovered having two or more editor instances on the same page causes chaos with the toolbar as they're being referenced by the same toolbar id. One way to fix this is to use different toolbar ids for each editor. But my editor component was rendered in a parent component which in turn was rendered in a loop, so how do we ensure the ids will always be unique?
Generate unique ids with a library like shortid and pass it as props to the editor component after which we can merge with the toolbar id. This ensures we always have unique ids.
<template>
   <quill-editor
      class="editor"
      v-model="content"
      :options="editorConfig['options']"
      @ready="onEditorReady($event)"
      ref="editor"
   >
      // id is merged with the generated shortid
      <div :id="'toolbar'+toolbarId" slot="toolbar">
      // toolbar markup
         <button class="ql-bold" type="button"><button/>
      </div>
   </quill-editor/>
</template>
That's a quick overview of how you can build your own custom editor like quora. Hopefully, you found this helpful. Once again, the code is available in this repository. You can check it out if you're interested. It was a good challenge and I'll keep working on the full project. Please share your thoughts below or ask questions, I'm open to discussions.

Top comments (0)