
[I recommend reading this article on the original Medium page]
If you have worked before with JavaScript trying to manipulate HTML elements, you might have come across them representing themselves as objects with 100s of properties out of thin air. Well, why does that happen? Let's learn why that happens in this article.
What is the DOM?
It is a structured tree-like graph representation of HTML & XML documents or webpages. It allows JavaScript to access HTML elements after the webpage loads, usually for modifying styles, properties, values, etc.
It is not a part of JavaScript. Instead, it belongs to a powerful browser component called Web APIs (Application Programming Interfaces).
They define the interface or act as a bridge between the Web and JavaScript by enabling other features, like access to Geolocation details of the user to figure out accident locations, timers to securely log out users on banking websites, fetch details from other APIs, and much more. DOM is a part of this massive infrastructure.
The API gives JavaScript exclusive access to the DOM tree, which allows JS developers to create HTML elements, remove them, modify them, style, listen for events, and perform other startling operations on HTML elements within a webpage.
DOM stands for Document Object Model and acts as a programming interface between the rendered Web and future additions to the site. It also allows us to make our web pages more dynamic.
Dynamic means that a website automatically alters the elements on a webpage without requiring a software developer to change the source code manually. For instance, consider Youtube as an example. It renders Youtube Videos without the developers at Youtube updating your feed manually (statically) every time you reload the homepage.
The browser makes a DOM tree for each web page on our website and enables us to access that DOM tree and its leaves through the Web API.
The Web API allows us to access those elements through the JS object named Document. Therefore, the Document Object Model. It is similar to the Console object, which enables us to use methods like log(). The Document object holds various properties related to attributes in HTML elements and functions to play with them.
We write the markup using HTML in our IDEs, and the browser creates a document based on the HTML to understand and store the code. We use them to make stylish navigation bars, FAQ dropdowns, etc. We can change colours or make elements disappear when the user does something using DOM, and that's how dropdowns get created.
However, we require an arrangement or system to organize those HTML elements, which makes it easier for developers to use and modify them. Therefore, the DOM has a tree of nodes. A tree refers to the Data Structures & Algorithms concept that allows developers to perform operations efficiently without taking the traditional slow routes.
However, that's not the concept here. We only borrow the tree diagram and a few other topics from DSA. Let us dive in.
✉️ Listen Up!

I've been working on a book project for quite a while. I'm writing
articles, like the one you're reading, and Twitter threads to help
people while growing my audience for free. I request you fill
out a form about AI replacing humans to help me customize my products
for you. I need your opinion, and it matters a lot to me.

https://afankhan.com/humans-and-ai to fill out the form.

It's on Google Forms.
The tree of nodes
Imagine this tree as your family tree, with your grandparents as the root, your parents as the parent nodes, and you, as the child node. And that's how it works on the Web. If a <div> element has another <p> element inside it, the DOM will represent <p> as a child node of the <div> parent node, like leaves with roots and branches in the real world.
Each leaf on the tree is an HTML element, and these leaves are called nodes. Nodes are nothing but objects in JavaScript. Thus, the tree of nodes.
Essentially, the DOM represents the entire structure of a page from top to bottom in this tree. When you modify the elements, you're altering this tree indirectly, not your source code. Therefore, it doesn't affect your source code.
Even text inside the <p> element gets evaluated in this tree. It includes everything in an HTML file. That means you can manipulate precisely everything.
We traverse or travel through these nodes indirectly from one to the other to access specific elements. When creating complex applications, these traversals become difficult. Therefore, understanding DOM is crucial as it defines relationships between multiple nodes.
Let us take code from an HTML file as an example to understand this DOM tree and how to use it.
<!DOCTYPE html>
<html lang="en">
<head>
<title>CrackJS Article — What is the DOM? How does it work?</title>
</head>
<body>
<h1 class="student-name">Liam Hoffman</h1>
<p class="student-achievements">None</p>
</body>
</html>
As you can see, the HTML code is in a hierarchical and nested order. Each element gets placed inside the other. Even the DOM tree works in the same way. Every leaf has a specific parent node, and so on. They are nested inside each other.
However, if you notice, the <html> element doesn't have a parent node. Right? Then does that mean it is the root node? No. The Document object that I cited earlier is the root node and the <html> element is a standard parent node with children nodes, such as <head> and <body>.
Let's visualize it with a flowchart.
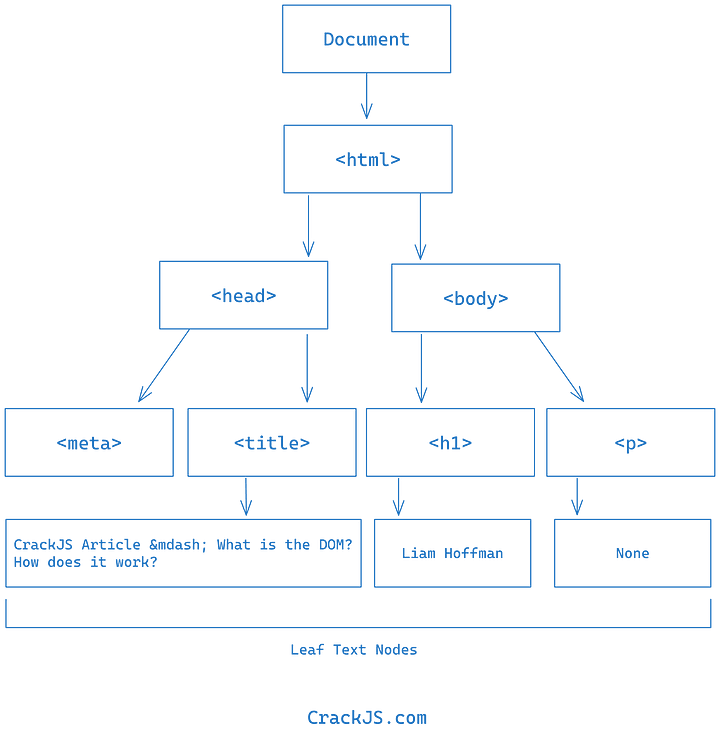
The tree begins from the root, which is the Document object. The Document object represents the entire HTML page, including the <html> element or any webpage loaded in the browser. It serves as an entry point to the DOM tree. Later, we will learn methods that will allow us to select HTML elements, and those methods are a part of this Document object.
The Document object contains the <html> child elements, which hold two more child elements. These two child elements are crucial for any web page. They are the <head> and <body> tags. Inside them, we have individual content-based tags, such as the <title>, <h1>, etc. As the DOM tree represents the entire structure, it creates nodes for plain text inside HTML elements.
According to Wikipedia, the DOM tree also consists of attributes, such like the href. However, I excluded them from this diagram for simplicity purposes. The HTML attributes do not directly participate in the DOM tree. However, they are a part of it as nodes. We can only access them using their respective parent node, like the <a> element for href.
Each node can have multiple child nodes but only one parent node. If you remove the parent node, it also eliminates the child elements, which is a drawback. The parent node wraps its children nodes.
When you inspect a website and delete or modify paragraphs, you essentially delete or alter a node in this tree. And when you delete a div or parent node, you automatically delete the child nodes.
Besides child nodes, we also have sibling nodes. For example, <h1> and <p> are siblings, <head> and <body> are siblings, etc.
Even comments in our code are considered nodes in the DOM tree. If we want to access the HTML elements, we use this tree, visualize elements, cherrypick them, and use them.
Although, do not worry. JS does not require us to write code that sequentially travels through each parent element to access a child element. We have methods to access HTML elements in the Document object.
When you try to access an HTML element, JS returns an object. It does that because an HTML element is a node in the DOM tree. And a node in JavaScript is an object with multiple properties like text value, attribute values, class names, etc. You try to access a node of the DOM and receive an object because every node in JS is an object.
We can access them directly using the Document object as the entry point to access any child element, including the buried <p> element in the tree with a class name and Document methods.
But what if we want to witness the DOM tree in an HTML page live through our extremely precious eyes?
The Elements tab
Programmers don't get access to the proper DOM tree structure and cannot use the complex DOM tree to understand their code. Therefore, the browser makes it simple for us by presenting the same tree more easily.
And it does that through the "Elements" tab in the Developer Tools (F12).
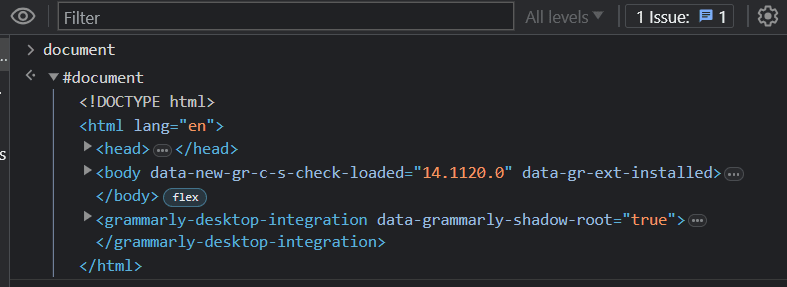
Additionally, you can access the DOM directly through the browser by simply typing "document" inside the console. We use this for only debugging purposes. Otherwise, we use the "Elements Tab."
Not to mention, this is not a pure DOM tree. It looks precisely similar to the source code. To visualize your HTML code as a real DOM tree, you must use a DOM Visualizer.
Since the Document is an object, it also has properties. And these properties are usually child nodes of other parent nodes, like the text node of
parent node, which has another parent node, and the loop continues. Even this text is a node.
We can access the body, head, and other default elements directly.

We can use further use the document.body property to modify the styles of our page dynamically, but I don't suggest using that property. I first make classes in CSS and apply them to HTML elements dynamically to maintain good code. However, if we want to access tags like <p> tag or <h1>, we use querySelector(), querySelectorAll(), etc.
So, let's try to understand these methods using an example or story throughout this article.
Imagine your school is trying to reach you on a Sunday afternoon. They can't reach out to you directly. Even if they could, they would instead let your parents know first, as this call marks a surprise for achieving an A+ grade in HTML & CSS.
Therefore, they reach out to your parents (root/parent nodes) to break the news to you (child node). In our case, we represent the school. We are the school. So, we'll reach out to the root node (Document) to access the child node <p>, and convey our message. Let's see how we can do this in code.
How to access these elements through DOM?
We will use the querySelector() method inside the Document object with the combination of a class name to access the <p> or any other HTML element. Each element or node in the DOM tree gets represented as an object with properties and methods.
Hence, we can attach methods like querySelector() because these nodes are objects. It is like asking your younger brother to access the unusual cabinet in the kitchen filled with chocolates to bring some of them for you on a silver platter.
The querySelector() method allows us to find elements in an HTML page through the DOM tree and returns the HTML element. Furthermore, we can then modify this element to our requirements.
Besides, a class name assigns a unique address to any HTML (child or parent) element. We use classes to find HTML elements and give CSS styles. It creates a win-win situation. We can use an ID, but that is a bad practice. Each HTML element must have an ID or a class. Otherwise, it becomes difficult for developers to pick those elements in JS or CSS.
According to our example, you have achieved a shiny new A+ grade because I, as the authority of the school, gave you that award. But the website currently shows "None" achievements next to your name, Liam Hoffman. So, let us try to modify that.
We will not modify the source code. Instead, I will revise the DOM tree, which renders the website dynamically through JavaScript with precisely a few lines of code. You must create a separate JS file to use the JS code in this article. Each snippet is a continuation of the previous one.
"use strict";

const studentAchievement = document.querySelector(".student-achievements");
studentAchievement.textContent = "A+ Grade in HTML & CSS";
We selected the <p> element using the querySelector() method with its class named "student-achievements." As the querySelector() method is not an independent function, we must attach it to the Document object using the dot notation.
I saved the HTML element inside a variable called studentAchievementto use it later. I prefer saving everything instead of attaching hundreds of methods in one line.
After storing the element, I assigned a new value using the textContent property, which modified the current text inside the tag. In our case, the <p> held "None" inside it. So, we replaced that with "A+ Grade in HTML & CSS" without reluctance.
For your reference, the textContent allows us to access the text inside a particular element at that moment.
When we alter the DOM tree, it modifies the website automatically and doesn't change the source code in the HTML file. It changes the DOM tree in the browser when the HTML & JS gets rendered in the memory of the user's machine.
The browser will overwrite the "None" in the DOM tree with your new achievement but not in the source code. However, the achievement will not revert to "None" when you reload the page, and it will always stay there till the JS file remains connected and continues to communicate with the DOM tree provided by the browser.
Press CTRL + U or right-click on the website and view the source code of the website. It hasn't changed, but the website appears different because the DOM and the HTML code in the source are different.

By the way, I had to create an external JS and CSS file to get the above result, and I modified the original HTML file. However, I won't make a new flowchart here to demonstrate the new tree. I want you to illustrate it yourself inside your head (I meant your mind, not the
).The Notion document at the end of this article contains the GitHub repository for the entire code.
How to identify the type of a node?
We can check the node type by using a property called nodeType. For instance, if I want to check the node type of "Liam Hoffman", I can use the following code.
const studentName = document.querySelector(".student-name");
console.log(studentName.nodeType); // Output: 1
The nodeType property returns various values like 1 represents an element node, 2 represents an attribute node, 3 represents a text node, and so on. The list of these constants is on the MDN website.
If we want to access the currently active element on the website, we can precisely type $0 in the console to find out. The browser always holds the presently highlighted or active tag and helps us in debugging.
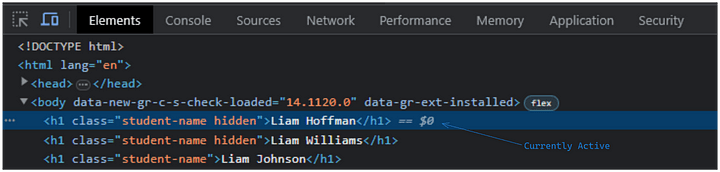
While you keep that element active, go to the console and type $0. You'll get the HTML element extracted from the DOM tree. And then, you can further perform operations on it to modify or debug.

You can even pick comments. I added one with my name in the HTML file. I highlighted the HTML comment node in the same way. Let me try to access it.


Now, back to the Liam Hoffman example. What if there are multiple elements with the same class name? Or what if we have more than one Liam in our class? Well, then we use querySelectorAll() method.
querySelectorAll()
The querySelectorAll() method accesses and retrieves all the elements with the same class name, id, or another identifier. It creates a collection of HTML elements that equalled the identifier or criteria. The array is called a NodeList.
It allows us to select all the nodes with the same child text nodes in an array. Each element in the NodeList represents an individual HTML element with the same class name or any other common identifier. When I talk about identifiers, I'm not talking about variables. I'm talking about datasets, class and id names, etc.
There can't be multiple people with the same roll number, but what about their names? Let's create two more paragraph elements in the same HTML file indicating the presence of two additional Liams in the class.
<!DOCTYPE html>
<html lang="en">
<head>
<meta charset="UTF-8" />
<meta name="viewport" content="width=device-width, initial-scale=1.0" />
<title>CrackJS Article — What is the DOM? How does it work?</title>
</head>
<link rel="stylesheet" href="styles.css" />
<body>
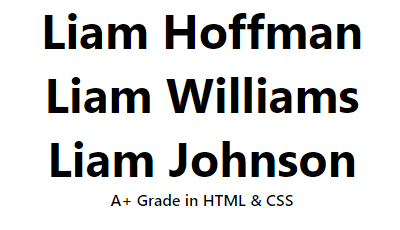
<h1 class="student-name">Liam Hoffman</h1>
<h1 class="student-name">Liam Williams</h1>
<h1 class="student-name">Liam Johnson</h1>
<p class="student-achievements">None</p>
<script src="dom.js"></script>
</body>
</html>
Now there are three Liams in our class. What if I want to select Liam Johnson? The querySelector() method will return Liam Hoffman because that is the first element with the student-nameclass. However, I want Liam Johnson.
JS always picks the first element whenever we get elements with identical properties, such as class names. Therefore, we will use the querySelectorAll() method.
const studentNames = document.querySelectorAll(".student-name");
console.log(studentNames);
That returns a NodeList, an array of all the HTML elements within the Document root or DOM tree that matched specific criteria.
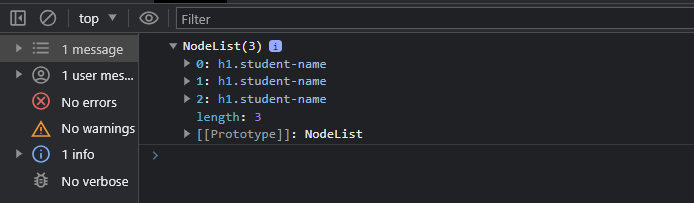
Since it is an array, we can use the bracket notation to access Liam Johnson or the textContent proper for a better approach.
// Approach 1

console.log(studentNames[2].textContent); // Output: Liam Johnson
However, we don't always know the index or order in which an element gets placed. In the real world, I will probably not know if Liam Johnson is in the 2nd Index of the NodeList. Therefore, I'll use the second approach.
// Approach 2

studentNames.forEach((student) => {
  if (student.innerText === "Liam Johnson") {
    console.log(student.textContent);
  }
}); // Output: Liam Johnson
I attached a forEach loop that goes through the HTML element present in the NodeList. As the NodeList is an array, we must use a loop to iterate through each HTML element.
The if-statement inside the loop checks the innerTextproperty value of each element, which is the fancier version of textContent for DOM Nodes, and will return the node that contains the "Liam Johnson" text.
We must use textContent and innerText individually because the DOM tree separates the text inside elements into their respective text nodes. When we use innerText, it only returns the text node inside that specific element.
And when we use textContent, it returns the text of its children elements together. Take the following StackOverflow explanation as another example.
https://stackoverflow.com/a/35213639
Once we get the HTML element, we will use the textContent property to get his name and log it to the console. However, now there are three names, and I only want Liam Johnson there.
We learned how to filter Liam Johnson amongst the other two names and print it to the console, and now let's use the same strategy to remove the extra two names.
I'll write some code in the loop itself that will modify these elements and only make the tag visible that has "Liam Johnson." And this is where we use CSS.
By the way, there are more DSA-driven solutions to going through a database of such names. But this is a simple demo. I won't get into that.
studentNames.forEach((student) => {
  if (student.innerText !== "Liam Johnson") {
    student.classList.toggle("hidden");
  }
});
.hidden {
 display: none;
}
The loop will iterate through each element present in the NodeList. Whenever it finds a student whose name is not "Liam Johnson," It will assign a new class named hidden, which has the display: noneproperty.
Eventually, it will hide the student element and virtually remove it. It ultimately makes "Liam Johnson" appear without any other student.

Wolla! We only have Liam Johnson with the "A+ Grade in HTML & CSS." Although we utterly stole the achievements of one student and passed them to another, that's fine.
Now, let us add a button to our website that switches the achievements of Liam Johnson whenever we click that button.
Event Listener
We will use the addEventListener() method to do that. It allows us to look out for something specific that a user does. For instance, if the user clicks on an arrow icon, the event listener registers that behaviour or interaction with certain tags and executes specific lines of code as a response. In most cases, a dropdown menu would appear.
If the user clicks on this image-based toggle, the event listener will catch that action, give us the details through the e object, and use those details to perform something.
<!DOCTYPE html>
<html lang="en">
<head>
<meta charset="UTF-8" />
<meta name="viewport" content="width=device-width, initial-scale=1.0" />
<title>CrackJS Article — What is the DOM? How does it work?</title>
</head>
<link rel="stylesheet" href="styles.css" />
<body>
<h1 class="student-name">Liam Hoffman</h1>
<h1 class="student-name">Liam Williams</h1>
<h1 class="student-name">Liam Johnson</h1>
<p class="student-achievements">None</p>
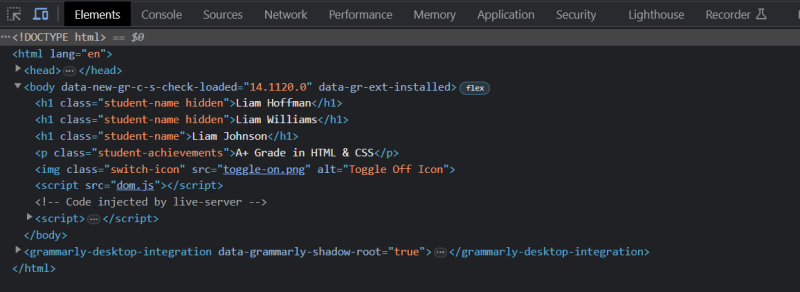
<img class="switch-icon" src="toggle-off.png" alt="Toggle Off Icon" />
<script src="dom.js"></script>
</body>
</html>
I am not using the default HTML button. Instead, I'm using an image of a toggle. Whenever the user clicks on this image, it should turn the toggle to green from black and vice versa. Basically, I will replace the currently disabled toggle image with another enabled toggle image using JS.
const switchIconImg = document.querySelector(".switch-icon");
console.log(switchIconImg);

switchIconImg.addEventListener("click", (e) => {
  if (e.target.getAttribute("src") === "toggle-off.png") {
    e.target.src = "toggle-on.png";
    studentAchievement.textContent = "A+ Grade in HTML & CSS";
  } else {
    e.target.src = "toggle-off.png";
    studentAchievement.textContent = "None";
  }
});
I added one image element in HTML with the file path or source of the image that contains the disabled state of the toggle button and selected that element in JavaScript with the switch-iconclass. Furthermore, I attached an event listener using the addEventListener() method.
So, once a user clicks the image, JavaScript instructs the browser to do something. In our case, JavaScript will change the path of the img element from "toggle-off.png" to "toggle-on.png" and vice versa. I have two images, and I'm alternating their source based on the current state of the imaginary toggle button.

I cleverly modified the image source whenever the user clicked the image. The image path changed repeatedly from "toggle-on.png" to "toggle-off.png" whenever the user clicked it. Along with that, I changed the achievement of Liam Johnson from "None" to "A+ Grade in HTML & CSS."
By default, it was "None." And when a user pressed the toggle button, it would show "A+ Grade in HTML & CSS." Isn't that simple? I'll give you time to understand that code.
There are many ways to use the DOM tree. Primarily, we use it to access HTML elements. However, there are many methods available with the Document object.
I went through a few of them, and tons of other methods exist to access the siblings of a child node, parent nodes, and text nodes by giving JS a clue of where it might be, and so on.
Before I conclude this article, let me give a small history lesson about DOM. I love the history and backstory of JavaScript and the Web.
A small history lesson
JavaScript was released in the 1990s through Netscape to make websites more dynamic. Netscape and other corporations were trying to shift from static websites to dynamic functional ones. Not to mention, Netscape had its famous browser - Netscape Navigator. Therefore, the DOM came incorporated with the history of JavaScript.
In the late 1990s, the Legacy DOM or DOM level 0 with minimum standardization didn't allow selecting various elements. We could only choose specific limited elements, such as form input elements, and we couldn't pick them directly using the Document object and its methods as a property.
We had to write a Hierarchical Path from the Document object down to the element. For Instance, document.body.div[0].h1.
Do you remember Dynamic HTML (DHTML)? Microsoft and Netscape began supporting DHTML in 1997, allowing developers dynamically modify a fully loaded and parsed HTML page. Even though browsers parted ways, specifically Microsoft and Netscape, when building the extensions for DHTML, the W3C brought them together.
The extensions and websites became incompatible on different browsers when they parted ways. Developers had to code differently for each browser. So, when JS received a similar standard specification sheet through ECMAScript, the World Wide Consortium (W3C) decided to standardize the DOM. We reached Level 1 of DOM, and changes kept incrementing since then.
Nevertheless, DOM has marvellous capabilities today. We can perform any dynamic operations with it. We can create websites like Twitter, Notion, and much more that were not possible back then. We must cherish these moments.
Summary
DOM stands for Document Object Model. It represents an HTML document or webpage. It creates a DOM tree or an HTML/XML document whenever we write HTML markup code. Our HTML code signifies the structure of our website with the content. However, the browser loads and parses that structure with the help of DOM to deliver a working website.
Layout Engines parse an HTML markup code to DOM. WebKit and Gecko are some of the engines within browsers like Google Chrome, Opera, Safari, and Firefox for parsing purposes. Parsing represents analyzing the markup code to translate it to proper instructions and make a website.
HTML helps describe and structure the website. XML stores and transfers that structural data to the DOM. XML does not represent a document. It only speaks for the data given to it by the HTML markup code.
It presents the data as documents, and DOM manages that data to parse a functional website.
The Object in DOM indicates that each node in the DOM tree is an object, including the Document. All of this together builds a model. It helps us understand how everything gets put together. Imagine blueprints of buildings as an example for other real-world models to put things together, including Ikea directions, floor plans, etc.
The browser reads the structure of our code and builds a DOM tree. It is a nested tree containing parent, child, sibling, text, and other nodes. Each element gets represented as a node in the tree as an object with properties and methods. Therefore, we can call methods like querySelector() and others on them.
People also call the Document object an interface because it provides a boilerplate of methods and properties of each object or node in the tree. You will understand this if you study OOP.
We can cherrypick these HTML elements in distinct ways using unique methods and play around with them. We can modify and style them or add new HTML elements to the DOM tree. We can perform various operations with it, especially on front-end applications.
Don't confuse yourself, though. HTML tags, HTML elements, and nodes are the same. We call them nodes because trees in Data Structures & Algorithms contain the same tree-like structures. Therefore, for simplicity purposes, developers call them nodes.
A DOM tree consists of the Document node (root), child nodes, attributes, text content nodes (#text), comment nodes (#comment), image nodes (#img), etc. And these nodes are simply a representation of each line in our code.
Remember that text nodes are leaf nodes. In DSA, leaf nodes represent the last nodes of a tree. They cannot have further child nodes.
Document object is not independent. It is a property of the Window object. JavaScript uses the DOM API and represents nodes as objects to manipulate information.
Also, DOM is a unique feature of JavaScript and a significant reason for its dominance. Many languages like WebAssembly tried to adapt it but couldn't.
Not to mention, DOM does not remain restricted to JS.
It is cross-platform. We can also use other languages to take the benefits of DOM because there's a regulatory specification/standard sheet allotted to every browser. Originally by the W3C, and then taken over by WHATWG.
Now, it's time you play around with the DOM. Explore the other methods to select further types of nodes from the tree.
Pick, modify, and use them to build solutions that solve real-world problems.
By the way, I am writing a book called CrackJS, which is based on and covers the fundamentals of JavaScript. If you want to learn more about JS, follow me on this journey of writing this book with these articles trying to help developers worldwide.
If you want to contribute, comment with your opinion and if I should change anything. I am also available via E-mail at hello@afankhan.com. Otherwise, Twitter (X) is the easiest way to reach out - @justmrkhan.
The notion document containing the resources/sources used to write this piece with drafts and an extra section - https://crackjs.com/dom-explanation.

Top comments (0)