
I recently finished working on my portfolio site abdulhamid.et, this blog is dedicated to one of the issue I was facing while trying to implement my site on a Next.JS environment. Something to note here is that, this was not the first time I was facing this issue, the same exact thing happened when we were trying to implement our podcast Zemach FM's new site.
Disclaimer
- This guide assumes that you already have a free Netlify subdomain site.
- Some cPanel hosting providers give access to some resources and disable some resources by default. This tutorial is designed with the assumption that you have
Domain,SubdomainandZone Editoraccess from your hosting provider.
The core problem is how do you deploy a JAM stack website with your own custom domain from Ethiopia. Recently some web-hosting services have been coming up here and there in Ethiopia. But All the services I have run in to use C-Panel hosting. This will solve the domain name purchasing issue in our Ethiopia, but hosting sites that are not static or not Wordpress on cPanel is going to be painful. Some of the providers claim they have Node.JS support but they are full of bugs with no support to CI/CD integrations, you will have to be willing to upload your code base every time you make a change. This is not scalable. There might be a way to implement automatic deployment right from your repository, but I am not aware of it currently. Plus I am sure you will all agree with me that cloud hosting services like Netlify and Vercel have much superior response time compared to most of the hosting providers that we currently have access to in Ethiopia.
Of course the main reason we can't use paid services outside Ethiopia is because it's impossible to make international payments online from Ethiopia. But thanks to Netlify, I was able to deploy my portfolio with their free plan.
So I have a custom domain and my Next.JS site on netlify with it's own automatic build and deploy set up. What can be done to integrate the two separate services ?
That's where the cPanel's Zone editor and Netlify's custom domain come in to play. Let's first see how we can point our root domain from cPanel to our Netlify site instance.
- First navigate to the
Zone Editorfrom the home page of your cPanel.
- From there click
Manageon your main domain. - After the page finishes loading there will be two records with your root domain names, at the top of the list. Change their settings according to the screenshot below. The
Arecord will point to Netlify's default load balancer IP address,75.2.60.5. Change the second record to anMXtype and fill in your netlify site default subdomain. You can find your netlify default subdomain at app.netlify.com > Your Web App / Domain > Domain Settings
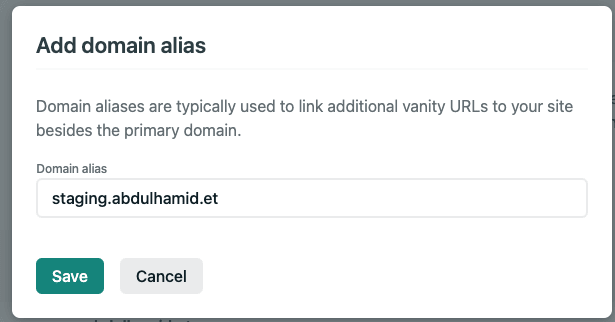
- Go to your netlify dashboard click on the site you want to configure > Domain Setting > Add Domain Alias. This will open a setting modal. On the modal fill in your new domain and save your changes.


- After that finishes saving, you can set the root domain as a primary domain. Just click on the
optionsdropdown next to the newly added domain.
Pointing a cPanel Subodmain to Netlify
If you are pointing a subdomain to your netlify instance, the process can take place as follow.
- Create the subdomain by clicking on the
Subdomainsbutton in your cPanel Domains section.
- Give your subdomain a name and leave the root directory the default value of the form.

- Go back to the previous
Domainssection at the home page of cPanel and navigate toZone Editor. From there clickManageon your main domain. - Find your subdomain on the list that is displayed. You will probably find two version of your subdomain. one with the prefix
wwwand one without.
Remove the one with the
wwwprefix and edit the main subdomain just like it's shown below. Change the record type toCNAMEand the record to your netlify's default subdomain. You can find your netlify default subdomain at app.netlify.com > Your Web App / Domain > Domain Settings.

Finally go to your netlify dashboard click on the site you want to configure >
Domain Setting>Add Domain Alias. This will open a setting modal. On the modal fill in your new subdomain and save your changes.
Now if your DNS configuration was correct your new domain and subdomain are good to go.
Note: You might need to wait a few minute until your sites SSL kicks in. Until then you can surf your site in un-secure mode.

Top comments (0)