Note: This is a syndicated post. If you'd like to, you can view the original on my dev blog.
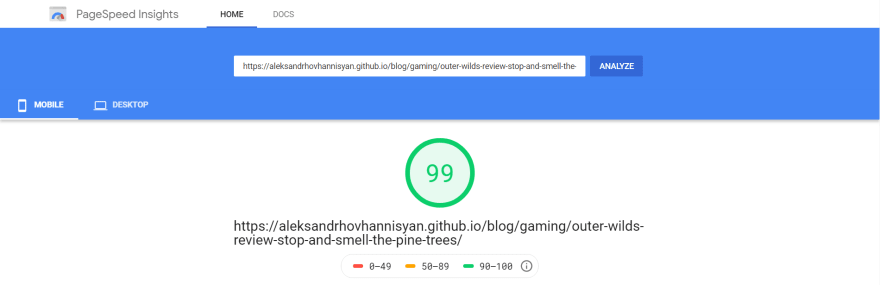
Run the blog posts on my personal website through Google's PageSpeed Insights or Cloudinary's Image Analysis tool, and you'll find that most of them (with the exception of a few that load iframes) get around 99 on mobile and 100 on desktop. Some of these are packed full of images.
Why does that matter? Because speed is an important factor to consider alongside SEO to improve your site's ranking. Google considers page load speed when determining whether your site provides a positive experience for new and returning visitors. If your site is using too much data—by loading expensive images, iframes, or scripts—your page will load slowly, and users will be more likely to ditch your site in favor of one that doesn't slow them to a crawl.
It's only when I began running my posts through the former tool, PageSpeed Insights, that I discovered a useful optimization: using the WebP image format. Here's how Google describes WebP:
WebP is a modern image format that provides superior lossless and lossy compression for images on the web. Using WebP, webmasters and web developers can create smaller, richer images that make the web faster.
Google even provides a useful command-line tool, cwebp, that allows you to convert images from other formats—like PNG, JPEG, and so on—to WebP. In this post, we'll consider Jekyll specifically and take a look at how you can improve your page load speed by using the WebP image format with just a single include.
Getting Started with WebP in Jekyll
Now, you actually have two options here:
1. Use a plugin
The jekyll-webp plugin generates WebP versions of your images and serves them on demand whenever they're requested; it does not create actual WebP image files under your assets folder.
The downside to this approach is that some plugins—including this one—are not supported by GitHub Pages, so you'll have to run jekyll build and push your _site/ to GitHub, instead of pushing your source.
2. Use Google's CLI utility
Install the cwebp CLI utility yourself and use it to manually convert images to WebP as you add them to your site. This is my preferred option, and it's the one that I'll use in this blog post.
To get started, head on over to Google's installation instructions page for the libwebp executables and libraries. The process is actually really straightforward.
Note: The installation will also come with
gif2webp, which can be used to convert GIFs to a WebP equivalent.
Converting an Image to WebP Format with cwebp
Assuming the previous step worked just fine for you and that cwebp is now accessible from the command-line, it's time to try it out on an actual image. Here's the general syntax for the command:
cwebp [options] input_file -o output_file.webp
You can specify a number of options, including the compression factor for converting to WebP; this dictates the quality of the resulting image. By default, this factor is set to 75%.
You can learn more about the available options in Google's documentation for cwebp.
For example, let's say you have an image under /assets/img/posts. To convert that to WebP, simply switch to the target directory and execute this command:
cwebp img.png -o img.webp
And that's it! Here's a quick demo of that in action:
You can ignore the output from the tool, as it's not too important.
In this case, notice that the image size was cut in a half—from 16 KB to 8 KB—without a significant loss of quality.
Note: You don't have to switch to the target directory to run the command. You could also just feed it a relative or absolute path from any directory. That said, I prefer to run it from the target directory to make my life easier.
How Do You Use the WebP Image Format?
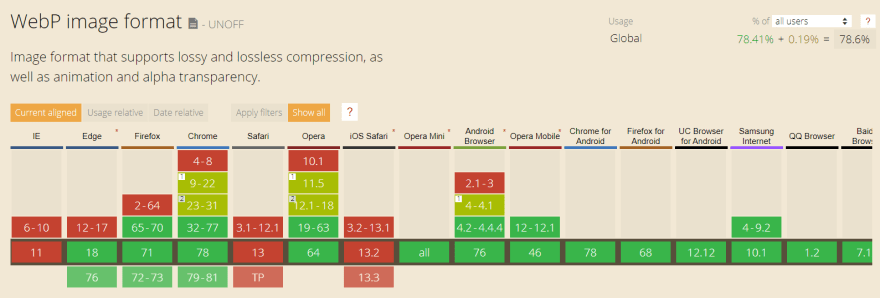
The good news is that browser support for WebP is high, excluding Internet Explorer (of course 😒) and Safari:
Assuming you want to cover all your bases and ensure that your images are displaying properly, you can use a picture element with a source for the WebP version and a backup img for the regular format:
<picture>
  <source srcset="/path/to/image.webp" type="image/webp">
  <img src="/path/to/image.jpg" alt="Your alt text" />
</picture>
Basically, browsers that don't support WebP will fall back to the plain old img element, while those that do support WebP will use the source element. Awesome!
Except... Do we really have to copy-paste this every time we want to create an image? We also want to avoid having to specify an absolute path to our image every single time we want to insert one in a blog post.
Jekyll Includes and Liquid to the Rescue
Time to make this reusable! Create a file named _includes/picture.html and add this markup:
{% assign img = include.img %}
<picture>
    <source type="image/webp" srcset="/assets/img/posts/{{ page.slug }}/{{ img }}.webp" >
    <img src="/assets/img/posts/{{ page.slug }}/{{ img }}.{{ include.ext }}" alt="{{ include.alt }}" />
</picture>
Let's try to understand this part specifically:
<source type="image/webp" srcset="/assets/img/posts/{{ page.slug }}/{{ img }}.webp" >
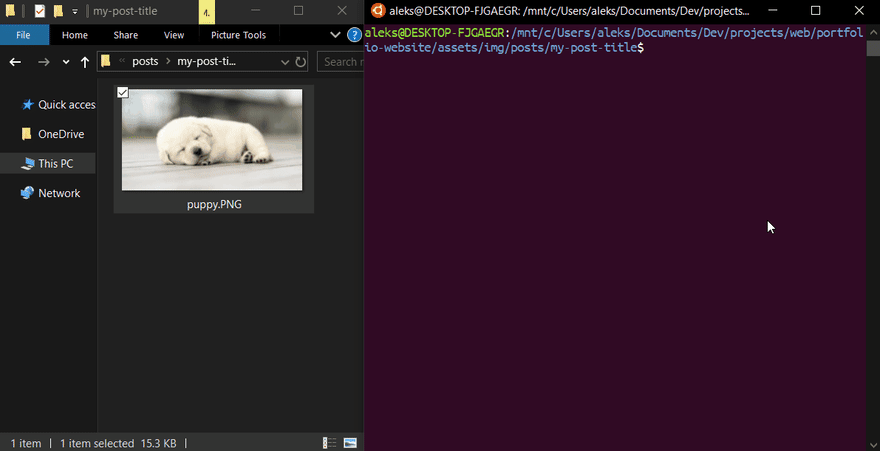
Before I explain why this works, you need to know how I like to structure my blog:
- All blog post images are under
/assets/img/posts/. - Under that directory, each post has its own folder whose name matches the slugged version of the post's title.
Here's a screenshot to make that clearer:

That allows us to get away with this simple and legible include:
{% include picture.html img="my-image" ext="png" alt="My alt text" %}
Notice that we don't have to worry about explicitly stating the path! That will be filled in by Liquid when it goes to evaluate {{ page.slug }}. To top that off, we get to take advantage of WebP behind the scenes, with little effort beyond converting the images.
And That's It!
Of course, it would be even more convenient if there were a Jekyll plugin that generates output files from cwebp and dumps them in your assets folder. That way, you don't have to use the CLI tool manually.
If you wanted to, you could automate this with a script that converts all images in a directory to WebP using the installed CLI. In the process of writing this blog post, I went ahead and created that script.
One final improvement is to add lazy-loading to your images with JavaScript to ensure that your content loads even more quickly.
I hope you found this helpful!

Top comments (0)