
In part 2 of this series, we made progress with the chat app by adding email authentication using the real-time auth service from Firebase. This ensures that we have a system in place to authenticate users.
In part 3, let's extend our progress by creating and storing chat rooms in real-time using Firestore data storage, provided by the Firebase. We'll continue to explore different tips and best practices for using react-navigation. For example, we'll create a modal screen and expand the home stack created in the previous post.
How to share common header options styles using screenOptions
Let us start with a simple yet a very common technique to modify header bar options across various screens in a stack navigator. This technique is a common practice that you will find using yourself with react-navigation.
Start by modifying the header in the home stack such that any route that is wrapped by HomeStack navigator is going to have a similar background color, header tint color, and font size.
This is a common practice to configure the header bar and share style properties among different routes in the same stack navigator.
Open src/navigation/HomeStack.js file and add a screenOptions prop to Stack.Navigator.
export default function HomeStack() {
  return (
    <Stack.Navigator
      screenOptions={{
        headerStyle: {
          backgroundColor: '#6646ee'
        },
        headerTintColor: '#ffffff',
        headerTitleStyle: {
          fontSize: 22
        }
      }}
    >
      <Stack.Screen name='Home' component={HomeScreen} />
    </Stack.Navigator>
  );
}
Go back to the simulator and you are going to get the following result.

Add a separate stack navigator for modal screen
In this section, you are going to create a modal screen that will allow the user in the app to create a new chat room. Later in this tutorial, the name of the chat room entered from this screen is going to be stored in the Firestore collection.
A modal screen displays the content that temporarily blocks interactions with the main view. It is like a popup and usually has a different transition in terms of opening and closing of the screen. This mode of the screen is generally used to display one specific piece of information.
Here's a flowchart to help visualize the navigation flow we're trying to achieve by the end of this section.

Start by creating a new screen file called AddRoomScreen.js inside src/screens directory with the following content.
import React from 'react';
import { View, Text } from 'react-native';
import FormButton from '../components/FormButton';

export default function AddRoomScreen({ navigation }) {
  return (
    <View style={{ flex: 1, justifyContent: 'center', alignItems: 'center' }}>
      <Text>Create a new chat room</Text>
      <FormButton
        mode='contained'
        title='Close Modal'
        onPress={() => navigation.goBack()}
      />
    </View>
  );
}
Right now, focus adding this modal screen to the Home stack navigator rather than its contents.
Also, add a temporary button to open the modal screen in the HomeScreen.js file.
import React, { useContext } from 'react';
import { View, StyleSheet } from 'react-native';
import { Title } from 'react-native-paper';
import { AuthContext } from '../navigation/AuthProvider';
import FormButton from '../components/FormButton';

export default function HomeScreen({ navigation }) {
  const { user, logout } = useContext(AuthContext);

  return (
    <View style={styles.container}>
      <Title>Home Screen</Title>
      <Title>All chat rooms will be listed here</Title>
      <Title>{user.uid}</Title>
      <FormButton
        modeValue='contained'
        title='Logout'
        onPress={() => logout()}
      />
      <FormButton
        modeValue='contained'
        title='Add Room'
        onPress={() => navigation.navigate('AddRoom')}
      />
    </View>
  );
}
Now open src/navigation/HomeStack.js file. In order to keep the modal as a separate route from other home stack routes (such as HomeScreen), let us create two new stack navigators in this file.
Start by importing the modal screen with the rest of the routes and create two new stack navigator instances. You can give a custom name to each instance.
// ... rest of the import statements
import AddRoomScreen from '../screens/AddRoomScreen';

// create two new instances
const ChatAppStack = createStackNavigator();
const ModalStack = createStackNavigator();
From the snippet, the ChatAppStack is going to contain those screens routes that are do not require the use of a modal screen and focus only on the chat app features.
function ChatApp() {
  return (
    <ChatAppStack.Navigator
      screenOptions={{
        headerStyle: {
          backgroundColor: '#6646ee'
        },
        headerTintColor: '#ffffff',
        headerTitleStyle: {
          fontSize: 22
        }
      }}
    >
      <ChatAppStack.Screen name='Home' component={HomeScreen} />
    </ChatAppStack.Navigator>
  );
}
The Modal stack is going to wrap both the ChatAppStack and the modal screen as routes. Modify the exported HomeStack as below. Make sure to set the mode of ModalStack.Navigator to modal and headerMode to none.
export default function HomeStack() {
  return (
    <ModalStack.Navigator mode='modal' headerMode='none'>
      <ModalStack.Screen name='ChatApp' component={ChatApp} />
      <ModalStack.Screen name='AddRoom' component={AddRoomScreen} />
    </ModalStack.Navigator>
  );
}
Go to the simulator. You are going to find the Add room button on the home screen as shown below.

Click on the button and notice the transition when the modal screen pops up.

How to add an icon in the header bar
The modal stack is working as per the requirement. But the way the user would navigate from the home screen to modal is not by clicking a button in the center of the home screen. This action is going to be done by clicking an icon button from the header.

Luckily, the react-navigation library provides props for us to implement this action without any hassle. Import IconButton from react-native-paper UI library inside the file src/navigation/HomeStack.js.
// rest of the imports
import { IconButton } from 'react-native-paper';
Then add an options prop with a function such that you are able to pass navigation prop reference. Add the following code to the HomeScreen route.
<ChatAppStack.Screen
  name='Home'
  component={HomeScreen}
  options={({ navigation }) => ({
    headerRight: () => (
      <IconButton
        icon='message-plus'
        size={28}
        color='#ffffff'
        onPress={() => navigation.navigate('AddRoom')}
      />
    )
  })}
/>
Also, remove FormButton in HomeScreen.js you create in the previous section.
Here is how the home screen in the simulator looks like after this step.

Complete the modal screen
Right now the modal screen just displays a line of text and a close button but the real functionality this screen has to provide is to allow the user to enter the name of the chat room using an input field. Then, using a form button, add the chat room name in a Firestore collection.
Open AddRoomScreen.js and start by modifying the import statements.
import React, { useState } from 'react';
import { View, StyleSheet } from 'react-native';
import { IconButton, Title } from 'react-native-paper';
import FormInput from '../components/FormInput';
import FormButton from '../components/FormButton';
Then, to add a chat room, define a state variable called roomName inside a functional component AddRoomScreen.
To modify the JSX returned from this component. Make sure to add a close button at the right corner of the screen and using custom components you can add the input field as well as the submit button.
export default function AddRoomScreen({ navigation }) {
  const [roomName, setRoomName] = useState('');
  // ... Firestore query will come here later

  return (
    <View style={styles.rootContainer}>
      <View style={styles.closeButtonContainer}>
        <IconButton
          icon='close-circle'
          size={36}
          color='#6646ee'
          onPress={() => navigation.goBack()}
        />
      </View>
      <View style={styles.innerContainer}>
        <Title style={styles.title}>Create a new chat room</Title>
        <FormInput
          labelName='Room Name'
          value={roomName}
          onChangeText={text => setRoomName(text)}
          clearButtonMode='while-editing'
        />
        <FormButton
          title='Create'
          modeValue='contained'
          labelStyle={styles.buttonLabel}
          onPress={() => handleButtonPress()}
          disabled={roomName.length === 0}
        />
      </View>
    </View>
  );
}
Do not worry about the handleButtonPress method on onPress prop for FormButton. This is going to execute the Firestore query and that is what you are going to do from the next section.
The corresponding styles of the above component are defined as below.
const styles = StyleSheet.create({
  rootContainer: {
    flex: 1
  },
  closeButtonContainer: {
    position: 'absolute',
    top: 30,
    right: 0,
    zIndex: 1
  },
  innerContainer: {
    flex: 1,
    justifyContent: 'center',
    alignItems: 'center'
  },
  title: {
    fontSize: 24,
    marginBottom: 10
  },
  buttonLabel: {
    fontSize: 22
  }
});
If you go to the modal screen, you are going to get the following result.

Here is the complete flow of the HomeStack navigator so far.

The Create button will remain disabled unless the user starts typing.
Add Firestore to the Chat app
To store messages as well as user information, let us use the Firestore data storage service from Firebase. Firestore has similarities to a NoSQL database (if you are familiar with NoSQL types).
To use the Firestore database, all you have to do is install the @react-native-firebase/firestore package and run the command to build the app again. Open up a terminal window and execute the following command.
yarn add @react-native-firebase/firestore

# do not forget to install pods for ios
cd ios / && pod install

# after pods have been installed
cd ..
Do note that, the Firestore package from react-native-firebase depends on two other packages:
@react-native-firebase/app@react-native-firebase/auth
This means that these two packages are required to install to use Firestore. For the current app, you have already installed these packages so you do not have to install them again.
The last step in this section is to rebuild the app for each OS.
# for iOS
npx react-native run-ios

# for Android

npx react-native run-android
That's it to install Firestore.
Create a collection in firestore to store chat rooms
Each chat room is going to contain x number of messages between different users. To store a chat room in the Firestore, let's create a collection called THREADS.
Start by importing firestore in the AddRoomScreen.js file.
// after other import statements
import firestore from '@react-native-firebase/firestore';
Inside the functional component AddHomeScreen add a handler method called handleButtonPress.
This method is going to have the business logic to store the name of the chat room under the collection THREADS. The unique id of each chat room is going to be created by the Firestore itself.
function handleButtonPress() {
  if (roomName.length > 0) {
    firestore()
      .collection('THREADS')
      .add({
        name: roomName
        }
      })
      .then(() => {
        navigation.navigate('Home');
      });
  }
}
Go back to the simulator and try to create a new chat room.

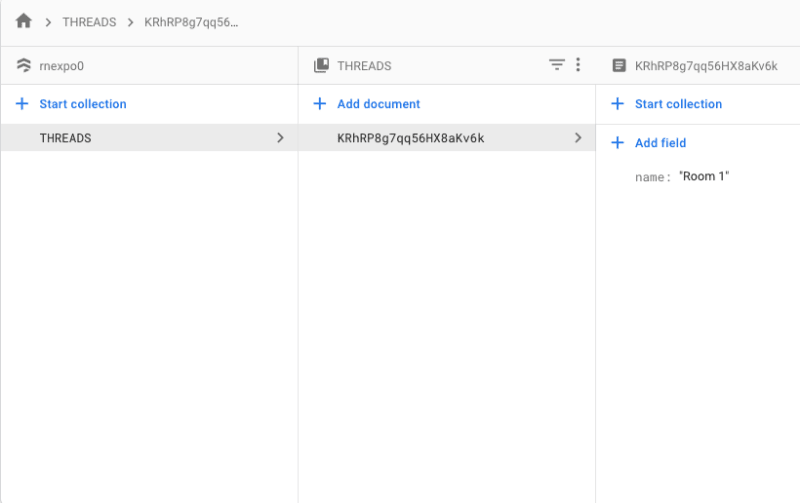
After that, go to the Firebase database console and verify if the THREADS collection has a room called Room 1 or not.
Display a list of chat rooms on the home screen
To display chat rooms from Firestore you are going to make use of FlatList form React Native. Start by adding the following the import statements inside the src/screens/HomeScreen.js file.
import React, { useState, useEffect } from 'react';
import { View, StyleSheet, FlatList } from 'react-native';
import { List, Divider } from 'react-native-paper';
import firestore from '@react-native-firebase/firestore';

import Loading from '../components/Loading';
Inside the functional component HomeScreen, define two state variables:
-
threadsthat is going to be used as the source of data for the FlatList component after the data has been fetched from the Firestore. -
loadingvariable is going to keep track of whether the data is being fetched or not.
export default function HomeScreen() {
  const [threads, setThreads] = useState([]);
  const [loading, setLoading] = useState(true);

  useEffect(() => {
    const unsubscribe = firestore()
      .collection('THREADS')
      .onSnapshot(querySnapshot => {
        const threads = querySnapshot.docs.map(documentSnapshot => {
          return {
            _id: documentSnapshot.id,
            // give defaults
            name: '',
            ...documentSnapshot.data()
          };
        });

        setThreads(threads);

        if (loading) {
          setLoading(false);
        }
      });

    /**
     * unsubscribe listener
     */
    return () => unsubscribe();
  }, []);

  if (loading) {
    return <Loading />;
  }

  // ...rest of the component
}
Using the hook useEffect in the above snippet you can query the Firestore to fetch the name of chat rooms from the collection THREADS.
When the component loads, to fetch the existing chat rooms or in other words, to read the data from the Firestore, start by declaring a unsubscribe listener to the query. This listener is going to subscribe to any updates. These updates can be new or existing chat rooms. Declaring a listener here is important because when the screen unmounts, it is important to unsubscribe from this listener.
Using the querySnapShot, you are going fetch every document or the chat thread is going to be the part of the the state variable threads. At this point, data is returned from the query, as well as a default object that contains the _id(required as unique if for each item in the FlatList component), and the name of the chat room.
Here is the complete JSX rendered by this component.
<View style={styles.container}>
  <FlatList
    data={threads}
    keyExtractor={item => item._id}
    ItemSeparatorComponent={() => <Divider />}
    renderItem={({ item }) => (
      <List.Item
        title={item.name}
        description='Item description'
        titleNumberOfLines={1}
        titleStyle={styles.listTitle}
        descriptionStyle={styles.listDescription}
        descriptionNumberOfLines={1}
      />
    )}
  />
</View>
The Divider component is a lightweight separator provided by UI library react-native-paper. Here are the styles associated with the above JSX.
const styles = StyleSheet.create({
  container: {
    backgroundColor: '#f5f5f5',
    flex: 1
  },
  listTitle: {
    fontSize: 22
  },
  listDescription: {
    fontSize: 16
  }
});
Go back to the simulator device and you are going to get the following result.

Conclusion
The main objective of this tutorial is to create and store chat room names in a Firestore cloud database collection as well as integrate the configure the Firestore in our current app. This objective has been completed among other tips and techniques to create a modal screen and share header bar modifications among different route screens.
What's Next?
In the next part of this series, we are going to explore how to integrate and use react-native-gifted-chat which is one of the most important, open source, and actively maintained library to use when building a chat app using React Native. The "out of the box" features it provides in terms of mere props are so helpful and saves a ton of development time.
You can find the complete source code for this project at this Github repo.
👉 Here is a list of resources used in this tutorial:
- Reactjs Context API
-
Firebase Authentication reference from
react-native-firebase - Getting started with stack navigator using
react-navigationv5 here
💙 To learn more about React Native, check out these resources:

Top comments (0)