
Recently, the alpha version Tensorflow.js for React Native and Expo applications was released. It currently provides the capabilities of loading pre-trained models and training. Here is the announcement tweet:

 TensorFlow@tensorflow
 Attention React Native developers and enthusiasts!
Check out the alpha release of TensorFlow.js for React Native and try out all the capabilities such as loading pre-trained models and training on device. Feedback is welcome!
Details here → goo.gle/2lwGuQh18:00 PM - 04 Sep 2019


TensorFlow.js provides many pre-trained models that simplify the time-consuming task of training a machine learning model from scratch. In this tutorial, we are going to explore Tensorflow.js and the MobileNet pre-trained model to classify image based on the input image provided in a React Native mobile application.
By the end of this tutorial, the app will look like the following:

Sidenote: Previously, I did dip my hands into Google’s Vision API to build an image classification app that determines whether a given image is a hotdog or not. If you’re interested in reading that example, please follow the link below:

Here is the link to the complete code in a Github repo for your reference.
Requirements
- Nodejs >= 10.x.x install on your local dev environment
expo-cli- Expo Client app for Android or iOS, used for testing the app
Integrating TFJS in an Expo app
To start and use the Tensorflow library in a React Native application, the initial step is to integrate the platform adapter. The module tfjs-react-native is the platform adapter that supports loading all major tfjs models from the web. It also provides GPU support using expo-gl.
Open the terminal window, and create a new Expo app by executing the command below.
expo init mobilenet-tfjs-expo
Next, make sure to generate Expo managed app. Then navigate inside the app directory and install the following dependencies.
yarn add @react-native-community/async-storage @tensorflow/tfjs @tensorflow/tfjs-react-native expo-gl @tensorflow-models/mobilenet jpeg-js
Note: If you are looking forward to using
react-native-clito generate an app, you can follow the clear instructions to modifymetro.config.jsfile and other necessary steps, mentioned here.
Even though you are using Expo, it is necessary to install async-storage as tfjs module depends on that.
Testing TFJS that it is working
Before we move on, let us test out that the tfjs is getting loaded into the app before the app is rendered. There is an asynchronous function to do so, called tf.ready(). Open App.js file, import the necessary dependencies, and define an initial state isTfReady with a boolean false.
import React from 'react'
import { StyleSheet, Text, View } from 'react-native'
import * as tf from '@tensorflow/tfjs'
import { fetch } from '@tensorflow/tfjs-react-native'

class App extends React.Component {
  state = {
    isTfReady: false
  }

  async componentDidMount() {
    await tf.ready()
    this.setState({
      isTfReady: true
    })

    //Output in Expo console
    console.log(this.state.isTfReady)
  }

  render() {
    return (
      <View style={styles.container}>
        <Text>TFJS ready? {this.state.isTfReady ? <Text>Yes</Text> : ''}</Text>
      </View>
    )
  }
}

const styles = StyleSheet.create({
  container: {
    flex: 1,
    backgroundColor: '#fff',
    alignItems: 'center',
    justifyContent: 'center'
  }
})

export default App
Since the lifecycle method is asynchronous, it will only update the value of isTfReady to true when tfjs is actually loaded.
You can see the output in the simulator device as shown below.

Or in the console, if using the console statement as the above snippet.

Loading Tensorflow model
Similar to the previous section, you can load the model being used in this app (mobilenet) is integrating or not. Loading a tfjs pre-trained model from the web is an expensive network call and will take a good amount of time. Modify the App.js file to load the MobileNet model. Start by importing the model.
import * as mobilenet from '@tensorflow-models/mobilenet'
Next, add another property to the initial state.
state = {
  isTfReady: false,
  isModelReady: false
}
Then, modify the lifecycle method.
async componentDidMount() {
    await tf.ready()
    this.setState({
      isTfReady: true
    })
    this.model = await mobilenet.load()
    this.setState({ isModelReady: true })
}
Lastly, the display on the screen when the loading of the model is complete.
<Text>
  Model ready?{' '}
  {this.state.isModelReady ? <Text>Yes</Text> : <Text>Loading Model...</Text>}
</Text>
When the model is being loaded, it will display the following message.

When the loading of the MobileNet model is complete, you will get the following output.

Asking user permissions
Now that both the platform adapter and the model are currently integrated with the React Native app, add an asynchronous function to ask for the user's permission to allow access to the camera roll. This is a mandatory step when building iOS applications using the image picker component from Expo.
Before, you proceed, run the following command to install all the packages provided by Expo SDK.
expo install expo-permissions expo-constants expo-image-picker
Next, add the following import statements in the App.js file.
import Constants from 'expo-constants'
import * as Permissions from 'expo-permissions'
In the App class component, add the following method.
getPermissionAsync = async () => {
  if (Constants.platform.ios) {
    const { status } = await Permissions.askAsync(Permissions.CAMERA_ROLL)
    if (status !== 'granted') {
      alert('Sorry, we need camera roll permissions to make this work!')
    }
  }
}
Lastly, call this asynchronous method inside componentDidMount().
async componentDidMount() {
    await tf.ready()
    this.setState({
      isTfReady: true
    })
    this.model = await mobilenet.load()
    this.setState({ isModelReady: true })

    // add this
    this.getPermissionAsync()
  }
Convert a raw image into a Tensor
The application will require the user to upload an image from their phone's camera roll or gallery. You have to add a handler method that is going to load the image and allow the Tensorflow to decode the data from the image. Tensorflow supports JPEG and PNG formats.
In the App.js file, start by importing jpeg-js package that will be used to decode the data from the image.
import * as jpeg from 'jpeg-js'
It decodes the width, height and the binary data from the image inside the handler method imageToTensor that accepts a parameter of the raw image data.
imageToTensor(rawImageData) {
    const TO_UINT8ARRAY = true
    const { width, height, data } = jpeg.decode(rawImageData, TO_UINT8ARRAY)
    // Drop the alpha channel info for mobilenet
    const buffer = new Uint8Array(width * height * 3)
    let offset = 0 // offset into original data
    for (let i = 0; i < buffer.length; i += 3) {
      buffer[i] = data[offset]
      buffer[i + 1] = data[offset + 1]
      buffer[i + 2] = data[offset + 2]

      offset += 4
    }

    return tf.tensor3d(buffer, [height, width, 3])
  }
The TO_UINT8ARRAY array represents an array of 8-bit unsigned integers. the constructor method Uint8Array() is the new ES2017 syntax. There are different types of typed arrays, each having its own byte range in the memory.
Load and Classify the image
Next, we add another handler method classifyImage that will read the raw data from an image and yield results upon classification in the form of predictions.
The image is going to be read from a source and the path to that image source has to be saved in the state of the app component. Similarly, the results yield by this asynchronous method have to be saved too. Modify the existing state in the App.js file for the final time.
state = {
  isTfReady: false,
  isModelReady: false,
  predictions: null,
  image: null
}
Next, add the asynchronous method.
classifyImage = async () => {
  try {
    const imageAssetPath = Image.resolveAssetSource(this.state.image)
    const response = await fetch(imageAssetPath.uri, {}, { isBinary: true })
    const rawImageData = await response.arrayBuffer()
    const imageTensor = this.imageToTensor(rawImageData)
    const predictions = await this.model.classify(imageTensor)
    this.setState({ predictions })
    console.log(predictions)
  } catch (error) {
    console.log(error)
  }
}
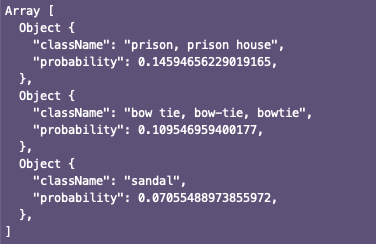
The results from the pre-trained model are yield in an array. An example is shown below.
Allow user to pick the image
To select an image from the device's camera roll using the system's UI, you are going to use the asynchronous method ImagePicker.launchImageLibraryAsync provided the package expo-image-picker. Import the package itself.
import * as Permissions from 'expo-permissions'
Next, add a handler method selectImage that will be responsible for
- let the image to be selected by the user
- if the image selection process is not canceled, populate the source URI object in the
state.image - lastly, invoke
classifyImage()method to make predictions from the given input
selectImage = async () => {
  try {
    let response = await ImagePicker.launchImageLibraryAsync({
      mediaTypes: ImagePicker.MediaTypeOptions.All,
      allowsEditing: true,
      aspect: [4, 3]
    })

    if (!response.cancelled) {
      const source = { uri: response.uri }
      this.setState({ image: source })
      this.classifyImage()
    }
  } catch (error) {
    console.log(error)
  }
}
The package expo-image-picker returns an object. In case the user cancels the process of picking an image, the image picker module will return a single property: canceled: true. f successful, the image picker module returns properties such as the uri of the image itself. That’s why the if statement in the above snippet holds so much significance.
Run the app
To complete this demonstration app, you need to add a touchable opacity where the user will click to add the image.
Here is the complete snippet of the render method in the App.js file.
render() {
    const { isTfReady, isModelReady, predictions, image } = this.state

    return (
      <View style={styles.container}>
        <StatusBar barStyle='light-content' />
        <View style={styles.loadingContainer}>
          <Text style={styles.commonTextStyles}>
            TFJS ready? {isTfReady ? <Text>✅</Text> : ''}
          </Text>

          <View style={styles.loadingModelContainer}>
            <Text style={styles.text}>Model ready? </Text>
            {isModelReady ? (
              <Text style={styles.text}>✅</Text>
            ) : (
              <ActivityIndicator size='small' />
            )}
          </View>
        </View>
        <TouchableOpacity
          style={styles.imageWrapper}
          onPress={isModelReady ? this.selectImage : undefined}>
          {image && <Image source={image} style={styles.imageContainer} />}

          {isModelReady && !image && (
            <Text style={styles.transparentText}>Tap to choose image</Text>
          )}
        </TouchableOpacity>
        <View style={styles.predictionWrapper}>
          {isModelReady && image && (
            <Text style={styles.text}>
              Predictions: {predictions ? '' : 'Predicting...'}
            </Text>
          )}
          {isModelReady &&
            predictions &&
            predictions.map(p => this.renderPrediction(p))}
        </View>
        <View style={styles.footer}>
          <Text style={styles.poweredBy}>Powered by:</Text>
          <Image source={require('./assets/tfjs.jpg')} style={styles.tfLogo} />
        </View>
      </View>
    )
  }
}
Here is the list of the complete styles object.
const styles = StyleSheet.create({
  container: {
    flex: 1,
    backgroundColor: '#171f24',
    alignItems: 'center'
  },
  loadingContainer: {
    marginTop: 80,
    justifyContent: 'center'
  },
  text: {
    color: '#ffffff',
    fontSize: 16
  },
  loadingModelContainer: {
    flexDirection: 'row',
    marginTop: 10
  },
  imageWrapper: {
    width: 280,
    height: 280,
    padding: 10,
    borderColor: '#cf667f',
    borderWidth: 5,
    borderStyle: 'dashed',
    marginTop: 40,
    marginBottom: 10,
    position: 'relative',
    justifyContent: 'center',
    alignItems: 'center'
  },
  imageContainer: {
    width: 250,
    height: 250,
    position: 'absolute',
    top: 10,
    left: 10,
    bottom: 10,
    right: 10
  },
  predictionWrapper: {
    height: 100,
    width: '100%',
    flexDirection: 'column',
    alignItems: 'center'
  },
  transparentText: {
    color: '#ffffff',
    opacity: 0.7
  },
  footer: {
    marginTop: 40
  },
  poweredBy: {
    fontSize: 20,
    color: '#e69e34',
    marginBottom: 6
  },
  tfLogo: {
    width: 125,
    height: 70
  }
})
Run the application by executing the expo start command from a terminal window. The first thing you’ll notice is that upon bootstrapping the app in the Expo client, it will ask for permissions.
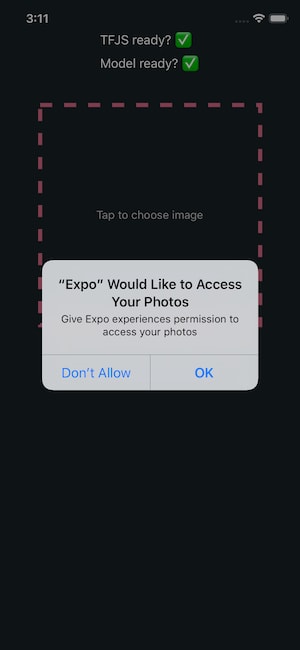
Then, once the model is ready, it will display the text "Tap to choose image" inside the box. Select an image to see the results.

Predicting results can take some time. Here are the results of the previously selected image.

Conclusion
I hope this post serves the purpose of giving you a head start in understanding how to implement a TesnorFlow.js model in a React Native app, as well as a better understanding of image classification, a core use case in computer vision-based machine learning.
Since the TF.js for React Native is in alpha at the time of writing this post, we can hope to see many more advanced examples in the future to build real-time applications.
Here are some resources that I find extremely useful.
Here are some resources that I find extremely useful.
- tfjs-react-native Github repo contain more examples using different pre-trained models
- Infinite Red's NSFW JS and React Native example
- Introduction to Tensorflow.js
Here is the link to the complete code in a Github repo for your reference.
Originally published at Heartbeat.Fritz.ai
I often write on Nodejs, Reactjs, and React Native. You can subscribe to my weekly newsletter to receive new updates straight to your inbox 💌

Top comments (10)
hi Aman , I tried your tutorial but I have an error saying that this.renderPrediction is not a function and I can't continue my project cuz of this error can you help me please ?
Are you using the same tfjs package version as mentioned in the demo project repo? The recent version of tfjs with React Native has lots of changes.
i had to do fews changes because I met fews issues basically everything works , the only problem that I have is the function this.renderPrediction , so just to see I erased it from my code and I can see the predictions on the console but on the application it keeps showing me " predicting ...."
I send u all my imports in the picture I'll join to my message
thx for your answer ;)
dev-to-uploads.s3.amazonaws.com/i/...
I can show you the entire code if you want :)
Hey, I know you are facing problem. Your import statements seems fine. At the time of writing this tutorial, tfjs only supported to load models via a network call. Now, with the latest version, you can try the and load the modal from the app.
yeah I know I can create my own model by coding it with python ( correct me if I'm wrong )
fews more questions :
1) do you know how to do it , I found a tutorial on the web page of tensorflow , they explain how to make it
2) also , can I use the same code that you used for your tutorial when I will import a external model ?
thx u a lot for answering my questions :)
Hi Aman - I'm running into all kinds of dependency issues trying to install tfjs-react-native from a clean expo init. Did you have any similar issues? (node 13.2, expo sdk 36)
Hi Michael,
what exactly is the issue?
I did not have any issues install tfjs rn module. You can use the same version as I am using for tfjs-react-native as mentioned in this GitHub repo: github.com/amandeepmittal/mobilene...
I think the issue is
@tensorflow/tfjs-react-native": "0.1.0-alpha.2"has a problem on Android platforms to fetch images fromfile:\\and a HTTP URL. As the discussion here, github.com/tensorflow/tfjs/issues/...Hi i noticed that when making predictions the app was slow can you help me
Some comments may only be visible to logged-in visitors. Sign in to view all comments.