Did you just start to replicate a bunch of tables then why should you repeat yourself? Especially if it is a landing, importing to a stage, or export to a flat file, it is better to not repeat yourself for these straightforward tasks. Instead of creating packages manually for each table, you can create a common BIML code and generate all packages automatically.
In this article, I will demonstrate how to generate flat file export packages for more than one table. It will create separated packages for each table. It is very basic for starting. However, we will have new tasks and logging mechanisms in the next series.
Getting Started
- To use Biml in Visual Studio, you need to install BimlExpress. If you already don't have you can download it at https://varigence.com/bimlexpress and see https://docs.varigence.com/bimlexpress/getting-started/install-bimlexpress how to install it.
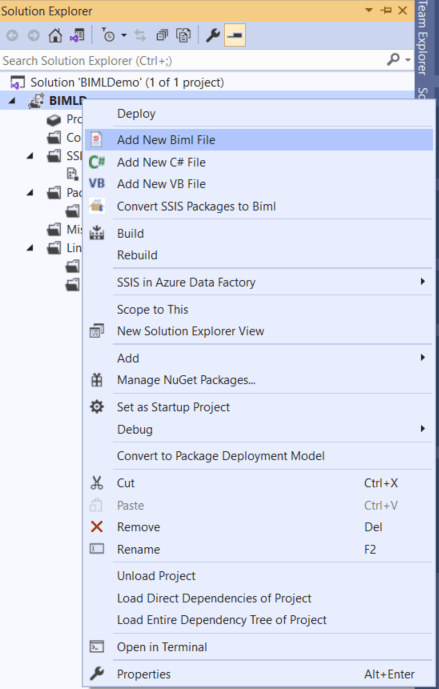
Once you install BimlExpress, open Visual Studio and create a new Integration Services project then right click on the solution to Add New Biml File.
SQL Script
I keep the table and column list in the custom tables to provide more flexibility for the replication stages. Even though it seems useless for this kind of small sample, this architecture will be more useful in the future. Furthermore, it is a way to involve your clients in replication and they can play/submit settings for new/existing entities. However, you can import source metadata with the built-in GetDatabaseSchema method.
- In order to prepare metadata to create these 2 tables in ReplicationDB or on any specific DB that you like to keep replication settings. Doesn't have to be the same database as the data source or target.
- Create a rpl schema.
CREATE SCHEMA rpl;
- Create [rpl].[TableList] table for keeping a list of the tables.
CREATE TABLE [rpl].[TableList](
    [Id] [bigint] IDENTITY(1,1) NOT NULL PRIMARY KEY,
    [SchemaName] [sysname] NOT NULL,
    [TableName] [sysname] NOT NULL,
    [ColumnDelimiter] [varchar](10) NULL,
    [TextQualifier] [varchar](10) NULL,
    [ReplicationType] [tinyint] NULL,
    [ReplicationDirection] [varchar](10) NULL,
    [StatusId] [tinyint] NULL
    )
- Create [rpl].[ColumnList] table for keeping a list of the columns.
CREATE TABLE [rpl].[ColumnList](
    [Id] [bigint] IDENTITY(1,1) NOT NULL PRIMARY KEY,
    [TableId] [bigint] NULL,
    [ColumnName] [sysname] NOT NULL,
    [StatusId] [bit] NULL,
    [DataType] [sysname] NULL,
    [Width] [int] NULL
    )
Use the below additional queries to prepare data for this demo.
 INSERT INTO rpl.TableList  (SchemaName, TableName, ColumnDelimiter, TextQualifier, ReplicationType, ReplicationDirection, StatusId)
     VALUES ('Person','Person','Comma','_x0022_',1,'Export',1),
            ('Production','Product','Comma','_x0022_',1,'Export',1)

    INSERT INTO rpl.ColumnList(TableId, ColumnName, StatusId, DataType, Width)
    VALUES  (1, 'PersonType',1,'String',2),
            (1, 'FirstName',1,'String',50),
            (2, 'Name',1,'String',50),
            (2, 'ProductNumber',1,'String',25)
Building the BIML File
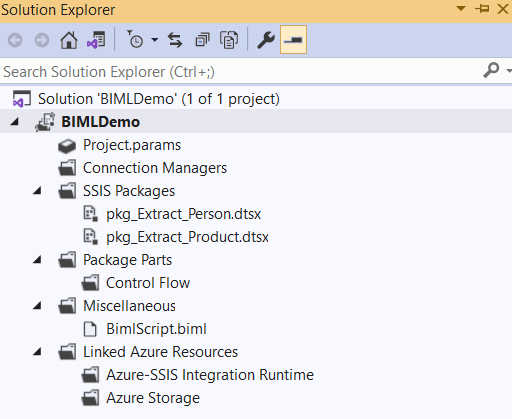
After adding a new file, click on BimlScript.biml file under the Miscellaneous.

C# Code
- Use
<#@ .. #>control nugget to import necessary namespaces and assembly. For this sample, we define template language and importingdatanamespace.
 <#@ template language="C#" hostspecific="true"#>
 <#@ import namespace="System.Data" #>
- In a new control nugget
<# ... #>, define variables that we need for this sample. We create separate variables for connection strings and queries. We have 2 variables for Columns and they areColumnListQueryandColumnListQueryRaw.ColumnListQueryRawis for an original query that we need to use the same a couple of times andColumnListQuerywill keep the completed query which will be generated with table id in the loop
var ReplicationServer   = ".";
var ReplicationCatalog  = "ReplicationDB";
var SourceServer        = ".";
var SourceCatalog       = "AdventureWorks2019";
var OutboundDirectory   = @"C:\FTP\Demo\outbound\";

string TableListQuery;
string ColumnListQueryRaw;
string ColumnListQuery;
DataTable columns;
- In the same control nugget, generating SQL Queries for both table and metadata of them.
TableListQuery =
        @"SELECT
                    tbl.Id
                ,   SchemaAndTableName = '[' +tbl.SchemaName + '].[' + tbl.TableName + ']'
                ,   tbl.TableName
                ,   tbl.ColumnDelimiter
                ,   tbl.TextQualifier
            FROM  rpl.TableList tbl
            Join  dbo.Status sts On tbl.StatusId = sts.Id
            Where tbl.ReplicationDirection ='Export' And sts.Name='Active'";
ColumnListQueryRaw =
        @"SELECT
                    clm.ColumnName
                ,   clm.DataType
                ,   clm.Width
        FROM rpl.ColumnList clm
        Join  dbo.Status sts On clm.StatusId = sts.Id
        Where sts.Name='Active' And TableId = ";
- Continue to build the connection string and reading table list in the same control nugget.
var ReplicationConString ="Data Source=" + ReplicationServer +";Initial Catalog="+ReplicationCatalog+";Provider=SQLNCLI11.1;Integrated Security=SSPI;Auto Translate=False;";
var con = SchemaManager.CreateConnectionNode("SourceConnection",ReplicationConString);
DataTable tables = ExternalDataAccess.GetDataTable(con, TableListQuery);
Biml Script
Now we are able to populate metadata and start to generate package task Biml. We will create separate packages for each table with a data flow task that exports to a CSV file.
- Starting by adding Connection Managers for Flat File and SQL( Using OleDB). We need dynamic Connection Managers while we have different destinations for each file. In order to make them dynamic, we use text nugget
<#=... #>to print data of variables or SQL results. In the below sample code, generating as many connections as table count.
<Biml xmlns="http://schemas.varigence.com/biml.xsd">
   <Connections>
       <#  foreach (DataRow row in tables.Rows) { #>
           <FlatFileConnection Name="CM_<#=row[2]#>_FlatFile" FilePath="<#=OutboundDirectory#><#=row[2]#>.csv" FileFormat="CM_<#=row[2]#>_FlatFile" />
       <# } #>
       <Connection Name="CM_OleDB" ConnectionString="Data Source=<#=SourceServer#>;Initial Catalog=<#=SourceCatalog#>;Provider=SQLNCLI11.1;Integrated Security=SSPI;Auto Translate=False;" />
    </Connections>
- After the Connection Managers, the next step is adding Tasks for the SSIS Package. Again using a for each loop to iterate through the table list. We name all packages by including the table name and getting a list of the fields from the SQL same as we do for the table.
<Packages>
    <#  foreach (DataRow row in tables.Rows) { #>
        <Package Name="pkg_Extract_<#=row[2]#>" ConstraintMode="Linear" AutoCreateConfigurationsType="None" ProtectionLevel="EncryptSensitiveWithPassword">
            <Tasks>
                <Dataflow Name="DFT - Export to File">
                    <Transformations>
                        <OleDbSource Name="OLEDB - Source" ConnectionName="CM_OleDB">
                            <Columns>
                                <#
                                ColumnListQuery = string.Format(ColumnListQueryRaw+" {0}", row[0] );
                                columns = ExternalDataAccess.GetDataTable(con, ColumnListQuery );
                                foreach (DataRow col in columns.Rows)
                                { #>
                                    <Column SourceColumn="<#=col[0]#>" IsUsed="true" />
                             <# } #>
                            </Columns>
                            <ExternalTableInput Table="<#=row[1]#>" />
                        </OleDbSource>
                        <FlatFileDestination Name="FFD - Target" LocaleId="None" ConnectionName="CM_<#=row[2]#>_FlatFile">
                            <Header></Header>
                        </FlatFileDestination>
                </Transformations>
            </Dataflow>
        </Tasks>
    </Package>
   <# } #>
</Packages>
In the above part, we already mapped to the flat-file connection and will create a connection manager with the same name in the next part. Here is the Connection Manager format.
<FlatFileDestination Name="FFD - Target" LocaleId="None" ConnectionName="CM_TableName_FlatFile">
- Should use the same Connection Name here in order to recognize the connection manager. Using the same loop once more for table and field list in order to generate File Format. It is the part where we tell Flat File Connection Manager about formats like Column Delimiter, Text Qualifier, and other properties that you can see in the SSIS tasks. I need to count the field list and use CRLF as a delimiter after the last field to tell the line ended, otherwise, data is shifting.
<FileFormats>
    <#  foreach (DataRow row in tables.Rows) { #>
        <FlatFileFormat Name="CM_<#=row[2]#>_FlatFile" CodePage="1252" TextQualifier="<#=row[4]#>" ColumnNamesInFirstDataRow="true" RowDelimiter="">
            <Columns>
                <#
                ColumnListQuery = string.Format(ColumnListQueryRaw+" {0}", row[0] );
                columns = ExternalDataAccess.GetDataTable(con, ColumnListQuery );
                int c = columns.Rows.Count;
                int i = 0;
                foreach (DataRow col in columns.Rows)
                {
                    i = i+1;
                    if (i < c)
                    { #>
                        <Column Name="<#=col[0]#>" Length="2" DataType="<#=col[1]#>" Delimiter="<#=row[3]#>" MaximumWidth="<#=col[2]#>" />
                    <# }
                    else
                    {#>
                        <Column Name="<#=col[0]#>" Length="2" DataType="<#=col[1]#>" Delimiter="CRLF" MaximumWidth="<#=col[2]#>" />
                    <# }
                }
                #>
        </Columns>
    </FlatFileFormat>
    <# } #>
</FileFormats>
</Biml>
Build the SSIS Project
- Biml file is completed, right-click on the Biml file in Solution Explorer and select Check Biml For Errors or select Generate SSIS Packages. At this point, BimlExpress will translate Biml codes into SSIS packages.

- After the package is created, Person and Product packages are ready to begin replicating data from the SQL Tables to Flat Files.
Complete Code
<#@ template language="C#" hostspecific="true"#>
<#@ import namespace="System.Data" #>
<#
    var ReplicationServer   = ".";
    var ReplicationCatalog  = "ReplicationDB";
    var SourceServer        = ".";
    var SourceCatalog       = "AdventureWorks2019";
    var OutboundDirectory   = @"C:\FTP\Demo\outbound\";

    string TableListQuery;
    string ColumnListQueryRaw;
    string ColumnListQuery;
    DataTable columns;

    TableListQuery =
        @"SELECT
                    tbl.Id
                ,   SchemaAndTableName = '[' +tbl.SchemaName + '].[' + tbl.TableName + ']'
                ,   tbl.TableName
                ,   tbl.ColumnDelimiter
                ,   tbl.TextQualifier
            FROM  rpl.TableList tbl
            Join  dbo.Status sts On tbl.StatusId = sts.Id
            Where tbl.ReplicationDirection ='Export' And sts.Name='Active'";
    ColumnListQueryRaw =
        @"SELECT
                    clm.ColumnName
                ,   clm.DataType
                ,   clm.Width
        FROM rpl.ColumnList clm
        Join  dbo.Status sts On clm.StatusId = sts.Id
        Where sts.Name='Active' And TableId = ";

    var ReplicationConString ="Data Source=" + ReplicationServer +";Initial Catalog="+ReplicationCatalog+";Provider=SQLNCLI11.1;Integrated Security=SSPI;Auto Translate=False;";
    var con = SchemaManager.CreateConnectionNode("SourceConnection",ReplicationConString);
    DataTable tables = ExternalDataAccess.GetDataTable(con, TableListQuery);
#>
<Biml xmlns="http://schemas.varigence.com/biml.xsd">
    <Connections>
        <#  foreach (DataRow row in tables.Rows) { #>
            <FlatFileConnection Name="CM_<#=row[2]#>_FlatFile" FilePath="<#=OutboundDirectory#><#=row[2]#>.csv" FileFormat="CM_<#=row[2]#>_FlatFile" />
        <# } #>
        <Connection Name="CM_OleDB" ConnectionString="Data Source=<#=SourceServer#>;Initial Catalog=<#=SourceCatalog#>;Provider=SQLNCLI11.1;Integrated Security=SSPI;Auto Translate=False;" />
    </Connections>
    <Packages>
        <#  foreach (DataRow row in tables.Rows) { #>
        <Package Name="pkg_Extract_<#=row[2]#>" ConstraintMode="Linear" AutoCreateConfigurationsType="None" ProtectionLevel="EncryptSensitiveWithPassword">
            <Tasks>
                <Dataflow Name="DFT - Export to File">
                    <Transformations>
                        <OleDbSource Name="OLEDB - Source" ConnectionName="CM_OleDB">
                            <Columns>
                                <#
                                ColumnListQuery = string.Format(ColumnListQueryRaw+" {0}", row[0] );
                                columns = ExternalDataAccess.GetDataTable(con, ColumnListQuery );
                                foreach (DataRow col in columns.Rows)
                                { #>
                                    <Column SourceColumn="<#=col[0]#>" IsUsed="true" />
                                <# } #>
                            </Columns>
                            <ExternalTableInput Table="<#=row[1]#>" />
                        </OleDbSource>
                        <FlatFileDestination Name="FFD - Target" LocaleId="None" ConnectionName="CM_<#=row[2]#>_FlatFile">
                            <Header></Header>
                        </FlatFileDestination>
                    </Transformations>
                </Dataflow>
            </Tasks>
        </Package>
        <# } #>
    </Packages>
    <FileFormats>
    <#  foreach (DataRow row in tables.Rows) { #>
        <FlatFileFormat Name="CM_<#=row[2]#>_FlatFile" CodePage="1252" TextQualifier="<#=row[4]#>" ColumnNamesInFirstDataRow="true" RowDelimiter="">
            <Columns>
                <#
                ColumnListQuery = string.Format(ColumnListQueryRaw+" {0}", row[0] );
                columns = ExternalDataAccess.GetDataTable(con, ColumnListQuery );
                int c = columns.Rows.Count;
                int i = 0;
                foreach (DataRow col in columns.Rows)
                {
                    i = i+1;
                    if (i < c)
                    { #>
                        <Column Name="<#=col[0]#>" Length="2" DataType="<#=col[1]#>" Delimiter="<#=row[3]#>" MaximumWidth="<#=col[2]#>" />
                    <# }
                    else
                    {#>
                        <Column Name="<#=col[0]#>" Length="2" DataType="<#=col[1]#>" Delimiter="CRLF" MaximumWidth="<#=col[2]#>" />
                    <# }
                }
                #>
            </Columns>
        </FlatFileFormat>
    <# } #>
    </FileFormats>
</Biml>

Top comments (0)