
How to setup a GIT profile when there are Enterprise Proxies
If your organization has a proxy server setup then if you tried to access remote repositories, you would have got error message Connection Refused: 443. If you try to add the proxy then your work repository will throw the same connection refused error. Now the challenge is how to configure git to have access to both the work repository and your personal code repositories.

Use below commands to setup global proxies :
git config --global http.proxy http://username:password@proxy-server:port
git config --global https.proxy https://username:password@proxy-server:port
Now go to your work repository and unset the proxy as it is the internal repo :
git config --local --unset http.proxy
git config --local --unset https.proxy
How to specify multiple users in GIT profile
Often you would have encountered the issue when the commit in your personal repo is made using your official username and email. This happens because there is only a global username and email setup in ~/.gitconfig.
There are two ways to fix this :
1) Set username and email explicitly in each of the private repo that you clone:
git config user.name yourName

    git config user.email yourEmail
2) Since git 2.13, there is a feature called conditional includes :
Replace any user config details present in ~/.gitconfig file with the below condition
[includeIf "gitdir:~/Personal/"]
  path = .gitconfig-personal
[includeIf "gitdir:~/Work/"]
  path = .gitconfig-work
Now create two siblings config files, next to .gitconfig
For personal or open-source work, personal user details to be added in .gitconfig-personal
[user]
name = yourUserName
email = email@gmail.com
For Official code related work, official user details to be added in gitconfig-work
[user]
name = yourUserId
email = email@work.com
With this approach, you would not require to set user details in every repo that you clone. You need to only place your repositories in specified directories. Git will automatically fetch correct user details.
Now with our Git setup is complete for open source work, let's see how efficiently VS code manages GIT workflows
Cloning a Repo

1) Fork the Repo that you need to clone
2) On your forked repo, click on "clone or download" button to copy URL
3) Open VS Code and open Command Palette (Cmd/Ctrl + Shift + P)
4) Select Git Clone and paste the URL copied from Github
5) Select Repository Location
6) VS Code will automatically set the upstream for the cloned repo
Pushing code to Remote
Analyzing the changes to the source file is very helpful in vs code
1) Whenever any line is modified, VS code puts a blue bar against that line number
2) When any is line is deleted (Shift+Del), VS code adds a red triangle against that line number
3) When any line is added, the VS code adds a green bar against that line number.
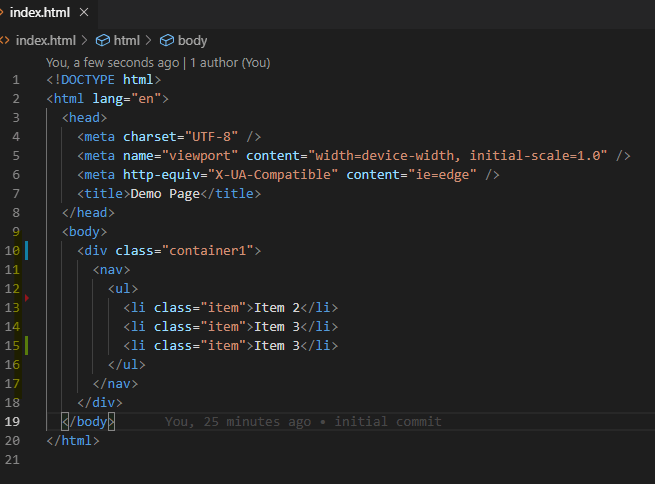
These colored gutter indicators can be expanded to review what changes have been done.
Resolving Merge Conflicts
Merge conflicts occur when two people change the same file outside the origin (upstream). GIT can auto-merge only if changes are at different locations, but for the conflicts occurring at the same place, manually it has to be resolved.
VS Code provides an easy way to resolve these conflicts within the editor itself.
Below is the scenario when merge conflicts will occur:
1) User2 has a forked a repo of User1
2) User2 creates a feature branch from master
3) User2 does changes and commits in the feature branch
4) User2 raises a Pull Request to merge with the master branch of forked Repo
5) In the meantime, User1 has also done some changes in the master and pushed to remote
6) User2 now creates the pull request to merge his master branch with User1's master branch.
7) Since both have modified the file at the same location, Auto_merging of files gets failed, although PR is raised but until conflicts are resolved, PR cannot be merged.
Steps to resolve the conflicts:
1) User1 needs to have GitHub Pull Request extension to view all the Pull Requests inside VS Code
2) User1 also needs to connect VS Code with his GitHub account
3) Under All section in the Source Control Explorer,Pull requests would be visible
4) To view the changes in PR, User1 clicks on Description text.
5) User1 will checkout the PR branch , now User1 can comment on PR from VS Code
6) After reviewing the changes, User1 switches to master branch
7) User1 opens Command Palette (Cmd/Ctrl + Shift + P) and selects merge branch to merge PR branch with master
8) Since there are conflicts, auto-merging will get failed.
9) Source Control inserts <<<,>>> and ==== characters to show conflicting changes
10) VS Code identifies the changes as Current Change or Incoming Change
11) After selecting the correct code version , changes needs to committed.
12) After syncing with Remote , PR raised by User1 get's merged and shows in his GitHub

Pro Tip : 👍
1) Install GitLens extension to get a history of each line of code
2) Prefer git sync over git push. Git Sync (🔃 icon in VS Code status bar next to branch name) will pull remote changes down to your local repository and then push local commits to the upstream branch.

Top comments (1)
Nice reading but I wouldn’t call it “git workflow”.