
This is tutorial 4 of a 5-part tutorial, but each tutorial can be read in isolation to learn various aspects Node+Express+TypeScript+Vue API/Vue web app set up.
Looking to learn mobile/desktop apps? The skills and concepts here are fundamental and re-usable for mobile apps (NativeScript) or desktop apps (Electron). I may cover them as a follow-on.
Navigation to other parts (you are at part 4)
- Setting up Node and Express API with TypeScript
- Setting up VueJs with TypeScript
- Setting up Postgres with Sequelize ORM
- Basic Vue templating and interaction with API
- Advanced Vue templating and image uploading to Express
In this part of the tutorial you will learn how VueJS can interact with your Node+Express+Sequelize backend.
If you have not, you can start building by cloning and checking out tutorial-part3 branch:
git clone https://github.com/calvintwr/basicgram.git
git checkout tutorial-part3
1. Get a Type-Checking/Validation and HTTP library
The first thing you want to get is a type-checking/validation library for runtime (TypeScript don't check at runtime).
The best practice to do this job is to get 2 zero-dependency libraries, Not and Validator.js:
npm install you-are-not --save
npm install validator --save
Not: This is a type-checking centric library (with comprehensible, customisable error messaging) that comprehensively cover code that will exposed to client inputs at runtime, or for code you don't intend to implement TS (which can be overkill sometimes).
Validator.js: This is "user-input" centric, and readily provides checking like isEmail methods. You need to use it in conjunction with Not because it doesn't type-checks.
So for example, you can type-check and validate client's email address like this:
import Not = require('you-are-not')
import Validator = require('validator')

Not.defineType({
    primitive: 'string',
    type: 'email',
    pass(string) {
        return Validator.isEmail(string)
    }
})
let not = Not.create()

var notEmail = 'notEmail'
var stillNotEmail = 10

not('email', notEmail) // fails
not('email', stillNotEmail) // fails
not('email', 'email@domain.com') // passes and is silent. carry on with execution.
For HTTP library, if you search around you will find that the popular ones lying around are request, axios, and superagent. request is deprecated now, and personally I like superagent's syntax better.
So we go for superagent:
npm install superagent --save
npm install @types/superagent --save-dev
We are now ready to start building pages.
2. Build a login component
We could have used some of OnsenUI's prebuilt components, but I just want to use this opportunity to introduce tailwindcss.
The idea is that a lot of times you will not get the components you want. So in Vue, you can build it fast with Tailwindcss.
Also, with Vue components, don't worry about in-line styling because components are reusable, and hence doesn't violate "dry" principle.
Create a "pages/login.vue" component:
<template>
    <div class="flex justify-center content-center items-center h-full w-full">
        <div class="max-w-xs">
            <h1 class="text-center text-xl p-3">Welcome to Basicgram</h1>
            <form class="bg-white shadow-md rounded px-8 pt-6 pb-8 mb-4">
                <div class="mb-4">
                    <label class="block text-gray-700 text-sm font-bold mb-2" for="username">
                        Username
                    </label>
                    <input
                        class="shadow appearance-none border rounded w-full py-2 px-3 text-gray-700 leading-tight focus:outline-none focus:shadow-outline"
                        id="username" type="text" placeholder="Username">
                </div>
                <div class="mb-6">
                    <label class="block text-gray-700 text-sm font-bold mb-2" for="password">
                        Password
                    </label>
                    <input
                        class="shadow appearance-none border border-red-500 rounded w-full py-2 px-3 text-gray-700 mb-3 leading-tight focus:outline-none focus:shadow-outline"
                        id="password" type="password" placeholder="******************">
                    <p class="text-red-500 text-xs italic">Please choose a password.</p>
                </div>
                <div class="flex items-center justify-center">
                    <button
                        class="bg-blue-500 hover:bg-blue-700 text-white font-bold py-2 px-4 rounded focus:outline-none focus:shadow-outline"
                        type="button">
                        Sign In
                    </button>
                </div>
            </form>
        </div>
    </div>
</template>

<script lang="ts">
import Vue from 'vue'

export default {
    data() {
        return {}
    }
}
</script>
Although it looks like doing inline styling, you will notice the difference as you use it more. Also especially when you can use SASS (also prepackaged in my boilerplate) to apply class en-masse (you can check out this concise 15-min video on Tailwind).
Now, we will want to have this login component show up when user is not logged in. You need to do a couple of things to home.vue, from top to bottom:
- Use
<div v-if="condition">and<div v-else>to trigger conditional view templating. Basically, it is used like this:
<div v-if="isLoggedIn">
   show our main app
</div>
<div v-else>
   show login page
</div>
- Import
login.vueas a component and register it with Vue undercomponentsobject:
<!-- Step3: use it like this in template after registering -->
<login></login>

<script>
// Step 1: import the component
import login from './pages/login.vue'

export default {
    components: {
        login: login // Step 2: register it with Vue
    }
}
</script>
- Add a
isLoggedInflag in Vue's data which we will use to toggle (in actual authentication set up, you will store such states in Vuex, but that's a tad complicated for now):
export default {
    data() {
        return {
            isLoggedIn: false
        }
    }
}
home.vue will look like this:
<template>
    <div class="w-full h-full">
        <div v-if="isLoggedIn">
            <v-ons-page>
                <v-ons-toolbar>
                    <div class="center">{{ title }}</div>
                </v-ons-toolbar>

                <v-ons-tabbar
                    swipeable position="auto"
                    :tabs="tabs"
                    :visible="true"
                    :index.sync="activeIndex"
                >
                </v-ons-tabbar>
            </v-ons-page>
        </div>
        <div class="w-full h-full" v-else>
            <login></login>
        </div>
    </div>
</template>

<script lang="ts">
import Vue from 'vue'
import homePage from './pages/homepage.vue'
import camera from './pages/camera.vue'
import profile from './pages/profile.vue'
import login from './pages/login.vue'

export default {
    components: {
        login
    },
    data() {
        return {
            isLoggedIn: false,
            activeIndex: 0,
            tabs: [
                {
                    icon: 'fa-home',
                    label: 'Home',
                    page: homePage,
                    key: "homePage"
                },
                {
                    icon: 'fa-camera',
                    label: 'Camera',
                    page: camera,
                    key: "camera"
                },
                {
                    icon: 'fa-user',
                    label: 'Profile',
                    page: profile,
                    key: "profile"
                },
            ]
        }
    },
    methods: {},
    computed: {
        title() {
            return this.tabs[this.activeIndex].label === 'Home' ? 'Basicgram' : this.tabs[this.activeIndex].label
        }
    }
}
</script>
Fire you your webpack dev server with npm run dev and you should see this:
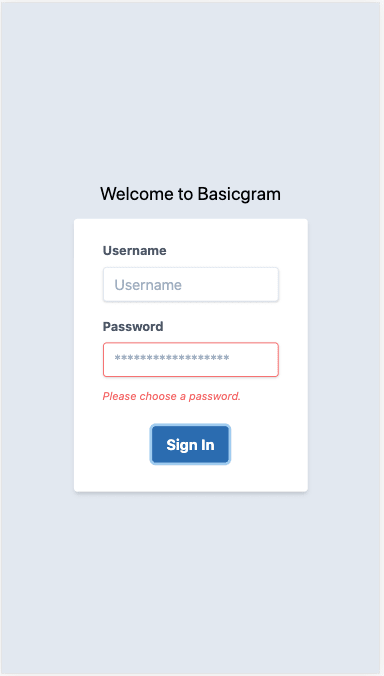
P.S. I also added class="h-full" to the containing divs which allows the login component to be vertically centered.
So now that you have a login view, we move on to bindings and events to execution codes to do a login.
3. VueJS bindings and events
I'll introduce the 3 most important VueJS binding mechanism.
v-model: VueJS binds your DOM with the data structure via v-model (two-way binding).
v-bind: Declared on DOM properties for one-way binding, like v-bind:href or just :href as the short-form. This is a subset of v-model.
Events: v-on:click="yourMethod()" or shorthand @click="yourMethod()" declarations on the DOM will trigger functions defined in methods. VueJS provides for many other events such as page scrolling via v-on:scroll.
To illustrate:
- A username input will use v-model (bound to
userName), so that updating its value will update our data:
<!-- this here binds to data.userName ⬇️ -->
<input v-model="userName">
<script>
export default {
    data() {
        return {
            // this variable here binds to `v-model="userName" ⬆️ .
            userName: ''
        }
    }
}
- Next is that we need the button to submit login, and also disable itself when it is waiting for a response from the server. So we bind the button to
falsewhich we will toggle. We also bind it to@clickevent, to execute ourloginmethod:
<button
    :disabled="loginButtonDisabled"
    @click="login"
>
<script>
export default {
    data() {
        return {
            // a flag that the button's "disabled" attribute
            // for "disabled" property, VueJS use boolean
            loginButtonDisabled: false
        }
    },
    methods: {
        login(event) {

            // disable the button
            this.loginButtonDisabled = true

            // perform some operations

            // a child component passes data back to parent
            // is by emitting an event
            return this.$emit('login-success', data)

            // enable it if login as failed
            this.loginButtonDisabled = false
        }
    }
}
Tip: When you write
@click="login", Vue will pass theeventobject into your function. Otherwise, you can specify what you want to pass in, like@click="login('myOwnData')", and Vue will respect that.
And when we bring in the superagent and you-are-not modules into login.vue, it will look like this:
<!-- pages/login.vue -->

<template>
    <div class="flex justify-center content-center items-center h-full w-full">
        <div class="max-w-xs">
            <h1 class="text-center text-xl p-3">Welcome to Basicgram</h1>
            <form class="bg-white shadow-md rounded px-8 pt-6 pb-8 mb-4">
                <div class="mb-4">
                    <label class="block text-gray-700 text-sm font-bold mb-2" for="username">
                        Username
                    </label>
                    <input
                        class="shadow appearance-none border rounded w-full py-2 px-3 text-gray-700 leading-tight focus:outline-none focus:shadow-outline"
                        id="username" type="text" placeholder="Username"
                        v-model="userName"
                    >
                </div>
                <div class="mb-6">
                    <label class="block text-gray-700 text-sm font-bold mb-2" for="password">
                        Password
                    </label>
                    <input
                        class="shadow appearance-none border border-red-500 rounded w-full py-2 px-3 text-gray-700 mb-3 leading-tight focus:outline-none focus:shadow-outline"
                        id="password" type="password" placeholder="******************">
                    <p class="text-red-500 text-xs italic">Please choose a password.</p>
                </div>
                <div class="flex items-center justify-center">
                    <button
                        class="bg-blue-500 hover:bg-blue-700 text-white font-bold py-2 px-4 rounded focus:outline-none focus:shadow-outline"
                        type="button"
                        :disabled="loginButtonDisabled"
                        @click="login"
                    >
                        Sign In
                    </button>
                </div>
            </form>
        </div>
    </div>
</template>

<script lang="ts">
import Vue from 'vue'
import * as superagent from 'superagent'
import Not = require('you-are-not')

// Some advanced usage of Not to define your own "types"
// Which is really useful because in a real wrong, '' is a string that makes people lose hair.
Not.defineType({
    primitive: 'string',
    type: 'valid-string',
    pass(string) {
        return string.length > 1
    }
})

const not = Not.create()

export default {
    data() {
        return {
            loginButtonDisabled: false,
            userName: ''
        }
    },
    methods: {
        login(event) {
            console.log(this.userName)

             // this will throw error and stop the operation
            not('valid-string', this.userName)

            // disable the button first and start
            this.loginButtonDisabled = true

            superagent
                .post('http://localhost:3000/users/add')
                .send({ name: this.userName })
                .end((err: Error, res: superagent.Response) => {

                    if (err) {
                        this.loginButtonDisabled = false
                        alert(err)
                        return
                    }

                    console.log(res)
                    this.$emit('login-success', res.body)

                })

        }
    }
}
</script>
In home.vue, you will need to receive and manage this event called login-success, like this:
<!-- home.vue -->

<template>
    <div class="h-full">
        <div v-if="isLoggedIn">
            <v-ons-page>
                <v-ons-toolbar>
                    <div class="center">{{ title }}</div>
                </v-ons-toolbar>

                <v-ons-tabbar
                    swipeable position="auto"
                    :tabs="tabs"
                    :visible="true"
                    :index.sync="activeIndex"
                >
                </v-ons-tabbar>
            </v-ons-page>
        </div>
        <div class="h-full" v-else>
            <!-- add an event "@login-success" to login component -->
            <!-- this event will trigger #loginView methods ⬇️ -->
            <login @login-success="loginView"></login>
        </div>
    </div>
</template>

<script lang="ts">
import Vue from 'vue'
import homePage from './pages/homepage.vue'
import camera from './pages/camera.vue'
import profile from './pages/profile.vue'
import login from './pages/login.vue'

export default {
    components: {
        login
    },
    data() {
        return {
            isLoggedIn: false,
            userName: { type: String },
            userID: { type: Number },
            activeIndex: 0,
            tabs: [
                {
                    icon: 'fa-home',
                    label: 'Home',
                    page: homePage,
                    key: "homePage"
                },
                {
                    icon: 'fa-camera',
                    label: 'Camera',
                    page: camera,
                    key: "camera",
                    props: {
                        userName: {
                            type: String // specify typing
                        },
                        userID: {
                            type: Number // specify typing
                        }
                    }
                },
                {
                    icon: 'fa-user',
                    label: 'Profile',
                    page: profile,
                    key: "profile",
                    props: {
                        userName: {
                            type: String // specify typing
                        },
                        userID: {
                            type: Number // specify typing
                        }
                    }
                },
            ]
        }
    },
    methods: {
        // this is the loginView method triggered by @login-success event ⬆️
        loginView(user) {
            // this.tabs[2] passes the userName to the `profile` tab child component
            // a child passes data to a parent by events ($emit)
            // a parent passes date to child by `props
            this.userName = this.tabs[2].props.userName = this.tabs[1].props.userName = user.name
            this.userID = this.tabs[2].props.userID = this.tabs[1].props.userID = user.id
            this.isLoggedIn = true
        }
    },
    computed: {
        title() {
            return this.tabs[this.activeIndex].label === 'Home' ? 'Basicgram' : this.tabs[this.activeIndex].label
        }
    }
}
</script>
Now just change pages/profile.vue to use userName prop that was passed in:
<template>
    <v-ons-page>
        <p style="text-align: center">
            {{ userName }}'s Profile
        </p>
    </v-ons-page>
</template>

<script lang="ts">
import Vue from "vue"

export default {
    props: {
        userName: {
            type: String
        },
        userID: {
            type: Number
        }
    },
    data() {
        return {}
    }
}
</script>
4. Cross-Origin Resource Sharing (CORS)
When you try to log in, you might see an error like this:
Access to XMLHttpRequest at 'http://localhost:3000/users/add' from origin 'http://localhost:8080' has been blocked by CORS policy: No 'Access-Control-Allow-Origin' header is present on the requested resource.
This is called the Same Origin Policy restriction which will not allow some HTTP methods when the requestor (our view in localhost:8080) and the resource owner (our API in localhost:3000) are of different "origins".
Same origin must satisfy 4 conditions: 1) domain, 2) subdomain, 3) protocol (
httpsorhttp), and 4) port (which is usually omitted in production). For example:https://domain.com(view) andhttps://domain.com/api(api) will work. Butapi.domain.comorapi.domain.com:3000won’t work.
Same Origin Policy very restrictive but does bypassing it cause any issue? Not really, as anyone with malicious intent can easily break through by spoofing origin of request. You can bypass it by enabling Cross-Origin Resource Sharing (CORS):
npm install cors --save
npm install @types/cors --save-dev
Add cors:
Note: app.use(cors) must be instantiated before your routings. So a good place to put can be just before the "//view engine setup"
import cors from 'cors'

// enable cors
app.use(cors({
    credentials: true,
    origin: true,
    methods: ['GET, HEAD, PUT, PATCH, POST, DELETE'],
    maxAge: 31536000000000,
    preflightContinue: true
}))
5. Login
Ignore the password and log in, and whichever name you use, it should either create the user if it doesn't exist, or login if it does:
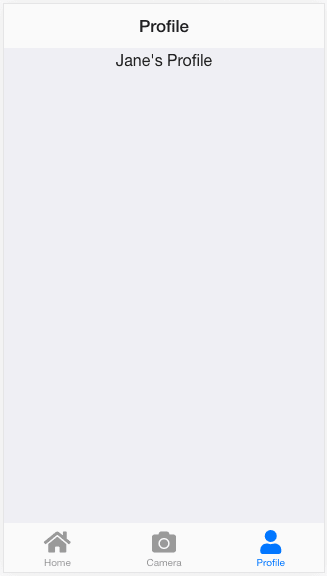
If you have finished up to Part 4, you have learnt the basics of TypeScript with Express and Vue. So now we are ready to more advance Express API works (receiving images and storing them) and Vue templating (AJAX updating) in Part 5.

Top comments (2)
found a typo
npm install @types/cors --save-dev
Nice series by the way. This is of great value for me
Thanks for that, made the correction.