
This is tutorial 3 of a 5-part tutorial, but each tutorial can be read in isolation to learn various aspects Node+Express+TypeScript+Vue API/Vue web app set up.
Looking to learn mobile/desktop apps? The skills and concepts here are fundamental and re-usable for mobile apps (NativeScript) or desktop apps (Electron). I may cover them as a follow-on.
Navigation to other parts (you are at part 3)
- Setting up Node and Express API with TypeScript
- Setting up VueJs with TypeScript
- Setting up Postgres with Sequelize ORM
- Basic Vue templating and interaction with API
- Advanced Vue templating and image uploading to Express
After you have gotten your view ready in part 2, we must now create API endpoints allow users to post pictures and captions, as well produce a post feed.
If you have not, you can start building by cloning and checking out tutorial-part2 branch:
git clone https://github.com/calvintwr/basicgram.git
git checkout tutorial-part2
1. Setting up runtime checking for your API
The first thing you want to do is to set up runtime checking for your API, because TypeScript does not do that. Also you may also need to produce comprehensible error messages for your requestors. A library that will serve this specific need is you-are-not:
npm install you-are-not --save
We will change the "routes/user.js" file to ".ts", and set up a /add route so that we can add users:
import express from 'express'
const router = express.Router()
const Not = require('you-are-not')
const not = Not.create()

router.get('/', function (req: express.Request, res: express.Response, next: express.NextFunction) {
    res.send('respond with a resource')
})

router.put('/add', function (req: express.Request, res: express.Response, next: express.NextFunction) {

    not('string', req.body.name, 'User Name', 'Please check your entry') // will error if name is not what you expected.

    // perform tasks here

    res.send('completed task and respond with results')
})
module.exports = router
The Not library also have many more features to strengthen your API, read more here.
You can use Postman or just cURL to test it out.
# This will error
curl -X PUT -d wrong=Input localhost:3000/users/add
# Outputs {"message":"Wrong Type (User Name): Expecting type `string` but got `undefined`. Please check your entry"}

# This will work
curl -X PUT -d name=Jane localhost:3000/users/add
Now that we have an endpoint working, and the error handling looks pretty alright with Not, it's time to create the database to store stuff.
2. Setting up a database - PostgresSQL with SequelizeJS
On PostgresSQL
We will use PostgresSQL as the database. It is fast, reliable and also have JSON field to store schema-less data. So it fulfils quite a lot as a principle database. In truth, a very large project will use different databases to complement each other. But for the most bit, Postgres has everything you need.
This tutorial will not cover how to install postgres, but you can read the following installation guides:
Once you have installed postgres, set up a database and keep the credentials with you, as we will need it later.
Tip: I personally like DBeaver as the GUI db management tool the most.
SequelizeJS
Sequelize is a mature NodeJS Object Relational Mapper/Mapping (ORM) that uses a promise-style syntax, which makes your code very readable:
DB.Model
    .findAll()
    .then(results => {
        //do something with results
    }).then(results => {
        //respond to client
    }).catch(err => {
        //the promise chain is broken
        //and error handling is elegant
    })
Promise patterns are also very powerful once you get the hang of it. It copes with error bubbling exceptionally well, which is critical in an API context. Promise syntax also makes it easy to use transactions, a data rollback feature which in my experience, is quite a baseline requirement but not always present in even popular apps.
We will continue to bleeding-edge our way with Sequelize beta 6. You will also need to install Postgres' adaptors as well:
npm install sequelize@6.0.0-beta.6 --save
npm install pg pg-hstore --save
You also want the sequelize-cli tool as it will become the default way to handle the models. The cli now generates JS files but we shouldn't need to care.
# @next tag brings in the beta 6 cli
npm install sequelize-cli@next -g

# cd into "basicgram/api/src"
sequelize init
Set up configurations:
/* config/config.json */

// by default node runs in development mode if you
// did not explicitly specify
"development": {
  "username": your username,
  "password": password,
  "database": database name,
  "host": "localhost", // this is usually the cause
  "dialect": "postgres"
}
Sequelize is pretty silent about successfully connecting to the database, so we will just insert some code in models/index.js to notify us when the connection succeeds:
/* models/index.js */

// Test and log connection to the database
sequelize
    .authenticate()
    .then(function (err) {
        console.log('Connection has been established successfully.')
    })
    .catch(function (err) {
        console.log('Unable to connect to the database:', err)
    })
3. Create our models
Seqeulize is enforcing use of CLI as a default way. Although it is a little clunky in my opinion, it does prevent a lot of errors once you get the hang of it. To create the User and Post models:
sequelize model:create --name User --attributes nam e:string
sequelize model:create --name Post --attributes caption:string, image:string
This creates user.js and post.js inside of "src/models", and also the migration files, which will be persisted to the db when you run:
sequelize db:migrate
And you should see:
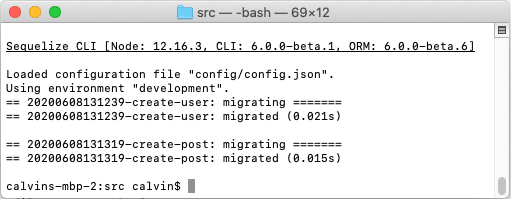
Note: And if you check your database, you will find that Seqeulize created "Users" and "Posts" tables, and took the initiative to plurialise the names. So just keep that in mind.
4. Add associations
The way to do this is to create a new migration file. It's again rather clunky at first but you'll be fine once you get the hang of it.
First we will need to add the associations to the files:
/* user.js */
User.associate = function(models) {
    // I always prefer to manually name my foreignKey.
    // But you can have Sequelize automatically take care of naming for you.
    User.hasMany(models.Post, {foreignKey: 'User_userID' })
}

/* post.js */
Post.associate = function(models) {
    Post.belongsTo(models.User, {foreignKey: 'User_userID' })
}
// #belongsTo will create the foreignKey on the Post table.
And set up a migration file:
sequelize migration:generate --name add-post-user-association
Go under the migrations folder and find a file with "[timestamp]-add-post-user-association". It is a template. And remember that your table names are pluralised:
module.exports = {
  up: (queryInterface, Sequelize) => {
    return queryInterface.addColumn(
      'Posts', // name of Source model - PLURAL!
      'User_userID', // name of the key we're adding
      {
        type: Sequelize.INTEGER,
        references: {
          model: 'Users', // name of Target model - PLURAL!
          key: 'id', // key in Target model that we're referencing
        },
        onUpdate: 'CASCADE',
        onDelete: 'SET NULL'
      }
    )
  },

  down: (queryInterface, Sequelize) => {
    return queryInterface.removeColumn(
      'Posts', // name of Source model - PLURAL!
      'User_userID' // key we want to remove
    );
  }
};
Explanation: What a migration file does is that the change you want to make is defined in up, and to undo this change, the reversal is defined in down. Which is why in this case the reversal is just to simply remove the User_userID column. To understand better, read this excellent guide by Maria Burlando.
We run the migration again:
sequelize db:migrate
If you get ERROR: relation "public.Post" does not exist error, remember it's Posts, not Post.
5. See if Sequelize works - Get all users
Set up the code to get all users for the '/' route:
/*.routes/users.ts */

router.get('/', function (req: express.Request, res: express.Response, next: express.NextFunction) {
    DB.User.findAll().then((result: any) => {
        console.log(result)
        res.send(result)
    }).catch((err: Error) => {
        // Calling #next will hand the error back to express,
        // so that the error handler defined in `app.ts` will handle.
        next(err)
    })
})
If all goes well, you will be able to see this in your terminal:
[nodemon] restarting due to changes...
[nodemon] starting `ts-node ./src/bin/www`
/ => .routes/index.js
/users => .routes/users.ts
Executing (default): SELECT 1+1 AS result
Connection has been established successfully.
In your browser, go to localhost:3000/users, to verify that a DB query will execute and return results:
Executing (default): SELECT "id", "name", "createdAt", "updatedAt" FROM "Users" AS "User";
[]
GET /users 304 31.818 ms - -
Executing (default): SELECT "id", "name", "createdAt", "updatedAt" FROM "Users" AS "User";
Where's the result? It's the empty array [] because we don't have any users yet, which we will add next.
6: Adding users
For simplicity, we will skip user signup and authentication (many tutorials out there), and provide a simple way to add users in the '/add' route:
/*.routes/users.ts */

router.put('/add', function (req: express.Request, res: express.Response, next: express.NextFunction) {

    not('string', req.body.name, 'User Name', 'Please check your entry')

    // most of the time, you will need findOrCreate
    // as users may attempt to create a user account
    // with a username or email that already exist
    return DB.User.findOrCreate({
        where: {
            name: req.body.name
        }
    }).then((user: any) => {
        // #findOrCreate returns an array [user, created (true or false)]
        console.log(user)
        // if created, it's 201, otherwise Express defaults to 200 so nothing needs to be done.
        if (user[1]) res.status(201)
        res.send(user[0])
    }).catch((err: Error) => {
        next(err)
    })
})
We will use cURL to add a few users:
curl -X POST -d name=Jane localhost:3000/users/add
curl -X POST -d name=John localhost:3000/users/add
curl -X POST -d name=Mike localhost:3000/users/add
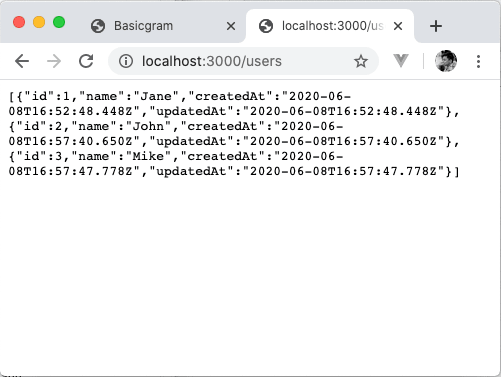
You should see the corresponding server logs that shows that the users have been successfully added. And if you now navigate to localhost:3000/users, you will see some results:
Now that your database is all set up, you can head over to Part 4 to learn some basic Vue templating and how it interacts with the Express/Node API.

Top comments (0)