
This is tutorial 5 of a 5-part tutorial, but each tutorial can be read in isolation to learn various aspects Node+Express+TypeScript+Vue API/Vue web app set up.
Advanced Vue templating and image uploading to Express
Looking to learn mobile/desktop apps? The skills and concepts here are fundamental and re-usable for mobile apps (NativeScript) or desktop apps (Electron). I may cover them as a follow-on.
Navigation to other parts (you are at part 5)
- Setting up Node and Express API with TypeScript
- Setting up VueJs with TypeScript
- Setting up Postgres with Sequelize ORM
- Basic Vue templating and interaction with API
- Advanced Vue templating and image uploading to Express
If you have not, you can start building by cloning and checking out tutorial-part4 branch:
git clone https://github.com/calvintwr/basicgram.git
git checkout tutorial-part4
In this tutorial you will complete the last feature, which is to upload a post with image with Basicgram app, build the Express API endpoint to receive the image, and another endpoint to produce a post feed, and finally the Vue templating to display them to complete the whole loop.
1. Image resizing
First, you want to resize images on client-side before uploading. This means using a Javascript browser resizer, which can sound like a bad idea at first, but it really isn't, given this context. On balance, client-side resized images allows faster upload time, reduced server bandwidth consumption, and flexibility to allow users to practically dump images in right from a DSLR. And in fact it is not that slow, with pretty good image results Blitz:
npm install blitz-resize --save
const Blitz = require('blitz-resize')
let blitz = Blitz.create()

blitz.resize({
    source: file or event,
    height: 640,
    width: 640,
    output: 'jpg', // or png or gif etc,
    outputFormat: image/canvas/data/blob/download,
    quality: 0.8 // 80%
}).then(output => {}).catch(err => {})
On Blitz and image manipulation/uploading
For data types in image manipulation, there are commonly 2 types. First is dataURI which comes in handy and can be attached to <img>'s src like this:
<!-- single quote due to XSS Markdown restrictions -->
<img src=`data:image/png;base64,iVBORw0KGgo...`>
Second is the Blob format, which is used for uploading over HTTP/HTTPS.
Blitz can provide for either by using output: 'data' or output: 'blob', but we will see later how this comes in handy.
2. Code camera.vue to prepare to post stuff:
<!-- camera.vue -->
<template>
    <v-ons-page>
        <div class="container text-center  mx-auto p-1">
            <!-- attach the #readFile method to change event -->
            <input
                type="file"
                capture="camera"
                accept="image/*"
                id="cameraInput"
                name="cameraInput"
                @change="readFile"
            >
            <img class="py-2" ref="image">
            <!-- `ref` defined for this textarea is a Vue reference which will be handy -->
            <textarea
                class="py-2 w-full textarea"
                rows="3"
                placeholder="Write your caption"
                ref="caption"
            ></textarea>

            <!-- #post is for uploading the post -->
            <button
                class="my-2 button"
                @click="post"
                :disabled="buttonDisabled"
            >Post</button>
        </div>

    </v-ons-page>
</template>

<script lang="ts">
import Vue from "vue"
import Blitz = require('blitz-resize')
import * as superagent from 'superagent'
const blitz = Blitz.create()

export default {
    props: {
        userName: {
            type: String
        },
        userID: {
            type: Number
        }
    },
    data() {
        return {
            image: { type: Blob }, // this is to store our image
            buttonDisabled: true // a flag to turn our button on/off
        }
    },
    methods: {
        readFile(event) {
            let file = event.srcElement.files[0] // this is where HTML file input puts the file
            let self = this
            let output;

            // super fast resizing
            blitz({
                source: file,
                height: 640,
                width: 640,
                outputFormat: 'jpg',
                // we will use data because we want to update the image in the DOM
                output: 'data',
                quality: 0.8
            }).then(data => {

                // update the image so that user sees it.
                self.$refs["image"].src = data

                // prepare the Blob. Blitz internally has a #dataURItoBlob method.
                self.image = Blitz._dataURItoBlob(data)

                self.buttonDisabled = false
            }).catch(err => {
                console.log(err)
            })

        },
        post(event) {
            let self = this
            this.buttonDisabled = true
            let caption = this.$refs["caption"].value // using Vue's $ref property to get textarea.

            // Note: To upload image, the request type will be "multipart"
            // Superagent automatically takes care of that and you need to
            // use `field` for text/plain info, and `attach` for files
            superagent
                .post('http://localhost:3000/posts/add')
                .field('userID', this.userID)
                .field('caption', caption)
                .attach('photo', this.image)
                .then((res: superagent.Response) => {
                    alert('Successful post. Go to your profile to see it.')
                }).catch((err: Error) => {
                    this.buttonDisabled = false
                    alert(err)
                })
        }
    }
}
</script>
3. Prepare the API to receive the post
So now that our view is ready to post, we need to create the API endpoint of localhost:3000/posts/add.
Before we write the code, we should think about where to upload the files. The natural choice is to put under "public/uploads", but remember that in tutorial 1, we set up the TypeScript compiler to delete the whole "dist" folder (which also has public folder in it) before compiling into it. This will delete all our uploaded images with every compile.
So you have to move the public folder out to see on the same level with "api" and src, like this:
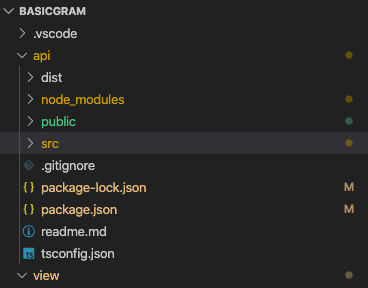
Also, you need to tell Express that you have changed the public folder, which is where by default it serves its static files from:
/* api/src/app.ts */

// change
app.use(express.static(join(__dirname, 'public')))

// to
app.use(express.static(join(__dirname, '../public')))
Express doesn't handle "multipart" requests, so we will need a module. The best one lying around is formidable. You also have multer and busboy, but again, I find formidable's syntax to be the most friendly.
Install formidable:
npm install formidable --save
npm install @types/formidable --save-dev
Formidable's syntax is pretty flexible, and is event-driven. So the idea is to attach functions to events. For example, when a HTTP receive completes all data transmission, formidable will emit the event end, which you will use like this:
const form = formidable()
function formEndHandler():void { perform some action. }
form.on('end', formEndHandler)
So with this in mind, we will create routes/posts.ts:
posts.ts:
import express from 'express'
import { Fields, Files, File } from 'formidable' // typing
import { join } from 'path' // we will use this for joining paths
const formidable = require('formidable') // formidable

const router = express.Router()
const Not = require('you-are-not')
const not = Not.create()
const DB = require('../models/index')

router.get('/', (req: express.Request, res: express.Response, next: express.NextFunction) => {
    // get all posts
})

router.post('/add', (req: express.Request, res: express.Response, next: express.NextFunction) => {

    const form = formidable({ multiples: true })

    let params: any
    form.parse(req, (err: Error, fields: Fields, files: Files) => {
        params = fields

        // use Not to sanitise our received payload

        // define a schema
        let schema = {
            userID: ['string', 'number'],
            caption: ['string']
        }

        // sanitise it
        let sanitised = Not.checkObject(
            'params',
            schema,
            params,
            { returnPayload: true }
        )

        // if sanitised is an array, we will throw it
        if(Array.isArray(sanitised)) {
            throw Error(sanitised.join(' | ')) // join the errors
        }
        params = sanitised
    })

    let fileName: string;
    form.on('fileBegin', (name: string, file: File) => {
        fileName = name + (new Date().getTime()).toString() + '.jpg'
        file.path = join(__dirname, '../../public/uploads', fileName)
    })

    form.on('error', (err: Error) => {
        next(err) // bubbble the error to express middlewares
    })

    // we let the file upload process complete before we create the db entry.
    // you can also do it asynchronously, but will require rollback mechanisms
    // like transactions, which is more complicated.
    form.on('end', () => {
        return DB.Post.create({
            User_userID: params.userID,
            image: fileName,
            caption: params.caption
        }).then((post: any) => {
            console.log(post)
            res.status(201).send(post)
        }).catch((err: Error) => {
            next(err)
        })
    })
})

module.exports = router
Restart your server and head over to your view, and you should be able to do this:

If you realise, the resizing was very fast, and likewise the upload time, as the file size is drastically reduced with client-side compression by Blitz.
Now we just need to create the endpoints for a user to get all his/her posts, for the profile page, and also make the post feeds for the home page.
4. Profile page profile.vue and API endpoint
You should be pretty good by now. The endpoint (which we will name GET /posts/own) to get all posts of a user is not hard at all:
/* routes/posts.ts */

router.get('/own', (req: express.Request, res: express.Response, next: express.NextFunction) => {

    // we will receive userID as a string. We want to parse it and make sure
    // it's an integer like "1", "2" etc, and not "1.1", "false"
    Not.defineType({
        primitive: 'string',
        type: 'parseable-string',
        pass(id: string) {
            // TypeScript does not check at runtime. `string` can still be anything, like null or boolean.
            // so you need Notjs.
            return parseInt(id).toString() === id
        }
    })

    // for GET, the standard is to use querystring.
    // so it will be `req.query` instead of `req.body`
    not('parseable-string', req.query.userID)

    DB.Post.findAll({
        where: {
            User_userID: req.query.userID
        },
        order: [ ['id', 'DESC'] ] // order post by id in descending, so the latest will be first.
    }).then((posts:any) => {
        res.send(posts)
    }).catch((err:Error) => {
        next(err)
    })
})
The low-down on VueJS's Hooks: #created(), #mounted() etc...
Next is profile.vue.
VueJS provides for several "hooks" which are called to prepare the view. They look like this:
<template>
    <div> {{ dataFromAPI }} </div>
</template>
<script>
import Vue from 'vue'
export default {
    data() {
        return {
            // this is bound to {{ dataFromAPI }} in the DOM
            dataFromAPI: 'Waiting for API call'
        }
    },
    // or created(), depending on when you want it.
    mounted() {
        // anything inside here gets called when this view is mounted

        // you will fetch some data from API.

        // suppose API results the results, then doing this:
        this.dataFromAPI = results
        // will update the value in {{ dataFromAPI }}
    }
}
</script>
The most commonly used are created() and mounted(). We are going to code profile.vue like this:
<!-- profile.vue -->
<template>
    <v-ons-page>
        <div class="content">
            <div class="w-full p-10" style="text-align: center">
                {{ userName }}'s Profile
            </div>

            <!-- Three columns Tailwind class-->
            <div v-if="posts.length > 0" class="flex flex-wrap -mb-4">
                <div
                    class="w-1/3"
                    v-for="post in posts"
                    :key="post.id"
                ><img :src="'http://localhost:3000/uploads/' + post.image"></div>
            </div>
        </div>
    </v-ons-page>
</template>

<script lang="ts">
import Vue from 'vue'
import * as superagent from 'superagent'

export default {
    props: {
        userName: {
            type: String
        },
        userID: {
            type: Number
        }
    },
    data() {
        return {
            posts: { type: Array }
        }
    },
    mounted() {
        superagent
            .get('http://localhost:3000/posts/own')
            .query({ userID: this.userID })
            .then((res: superagent.Response) => {
                // attach the results to the posts in our data
                // and that's it! Vue will update the DOM because it's binded
                this.posts = res.body
            }).catch((err: Error) => {
                alert(err)
            })
    }
}
</script>
Explanation: That just tells Vue that when this view is mounted, please run the superagent request for me.
Tip: For some very odd reasons, OnsenUI needs all your content to be wrapped in
<div class="content">, if not things will start to behave funny.Tip: Notice that we wrap the posts with
<div v-if="posts.length > 0">. This is to prevent Vue from rendering the DOMs which requires data but the API call has not yet completed. If you don't do that, nothing will break, just that you will see some pesky console log errors telling you that an image url is broken, for example.
For simplicity, we will skip the triggers that will update the views when say, you upload a post. Right now you will have to refresh the whole app.
And you should see:


We will do something similar for the homepage.vue, using #created(), which will be called a little earlier:
<template>
    <v-ons-page>
        <div class="content">
            <div v-if="posts.length > 0">
                <v-ons-card v-for="post in posts" :key="post.id">
                    <img class="w-full" :src="'http://localhost:3000/uploads/' + post.image">
                    <div class="py-1 content">
                        <p class="text-xs font-bold py-2">{{ post.User.name }}<p>
                        <p class="text-xs text-gray-700">{{ post.caption }}</p>

                    </div>
                </v-ons-card>
            </div>
        </div>
    </v-ons-page>
</template>

<script lang="ts">
import Vue from 'vue'
import * as superagent from 'superagent'

export default {
    props: {
        userID: {
            type: Number
        }
    },
    data() {
        return {
            posts: { type: Array }
        }
    },
    created() {
        superagent
            .get('http://localhost:3000/posts/feed')
            .query({ userID: this.userID })
            .then((res: superagent.Response) => {
                this.posts = res.body
            }).catch((err: Error) => {
                alert(err)
            })
    }
}
</script>
And our "/posts/feed" inside of routes/post.ts API:
router.get('/feed', (req: express.Request, res: express.Response, next: express.NextFunction) => {

    not('parseable-string', req.query.userID)

    // user's feed is not his/her own posts
    DB.Post.findAll({
        where: {
            User_userID: {
                // this is a Sequelize operator
                // ne means not equal
                // so this means from all post that
                // doesn't belong to this user.
                [DB.Sequelize.Op.ne]: req.query.userID
            }
        },
        // we want to include the User model for the name
        include: [ DB.User],
        order: [ ['id', 'DESC'] ] // order post by id in descending, so the latest will be first.
    }).then((posts:any) => {
        res.send(posts)
    }).catch((err:Error) => {
        next(err)
    })
})
But after doing that, you realise that your app isn't sending userID the API. That is because we did not pass the userID prop to homepage.vue. We can fix that by editing home.vue:
icon: 'fa-home',
label: 'Home',
page: homePage,
key: "homePage",
props: {
    userID: {
        type: Number // add the userID prop to homePage
    }
}
Tip: You will realise that your app quickly outgrows Vue's basic mechanism of passing data around via
propsand event emitters. This is why you almost always needVuexfor state management, to store data accessible by the whole app in one place.
And it should work:

And there you have it! A super sketchy Instagram.
You can head over to the git repo to clone this completed app to play with it:
git clone https://github.com/calvintwr/basicgram.git

Latest comments (6)
Unrelated to the post content.
I think you should turn these articles into a series to enable easy navigation.
Yup thats right. I didnt use the automatic one. There's the manually created one already up.
Hey thanks for the comments, and for pointing out the 404. The tutorials are written not with as much attention as I would like to as the original task of conversion to typescript along with dealing with "bleeding edge" pre-release version took up unforeseen amount of my time. Will be happy if you have more suggestions.
Have updated the link to Part 2. Here's one for your convenience:
Setting up VueJs with TypeScript
Thanks! 👍 would be happy to get it working and help people