
Thanks to Dev.to, us developers have a niche platform to write without the need to start our own blog. This is awesome, but you built a portfolio specifically to showcase and consolidate your work, so leaving a link to your Dev.to profile hoping it'll be clicked isn't nearly as effective as a slick card with a preview of your post (click-bait, do your stuff). I'm going to go over how & why I decided to build my blog with a Dev.to backend.
Why?!
Why not Vuepress or Gridsome?

If I were starting my site from the ground up, Gridsome would've been the obvious choice, but I already have my site built in vanila VueJs exactly as I want it.
I did heavily consider Vuepress, but decided the effort couldn't be justified by my needs. I'm not worried about SEO and I don't need to write from my own admin panel. Plain and simply, I just want my portfolio to be a centralized repository of all my work relating to development.
Why Dev.to?
There's a few reasons I decided on using Dev.to.
1.) Its all tech, which means that I'm directly interacting with my peers whereas if I were to use say Medium, I'd be in a very deep pool and not accomplishing the interaction I'm shooting for with as much ease.
2.) No SEO or advertising to worry with. By using Dev.to to host my content I'm completely eliminating my need to worry with SEO. I'll use vue-meta to aid with SEO on my blog by taking some data from Dev.to's API.
3.) Tiny impact to bundle, Netlify compatible, super quick. Gridsome boasts some crazy performance numbers for sure, but the flow of having to push changes to the overall codebase isn't nearly as elegant as just writing on Dev.to and knowing that the post will be on my site automatically.
4.) Dev.to's API provides all of the data I'd expect from any other CMS. There are some caveats for sure, but worth noting that their API is still in beta so who knows what more is to come.
Here's an example response from this article (I'll be omitting the keys body_html & body_markdown to avoid an inception level catastrophe):
{
  "type_of": "article",
  "id": 203240,
  "title": "Start your blog with a Dev.to backend",
  "description": "",
  "cover_image": "https://res.cloudinary.com/practicaldev/image/fetch/s--x1wXDXOK--/c_imagga_scale,f_auto,fl_progressive,h_420,q_auto,w_1000/https://res.cloudinary.com/practicaldev/image/fetch/s--A1UtFhw3--/c_imagga_scale%2Cf_auto%2Cfl_progressive%2Ch_420%2Cq_auto%2Cw_1000/https://thepracticaldev.s3.amazonaws.com/i/1mj5i26wfcagzuisquc7.png",
  "readable_publish_date": "Nov 11",
  "social_image": "https://res.cloudinary.com/practicaldev/image/fetch/s--r6RM1gMz--/c_imagga_scale,f_auto,fl_progressive,h_500,q_auto,w_1000/https://res.cloudinary.com/practicaldev/image/fetch/s--A1UtFhw3--/c_imagga_scale%2Cf_auto%2Cfl_progressive%2Ch_420%2Cq_auto%2Cw_1000/https://thepracticaldev.s3.amazonaws.com/i/1mj5i26wfcagzuisquc7.png",
  "tag_list": "beginners, vue, javascript",
  "tags": [
    "beginners",
    "vue",
    "javascript"
  ],
  "slug": "start-your-blog-with-a-dev-to-backend-13e2",
  "path": "/codespent/start-your-blog-with-a-dev-to-backend-13e2",
  "url": "https://dev.to/codespent/start-your-blog-with-a-dev-to-backend-13e2",
  "canonical_url": "https://dev.to/codespent/start-your-blog-with-a-dev-to-backend-13e2",
  "comments_count": 0,
  "positive_reactions_count": 0,
  "collection_id": null,
  "created_at": "2019-11-11T02:43:22Z",
  "edited_at": "2019-11-11T04:35:47Z",
  "crossposted_at": null,
  "published_at": "2019-11-11T04:09:07Z",
  "last_comment_at": "2019-11-11T04:09:07Z",
  "published_timestamp": "2019-11-11T04:09:07Z",
  "user": {
    "name": "CodeSpent",
    "username": "codespent",
    "twitter_username": "CodeSpent",
    "github_username": null,
    "website_url": "https://codespent.dev/",
    "profile_image": "https://res.cloudinary.com/practicaldev/image/fetch/s--mT1TUP7B--/c_fill,f_auto,fl_progressive,h_640,q_auto,w_640/https://thepracticaldev.s3.amazonaws.com/uploads/user/profile_image/178244/de976252-7575-4822-aff1-bbffa007fe24.jpg",
    "profile_image_90": "https://res.cloudinary.com/practicaldev/image/fetch/s--gp1VBpDB--/c_fill,f_auto,fl_progressive,h_90,q_auto,w_90/https://thepracticaldev.s3.amazonaws.com/uploads/user/profile_image/178244/de976252-7575-4822-aff1-bbffa007fe24.jpg"
  }
}
We have plenty of data available to create a stylish blog with some vue-meta additions. Maybe even slug routing later.
Starting the project
I'm starting with an existing project, so I'm going to pick this article up where that begins. If you need help getting your Vue app started, check out this excellent write-up from @therealdanvega.
Fetching articles
WARNING: For this use case, we'll be using Dev.to's API publically with NO API_KEY. Currently there is no read only api_key and all your secrets will be baked into the application and accessible from the browser, giving an attacker the ability to post to Dev.to on your behalf. Please do not use your Dev.to api_key on the frontend.
We'll start by creating a /services/ directory in your /src/ folder. Inside this directory, create a file called blogService.js which will house the api methods for collecting articles. First create an instance of axios with our baseUrl pointing at Dev.to's API at https://dev.to/api/.
import axios from 'axios'

const api = axios.create({
  baseURL: 'https://dev.to/api/',
  timeout: 5000,
  headers: {
    'Content-Type': 'application/json',
  }
})
This gives us a reusable axios instance for use in our blog service. We'll want to use that to start fetching articles, which sensibly is just at the /articles/ endpoint, so lets add that method to our blogService.
export default {
  async fetchArticles() {
    try {
      return await api.get(`articles`)
    }
    catch(e) {
      return e.response
    }
  },
}
In any of your components, go ahead and test this by importing it and calling the fetchArticles() method.
import blogService from '@/services/blogService'
You'll find that this isn't quite right, its pulling all Dev.to articles, so we'll want to add a query parameter to filter to just our own posts. In your fetchArticles() method, just append ?username=<your_username> to the url arg.
export default {
  async fetchArticles() {
    try {
      return await api.get(`articles?username=codespent`)
    }
    catch(e) {
      return e.response
    }
  },
}
All set! We can now get all of our articles!
Blog components
We're going to need to create 3 components:
- Blog Component
-- Houses the
<router-view>for our nested Blog routes. - Blog Home Feed -- This is where we're going to see an overview of all blog posts.
- Blog Post -- Appropriately named, this is where a single post will be available to read.
Blog.vue
<template>
    <div class="container text-center p-4 min-w-full">
      <h1 class="text-white text-5xl">CodeSpent.dev</h1>
      <h3 class="text-gray-600 text-sm font-black italic">This blog is powered by </h3>
      <a href="https://dev.to/" class="text-center text-white"><font-awesome-icon size="2x" :icon="['fab', 'dev']" /></a>
      <router-view></router-view>
    </div>
</template>
The Blog component will be rather simple. Just a header, and a Powered by Dev.to badge. The important parts will be coming from our <router-view></router-view> which is going to render our other 2 components based on the route.
Routing
For my site, I've got a home page which is located at /, and the blog I'd like to be available at /blog. This introduces a necessity for nested routing.
My blog routes will look something like this.
/blog                                /blog/post/:articleId
+------------------+                  +-----------------+
| Blog             |                  | Blog            |
| +--------------+ |                  | +-------------+ |
| | BlogHome     | |  +------------>  | | BlogPost    | |
| |              | |                  | |             | |
| +--------------+ |                  | +-------------+ |
+------------------+                  +-----------------+
We can achieve this pretty easily by first creating a /blog/ route for our Blog.vue component.
export default new Router({
  mode: 'history',
  routes: [
    {
      path: '/',
      component: Home,
      name: 'home'
    },
    {
      path: '/blog/',
      component: Blog,
      name: 'blog'
    }
Under /blog/ we'll want to put our 2 nested routes, BlogHome and BlogPost, so these will be passed as children under the /blog/ route. Here is my complete router.js with the nested routes for reference.
import Vue from 'vue'
import Router from 'vue-router'

import Home from '@/components/home/Home'
import Blog from '@/components/blog/Blog'
import BlogHome from '@/components/blog/BlogHome'
import BlogPost from '@/components/blog/BlogPost'

Vue.use(Router)

export default new Router({
  mode: 'history',
  routes: [
    {
      path: '/',
      component: Home,
      name: 'home'
    },
    {
      path: '/blog/',
      component: Blog,
      name: 'blog',
      children: [
        {
          path: '/',
          component: BlogHome,
          name: 'blog-home'
        },
        {
          path: '/blog/post/:articleId/',
          component: BlogPost,
          name: 'blog-post'
        }
      ]
    },
  ]
})
Now we have all the routing ready to handle both the BlogHome and BlogPost component. You'll notice the :articleId/ at the end of the BlogPost path, this is used to get the Dev.to article id from a url parameter later!
BlogHome
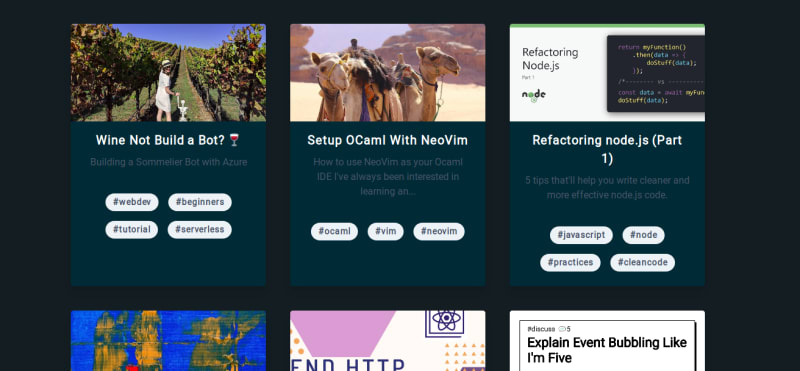
The BlogHome component is where we'll be presenting all articles with some description text, tags, and the cover image used. Now I'm just getting started on Dev.to myself, so this screenshot you'll notice is other awesome developers' articles for testing. In your fetchArticles() method in blogService.js you can remove the username query parameter to get all articles from Dev.to for the sake of testing/designing if you're new as well.
<template>
  <div class="container text-center p-4">
      <div class="container flex flex-row flex-wrap m-8 p-8 min-h-screen">
        <h3 v-if="articles.length < 1" class="text-gray-600">No posts yet, stay tuned!</h3>
        <div
          v-for="article in articles"
          :key="article.id"
          @click="openArticle(article.id)"
          class="max-w-xs m-5 rounded overflow-hidden shadow-lg bg-terminal"
        >
        <img class="w-full" :src="article.social_image" :alt="article.description">
        <div
          class="px-6 py-4"
        >
          <div class="font-bold text-xl mb-2 text-white">{{ article.title }}</div>
          <p class="text-gray-700 text-base">{{ article.description }}</p>
        </div>
        <div class="px-6 py-4">
          <span
            class="inline-block bg-gray-200 rounded-full px-3 py-1 text-sm font-semibold text-gray-700 m-2"
            v-for="tag in article.tag_list"
            :key="tag"
          >
          #{{ tag }}
          </span>
        </div>
      </div>
    </div>
  </div>
</template>

<script>
import blogService from '@/services/blogService'

  export default {
    data() {
      return {
        articles: []
      }
    },
    methods: {
      async fetchArticles() {
        await blogService.fetchArticles()
        .then((response) => {
          switch(response.status) {
            case 200: {
              this.articles = response.data
              break
            }
            default: {
              this.articles = false
              break
            }
          }
        })
      },
      openArticle(articleId) {
        this.$router.push('post/' + articleId)
      }
    },
    mounted() {
      this.fetchArticles()
    }
  }
</script>
I'm using TailwindCSS here to build the layout with the card object, then using the v-for directive, I loop over the articles that were set from the fetchArticles() method called on the beforeMount() hook. You're welcome to use this template for yourself, I'm not much of a designer, but this contains the basic elements I felt necessary; Title, Description, CoverImage, & Tags.
You'll notice that on the @click directive for the card div, we have a method called openArticle() which pushes the route to blog/post/:articleId. This is where we'll use that url param from earlier. Lets go ahead and move over to the BlogPost component.
BlogPost.vue
This one is a work-in-progress, for sure. The Dev.to API does provide both body_markdown & body_html keys in the article data, but we'll still need to style based on that data. Considering I have very few posts yet to work with, I haven't caught a whole lot of conditions needed to style.
<template>
  <div class="container flex flex-col items-center m-5 min-h-screen">
    <h1 v-if="!article" class="text-gray-600">That post can't be found.</h1>
    <img :src="article.cover_image" class="rounded max-h-30" width="1000px" />
    <h1 class="text-white text-3xl font-black mt-4">{{ article.title }}</h1>
    <div class="article text-left" v-html="article.body_html"></div>
  </div>
</template>

<script>
import blogService from '@/services/blogService'

export default {
  data() {
    return {
      article: {}
    }
  },
  beforeMount() {
    this.fetchArticle()
  },
  methods: {
    async fetchArticle() {
      const articleId = this.$route.params.articleId
      await blogService.fetchArticleById(articleId)
      .then((response => {
        switch(response.status) {
          case 200: {
            this.article = response.data
            break
          }
          default: {
            this.article = false
            break
          }
        }
      }))
    }
  }
}
</script>
Another pretty basic layout with some very similar things from the BlogHome component. Take notice to the final div in our template. This is where we use the v-html directive to "inject" the html from the article into that div. You'll notice by default, this comes out very ugly, so we'll want to style it. Now this part is very much still a work-in-progress for me as I haven't seen a whole lot of articles enough so to style, but I do want to make a comment about the /deep/ >>> selector. Here are my current styles.
<style scoped>
  .article {
    padding: 4em;
  }
  .article >>> {
    color: #fff !important;
  }
  .article >>> h1 {
    font-size: 2.2em;
  }

  .article >>> p {
    font-size: 1.2em;
    margin: 1,2 0 1.8em;
  }

  .article >>> li {
    margin: 0.3em auto;
    list-style: square;
  }
</style>
The >>> selector has been deprecated some time ago, but with scoped styles, this has been the only way I could actually get the styles to apply within the v-html directive. Happen to have a better way of handling this? Please feel free to comment!
Netlify redirect
Just want to quickly address this as I've had a lot of people get stuck on this when using vue-router with Netlify. To keep nice syntactic urls, we'll want to use history mode on vue-router, but this only works when the server is handling route redirects. Since we don't have access to Nginx/Apache on Netlify, we'll want to create a redirect in a netlify.toml.
Create a file in the root of your project called netlify.toml. The purpose of this file is to send a message to the builder robots when deploying with Netlify that lets them know some additional configurations are needed.
In this file, add the following:
[[redirects]]
  from = "/*"
  to = "/index.html"
  status = 200
What this will do is redirect all routes back to index.html in your Vue app allowing vue-router to take care of the routing.
Note: Do not use the force = true argument if redirect doesn't work at first, this will also force redirects on /static /assets routes which is where your js files are hosted. Instead clear cache & deploy again.
Demo
You can see a live demo of this at https://CodeSpent.dev/ and this specific article at https://www.codespent.dev/blog/post/203240/

Conclusion
Well that's pretty much it, now you can just write up your blog posts on Dev.to as normal, but your site will still contain a good-looking blog to centralize all your work. Of course I am by no means a Vue or Javascript expert, so if you see an issue or spot a way this could be improved, please leave a comment!
Suggestions Welcome
Of course any suggestions or critique on this post, contents within, or the code provided are heavily welcome!
Issues
A few issues I'm currently working out:
- Adding Prism/Highlightjs syntax highligting
- Implement comments and like counts (Read only)
You can also find my portfolio/blog code on GitHub for reference.

Top comments (13)
For syntax highlighting you could feed the raw markdown into the wc-markdown web component.
github.com/vanillawc/wc-markdown
It has markdown parsing (Marked) and syntax highlighting (PrismJS) built-in.
I'm going to try hosting this from a S3 Bucket.
This is huge. Thank you! May just be the solution to some styling hacks here as well. :)
In theory, it should work. I haven't actually tried integraring the web component into Vue yet. When you import, use the
dist/bundle.I've been looking for a setup like this for my own blog. So, I'll be trying to do the same.
Except, I'm going to try hosting it on AWS. With the website code on S3, the Dev.to requests proxied through API Gateway, and everything sitting behind a Cloudfront distribution.
That should allow HTTPS, cache all requests (incl the ones proxied to Dev.to) for 24 hours, and be dirt cheap to host.
BTW, the component uses lightDOM. Meaning you can style it globally.
Styles can be defined relative to the component. Once parsed, it'll contain the Markdown rendered as HTML. So, you can define styles like this:
Thanks for your nice article. I also moved my blog site from wordpress to vuejs and netlify. I also wrote an article crediting you here
Moved My Blog Website From WordPress To Dev.to With VueJS
Sulman Baig ・ Jul 22 ・ 3 min read
It would be great for me to have something like this but using a lightweight framework like Stimulus or Trimmings
Great work :)
I'm preparing my blog with Nuxt for a while. This will help me. Thanks.
Fantastic! Let me know if you have any questions or figure out some better ways to display the article contents. The biggest challenge with this approach so far is style overrides & syntax highlighting.
Of course :) Maybe I will permanently move my blog to Dev.
Awesome
Dude! This looks soo cool! I love the gif banner on your website.
Stackbit is also an alternative for publishing from dev.to, that takes away bit of the complexity of the setup.
Nice read! 🔥
The code typer animation on my site is actually a demonstration of of
setIntervalwith Prism.It's a bit messy but you can check out the code here.
Thanks a lot! I'll definitely look into Stackbit as well.
Cool!
Could you get document API dev.to for me?
Thanks!