
TL;DR
In this tutorial, you'll learn how to utilize CoinAPI's RESTful API in a Node.js environment to fetch live cryptocurrency data. You'll also learn how to visualize this real-time data using D3.js within a React.js application, allowing for real-time, interactive data visualization.
Why do you need it?
CoinAPI's access to comprehensive, historical data, combined with D3.js's dynamic visualization capabilities, simplifies understanding complex market trends. This integration also eases data management and enhances customizability for specific analytical needs. Furthermore, the tutorial's step-by-step approach makes advanced data visualization more accessible to developers with varying skill levels. This not only aids in current data analysis but also equips users with essential tools for handling real-time data, crucial for informed decision-making in the rapidly changing cryptocurrency market.
🔥 On the agenda:
- Retrieve up-to-the-minute cryptocurrency data using CoinAPI and Node.js.
- Process and set up the data for effective visualization.
- Develop a dynamic, historical price chart utilizing D3.js.
- Enhance the chart's appearance with professional CSS styling.
- Incorporate additional sophisticated features such as tooltips and zoom capabilities.
CoinAPI: Cryptocurrency data API 🚀
Just a quick background about us. CoinAPI is a crypto market data API that provides streamlined access to both real-time and historical financial data sourced from numerous exchanges globally. Catering to a wide range of needs, we offer everything from raw trading data, OHLCV (Open, High, Low, Close, Volume) data, to detailed information on specific market events. Our robust support for various data delivery methods, including REST and WebSocket, makes our API incredibly versatile and developer-friendly. It's an ideal tool for those aiming to create anything from trading algorithms to detailed financial visualizations.
Getting Started
First, create a new project folder on your computer and name it crypto_price_chart. Inside this folder, create three files: index.html, style.css, and script.js.
Setting up the API request
To fetch data from CoinAPI, we'll first need to make an API request. This will require an API key, which you can obtain by registering at the CoinAPI website.
Code Snippet: Prepare index.html
Here's the basic structure of a web page designed to visualize cryptocurrency closing prices over a specified period using D3.js.
<!doctype html>
<html>
<head>
<title>Coinapi</title>
<script src="https://d3js.org/d3.v6.min.js"></script>
<script src="script.js"></script>
<link rel="stylesheet" href="style.css">
</head>
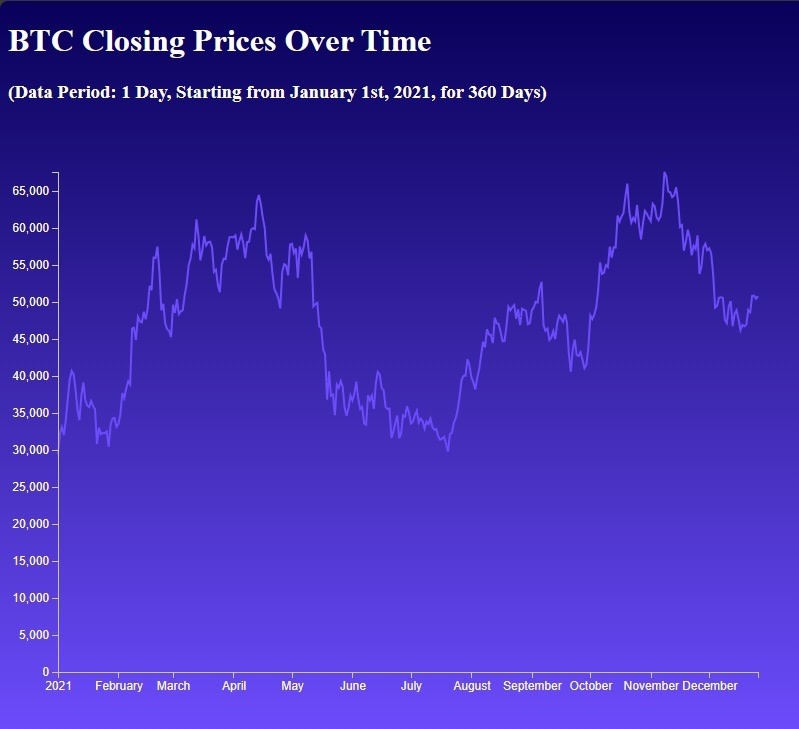
<h1>BTC Closing Prices Over Time</h1>
<h3>(Data Period: 1 Day, Starting from January 1st, 2021, for 360 Days)</h3>
<svg width="800" height="600"></svg>
</html>
Fetching Data from CoinAPI
Create a function in your script.js to fetch historical data.
const API_KEY = "YOUR_API_KEY_HERE";
const url = `https://rest.coinapi.io/v1/ohlcv/BITSTAMP_SPOT_BTC_USD/history?apikey=${API_KEY}&period_id=1DAY&time_start=2021-01-01T00:00:00&limit=360`;

async function fetchData() {
  try {
    const response = await fetch(url);
    if (!response.ok) {
      throw new Error('Network response was not ok');
    }
    const data = await response.json();
    return data;
  } catch (error) {
    console.error('Error fetching data:', error);
    throw error;
  }
}
Preparing the data
After fetching the data, it needs to be prepared for charting. We'll create a simple function to transform the data into a format that D3.js can easily interpret. Add it to the end of script.js.
Data transformation
function transformData(data) {
  return data.map(entry => ({
    date: new Date(entry.time_period_start),
    price: entry.price_close
  }));
}
Now let's dive into building the chart with D3.js🔥
Add this code at the end of your script.js file.
document.addEventListener('DOMContentLoaded', () => {
  const svg = d3.select("svg"); // Select the existing SVG element in the HTML

  fetchData()
    .then(data => {
      const transformedData = transformData(data);

      // Define chart dimensions
      const width = 800;
      const height = 600;
      const margin = { top: 50, right: 50, bottom: 50, left: 50 };

      // Create a group for the chart elements
      const chartGroup = svg.append("g")
        .attr("transform", `translate(${margin.left}, ${margin.top})`);

      // Create scales
      const xScale = d3.scaleUtc()
        .domain(d3.extent(transformedData, d => d.date))
        .range([0, width - margin.left - margin.right]);

      const yScale = d3.scaleLinear()
        .domain([0, d3.max(transformedData, d => d.price)])
        .range([height - margin.bottom - margin.top, 0]);

      // Create a line generator
      const line = d3.line()
        .x(d => xScale(d.date))
        .y(d => yScale(d.price));

      // Draw the line
      chartGroup.append("path")
        .datum(transformedData)
        .attr("class", "line")
        .attr("d", line);

      // Add axes
      chartGroup.append("g")
        .attr("class", "x-axis")
        .attr("transform", `translate(0, ${height - margin.bottom - margin.top})`)
        .call(d3.axisBottom(xScale));

      chartGroup.append("g")
        .attr("class", "y-axis")
        .call(d3.axisLeft(yScale));
    })
    .catch(error => console.log(error));
});
Styling the chart
Now, let's style your chart using the provided CSS. Add the following CSS to your style.css file:
body, h1, h2, h3, p, ul, li {
  margin: 5;
  padding: 0;
  color: white;
}

/* Set a gradient background for the body */
body {
  background: linear-gradient(to bottom, #080059, #6C4CFC);
}

/* Style the SVG container */
svg {
  background-color: transparent; /* Transparent background for the chart */
}

/* Style the chart line */
.line {
  fill: none;
  stroke: #6C4CFC; /* Purple color for the line */
  stroke-width: 2;
}

/* Style the x-axis */
.x-axis path,
.x-axis line {
  fill: none;
  stroke: #ccc; /* Light gray color for x-axis lines */
  shape-rendering: crispEdges;
}

.x-axis text {
  font-size: 12px;
  fill: white; /* Text color for the x-axis labels */
}

/* Style the y-axis */
.y-axis path,
.y-axis line {
  fill: none;
  stroke: #ccc; /* Light gray color for y-axis lines */
  shape-rendering: crispEdges;
}

.y-axis text {
  font-size: 12px;
  fill: white; /* Text color for the y-axis labels */
}

/* Style the legend */
.legend {
  font-size: 16px;
  text-align: right;
  color: white; /* Text color for the legend text */
}
Testing your chart
Save all your files and open index.html in a web browser. You should see a beautiful historical crypto price chart generated from real data!
Conclusion
Congratulations!🔥 You've successfully built a historical crypto price chart using CoinAPI and D3.js. This exercise demonstrated the power of APIs and data visualization libraries in creating interactive, informative visual tools.
Thank you for reading!

Top comments (0)