
In this tutorial, I am going to build a pricing component in React using the HTML structure from the previous article of this series.
Let's create a Pricing.js component file, and add the HTML into the return statement 👇
import React from "react";

class Pricing extends React.Component {
  render() {
    return (
      <div className="pricing">
        <div className="pricing-slider center-content">
          <label className="form-slider">
            <span>How many users do you have?</span>
            <input type="range" />
          </label>
          <div className="pricing-slider-value">
            {/* Current slider value */}
          </div>
        </div>

        <div className="pricing-items">
          <div className="pricing-item">
            <div className="pricing-item-inner">
              <div className="pricing-item-content">
                <div className="pricing-item-header center-content">
                  <div class="pricing-item-title">Basic</div>
                  <div className="pricing-item-price">
                    <span className="pricing-item-price-currency" />
                    <span className="pricing-item-price-amount">Free</span>
                  </div>
                </div>
                <div className="pricing-item-features">
                  <ul className="pricing-item-features-list">
                    <li className="is-checked">Excepteur sint occaecat</li>
                    <li className="is-checked">Excepteur sint occaecat</li>
                    <li className="is-checked">Excepteur sint occaecat</li>
                    <li>Excepteur sint occaecat</li>
                    <li>Excepteur sint occaecat</li>
                  </ul>
                </div>
              </div>
              <div class="pricing-item-cta">
                <a class="button" href="http://cruip.com/">
                  Buy Now
                </a>
              </div>
            </div>
          </div>

          <div className="pricing-item">
            <div className="pricing-item-inner">
              <div className="pricing-item-content">
                <div className="pricing-item-header center-content">
                  <div class="pricing-item-title">Advanced</div>
                  <div className="pricing-item-price">
                    <span className="pricing-item-price-currency">$</span>
                    <span className="pricing-item-price-amount">13</span>
                    /m
                  </div>
                </div>
                <div className="pricing-item-features">
                  <ul className="pricing-item-features-list">
                    <li className="is-checked">Excepteur sint occaecat</li>
                    <li className="is-checked">Excepteur sint occaecat</li>
                    <li className="is-checked">Excepteur sint occaecat</li>
                    <li className="is-checked">Excepteur sint occaecat</li>
                    <li className="is-checked">Excepteur sint occaecat</li>
                  </ul>
                </div>
              </div>
              <div class="pricing-item-cta">
                <a class="button" href="http://cruip.com/">
                  Buy Now
                </a>
              </div>
            </div>
          </div>
        </div>
      </div>
    );
  }
}

export default Pricing;
Shaping input and output data
We already have a data scheme with input and output values (check out the first article of this series to know more).
| Key | Slider value | Price, currency | Price, amount | Price, after |
|---|---|---|---|---|
| 0 | 1,000 | Free | ||
| 1 | 1,250 | $ | 13 | /m |
| 2 | 1,500 | $ | 17 | /m |
| 3 | 2,000 | $ | 21 | /m |
| 4 | 2,500 | $ | 25 | /m |
| 5 | 3,500 | $ | 42 | /m |
| 6 | 6,000 | $ | 58 | /m |
| 7 | 15,000 | $ | 117 | /m |
| 8 | 50,000 | $ | 208 | /m |
| 9 | 50,000+ | Contact us |
We will use the state object to contain that data.
Defining the component state
React has a built-in state object where to store property values that belongs to the component. I will use that to set input range and data scheme values.
state = {
  priceInputValue: "0", // initial input value
  priceInput: {         // slider values
    0: "1,000",
    1: "1,250",
    2: "1,500",
    3: "2,000",
    4: "2,500",
    5: "3,500",
    6: "6,000",
    7: "15,000",
    8: "50,000",
    9: "50,000+"
  },
  priceOutput: {        // output values
    plan1: {
      0: ["", "Free", ""],
      1: ["$", "13", "/m"],
      2: ["$", "17", "/m"],
      3: ["$", "21", "/m"],
      4: ["$", "25", "/m"],
      5: ["$", "42", "/m"],
      6: ["$", "58", "/m"],
      7: ["$", "117", "/m"],
      8: ["$", "208", "/m"],
      9: ["", "Contact Us", ""]
    }
  }
};
Now pass the priceInputValue to the input range defaultValue attribute:
<input type="range" defaultValue={this.state.priceInputValue} />
Setting range slider attributes
Create a ref and attach it to the input range element
// Create ref
slider = React.createRef();
// Attach ref
<input
  type="range"
  defaultValue={this.state.priceInputValue}
  ref={this.slider} />
Let's set the range slider min, max attributes, right after the component output has been rendered to the DOM 👇
componentDidMount() {
  this.slider.current.setAttribute("min", 0);
  this.slider.current.setAttribute(
    "max",
    Object.keys(this.state.priceInput).length - 1
  );
}
We have now a range slider whose values go from 0 to 9! 🙌
Here is a recap of what we have built so far:
Binding input and output data
We have a working range slider, but it is still disconnected from the visualized price.
Before anything else, we need to update the priceInputValue property value every time a user interacts with the slider. To do that, let's create a method ...
handlePricingSlide = e => {
  this.setState({ priceInputValue: e.target.value });
};
... to be invoked when the input onChange event occurs.
<input
  type="range"
  ref={this.slider}
  defaultValue={this.state.priceInputValue}
  onChange={this.handlePricingSlide}
/>
OK, now we need another method to retrieve the data to be outputted, accordingly with the current input value
getPricingData = (obj, pos) => {
  return set !== undefined
    ? obj[this.state.priceInputValue][pos]
    : obj[this.state.priceInputValue];
};
This method has two parameters:
-
obj- The input or output object we want to retrieve data from -
pos(optional) - The position of a required element in the array, if there is any. It is required for the plan objects, since to each key corresponds an array of values (e.g.0: ["", "Free", ""], ...).
So, to output the current slider value, we will call the method like this 👇
<div className="pricing-slider-value">
  {this.getPricingData(this.state.priceInput)}
</div>
And here is how to output the price data instead 👇
<div className="pricing-item-price">
  <span className="pricing-item-price-currency">
    {this.getPricingData(this.state.priceOutput.plan1, 0)}
  </span>
  <span className="pricing-item-price-amount">
    {this.getPricingData(this.state.priceOutput.plan1, 1)}
  </span>
  {this.getPricingData(this.state.priceOutput.plan1, 2)}
</div>
Adjusting the slider value element position
Almost there. 🏁 We want the slider value to be following the slider thumb.
We need a new method for that but, before proceeding, there is another DOM element that needs to be referenced.
Create a ref and pass it to the current slider value
// Create ref
sliderValue = React.createRef();
// Attach ref
<div className="pricing-slider-value" ref={this.sliderValue}>
Get the slider thumb size from a CSS property 👍
this.thumbSize = parseInt(
  window
    .getComputedStyle(this.sliderValue.current)
    .getPropertyValue("--thumb-size"),
  10
);
Now that we have a reference for the .pricing-slider-value element, we can create the method.
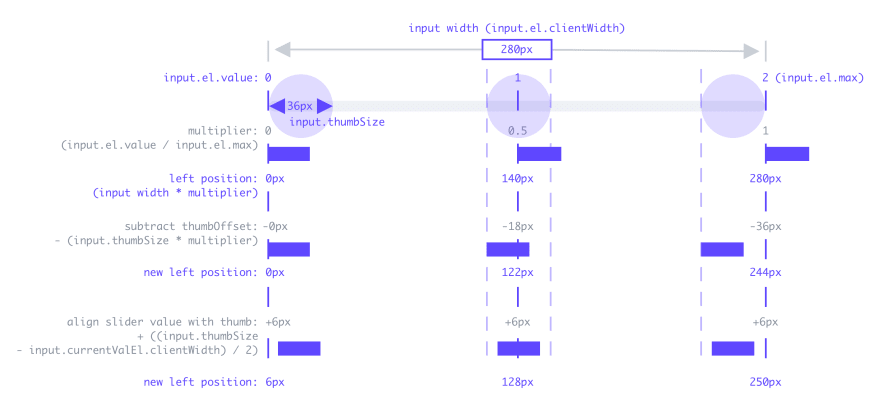
handleSliderValuePosition = input => {
  const multiplier = input.value / input.max;
  const thumbOffset = this.thumbSize * multiplier;
  const priceInputOffset =
    (this.thumbSize - this.sliderValue.current.clientWidth) / 2;
  this.sliderValue.current.style.left =
    input.clientWidth * multiplier - thumbOffset + priceInputOffset + "px";
};
Here is a visual representation of what the method does 👇
Call the method as soon as the component has rendered ...
componentDidMount() {
  this.handleSliderValuePosition(this.slider.current);
}
... and every time the input range value changes:
handlePricingSlide = e => {
  this.handleSliderValuePosition(e.target);
};
Conclusion
Here is the final result. Click on Open Sandbox to see the full code.
I hope you enjoyed this tutorial. If you want to see this in action, here is a landing page template where it’s implemented 👉 Storm


Top comments (0)