
📖 Introduction
Welcome to the last part of the "Introduction to the IndexedDB API" series. In the last post, we added an important feature to our application, the ability to see the tasks on the page; we also did a little bit of refactoring as we needed to perform some actions for when the connection to the database is established. In this last part, we are going to finish our app by adding the ability to delete any given task.
Goals
- Create a
deletemethod on theDatabaseclass that deletes a task given its id - Complete the
removeTaskfunction on theindex.jsfile so that effectively delete a task when needed
Initial Setup
If you want to code along (which is highly recommended), then go to the following GitHub repository:
 DevTony101
/
js-todo-app-indexed_db
DevTony101
/
js-todo-app-indexed_db
This is a to-do web application that uses the IndexedDB API.
Once there, go to the README.md file and search for the link labeled Starting Code for the third (last) part. It will redirect you to a commit tagged as starting-code-part-three that contains all we have done so far plus the new delete function on the Database class.
🛠 Completing the delete Function
This will be pretty straight forward, the process is exactly the same as the one we did back in part two:
- Create a
transactionobject from the database - Get a reference to the
objectStore - Create a request based on the action you need to perform, which in this case, is to delete something
In code, it would look something like this:
delete(id) {
  // Skipping validation of the id ...
  // Step 1
  const transaction = this.indexedDB.transaction([this.name], "readwrite");
  // Step 2
  const objectStore = transaction.objectStore(this.name);
  // Step 3
  const request = objectStore.delete(id);
}
The key difference here, in contrast to the persist function, is that we are only going to take care of the complete event emitted by the transaction because, if the task was successfully deleted, we would want to remove it from the DOM but, we will get to that later.
Now we have to ask ourselves an important question, how we should handle see oncomplete callback? There are two ways:
- We could return the
transactionobject and handle it in theindex.jsfile - We could pass a function as a parameter to the
deletefunction
Both are equally valid but, just because it looks fancier, let's choose to do the second one, in which case, we need to change the signature of the delete function so that accepts a second named argument. The rest is pretty much the same as in the persist function:
delete(id, success) {
  // ...
  if (typeof success === "function") transaction.oncomplete = success;
}
That's all! Our delete function is complete, a piece of cake 🍰, right?
👨🔧 Assigning an ID to our Tasks
In order to use the delete function, we need to have the id of the task we want to delete but, because we don't know in advance which task the user is going to remove, the id needs to be dynamically retrieved.
A great way to accomplish this is by storing the id of the task in a data-* attribute inside the message component. To do it, we just need to use the setAttribute() method on the message object in the showTasks function, like this:
function showTasks() {
  // ...
  const request = database.getOpenCursor();
  request.onsuccess = event => {
    const cursor = event.target.result;
    if (cursor) {
      // The 'id' is the key, it's stored in the value property of the cursor object alongside the other fields
      const {key, title, description} = cursor.value;
      const message = document.createElement("article");
      message.classList.add("message", "is-primary");
      // Here we store the key in a data attribute called data-id
      message.setAttribute("data-id", key);
      // ...
      cursor.continue();
    } else {
      // ...
    }
  }
}
That's it! Now we are all set to start deleting stuff.
👨💻 Using the delete Function
On the index.js file, let's create a new function called removeTask with the following signature:
function removeTask(event) {
  // The event will be the message component representing the task
}
This function will be called from within a button element that will be placed inside the header of the message component (according to Bulma´s official documentation)1.
Inside there, let's first retrieve the article block itself from the event object (remember that the event only carries the node that fired up the action, in this case, the button element) and then, get the actual id from the data-id attribute. Next, pass the id to the delete function we created earlier, like this:
function removeTask(event) {
  const header = event.target.parentElement;
  const task = header.parentElement;
  const id = Number(task.getAttribute("data-id"));
  database.delete(id, () => {
    // Success callback
  });
}
Now all that's left is to figure out what to put inside the callback function.
If the task is successfully deleted, then we must remove it from the DOM, else the user is going to be very confused. On top of that, if there was only one task, we need to let the user know that there are no more tasks left, this is exactly what we did in the showTasks function for when the cursor object is not defined.
So, putting it together:
Remove the task from the
DOM, that is, remove the message component (thearticleblock) from thetasksContainerdivIf there are no more tasks inside the div i.e. the are no more tasks left to show, we need to add a message to let the user know
In code, we would have something like this:
function removeTask(event) {
  // ...
  database.delete(id, () => {
    // Step 1
    tasksContainer.removeChild(task);

    // Step 2
    if (!tasksContainer.firstChild) {
      const text = document.createElement("p");
      text.textContent = "There are no tasks to be shown.";
      tasksContainer.appendChild(text);
    }

    // Optional Step 3: Console log for debugging purposes
    console.log(`Task with id ${id} deleted successfully.`);
  });
}
Last but not least, let's put the actual delete button element inside the message component in the showTasks function, like this:
function showTasks() {
  // ...
  const request = database.getOpenCursor();
  request.onsuccess = event => {
    const cursor = event.target.result;
    if (cursor) {
      const {key, title, description} = cursor.value;
      const message = document.createElement("article");
      // ...
      // Creating the delete button element
      const deleteButton = document.createElement("button");
      deleteButton.classList.add("delete");
      deleteButton.setAttribute("aria-label", "delete");
      deleteButton.onclick = removeTask;

      // Adding it to the div message header
      message.firstChild.nextSibling.appendChild(deleteButton);
      tasksContainer.appendChild(message);
      cursor.continue();
    } else {
      // ..
    }
  }
}
And... we are done 👏! Now let's test it out, start your local development server and go the index page of our application. If there are no tasks there, create some and when they render on the page you will see that a little X button appears on top on the task description, like so:

If everything went right, when you click on the X button, the task should disappear. We can confirm this by looking up in the console:
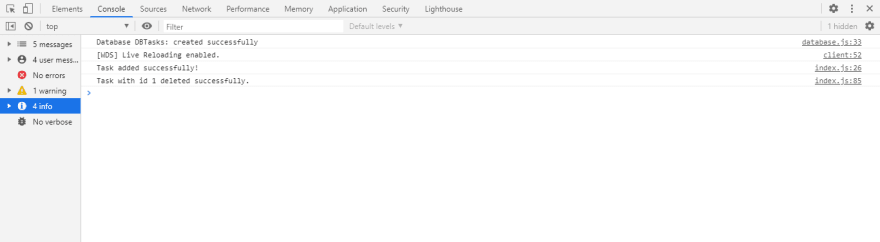
Awesome 🎉! Everything works as expected.
🕵️♂️ Let's Recap
Whew! What a journey, we sure learned a lot since part one, so let's do a quick review of all:
We learned what
IndexedDBAPI is and how we can create our own database in the browserWe learned how to perform
CRUDoperations usingtransactionsandrequestWe learned how we can create a
Databaseclass with custom methods that let us seamlessly use the ones exposed by the API, effectively enclosing the business logic we could needAnd finally, we learned how we can use the
Databaseclass in a real-world project by creating our own to-do application.
The complete code of the project can be found at GitHub on the master branch. The specific changes we made for this part are under the commit tagged as finished-code-part-three. I invite you to fork the project so you can experiment with it.
Also, the project is up and running on Netlify at the following URL:
Thank you so much for reading, I hope all of this is useful to you if you have comments, questions or suggestions please leave them down below.
See you next time 👋.
1: This is relevant because the project uses Bulma as a CSS framework but it does not mean you can't call the function in another way. What's important is that the element that calls the function is inside the article block, otherwise, you won't have access to its id

Latest comments (0)