
In this article we will automatize the creation of multiple components by using an external JSON file to hold our information.
This will make our projects more organized because we make a clear separation of concerns.
- The JSON contains our information.
- The components are the visual representation.
Pre-requisites
- Arrow functions: A modern way to write functions in JavaScript. Is used all across React and in the map, filter, reduce methods.
- Map function: A JavaScript method that allows to create a new array based on information from another array. (watch from 1:58 to 2:54)
Intended result
 Figure 1: The same pet shot app but more organized behind the scenes.
 Figure 2: Hierarchy diagram. The element in the middle with dash lines is not a component, but an array holding components.
Anatomy of a map function
Before we get started let's explain a bit about:
The map function
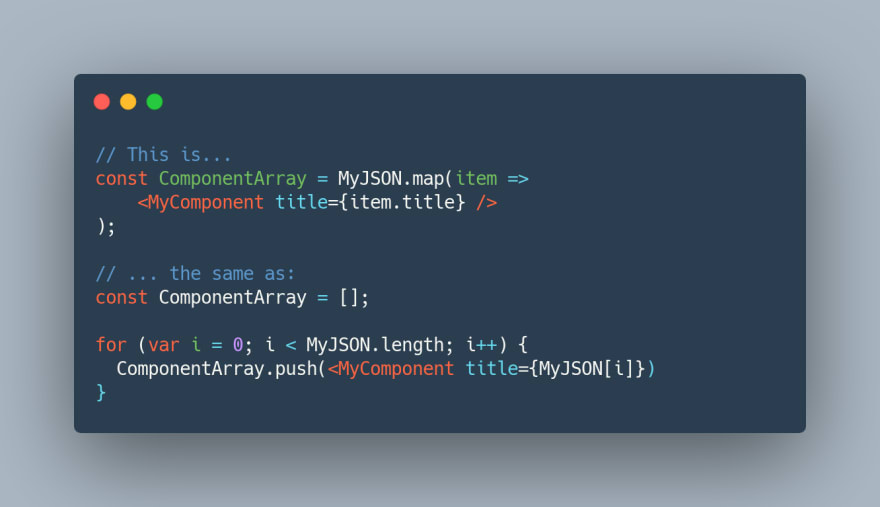
Figure 3: A comparison between the map function with an arrow function inside vs. a traditional for loop.
As you can see, the map function is just a shortcut to write more compact code. The less code you write, the less bugs you will have.
Arrays of components
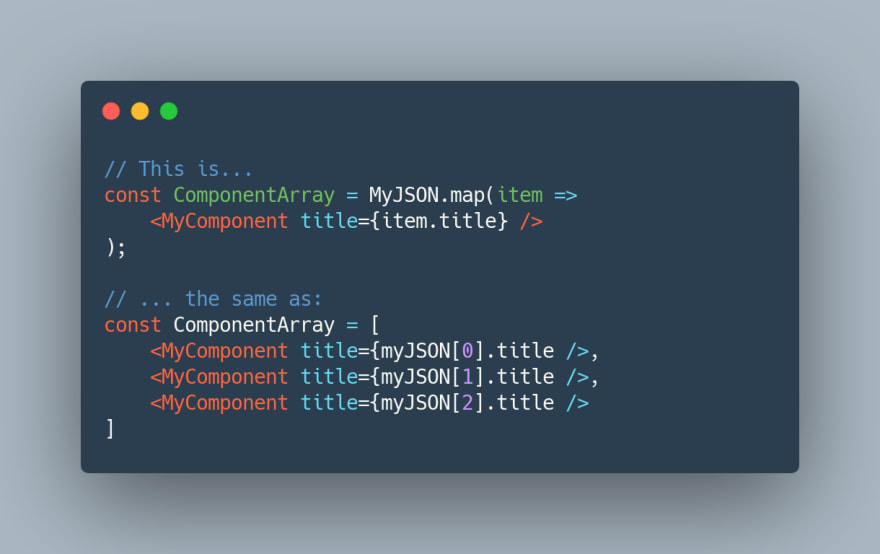
Figure 4: The contents of ComponentArray.
As you can see, JavaScript arrays can literally hold anything, from strings, numbers, to even React components.

Getting started
For this exercise we will use a JSON file to create our list of components.
JSON file:
Create a json file inside your src/ folder. Preferably inside a folder name data/.
Note: Each object inside the array needs a key called id. React needs this in order to keep track of each component.
[
    {
      "id": 1,
      "title": "Puppy",
      "fileName": "dog.jpg"
    },
    {
      "id": 2,
      "title": "Whiskers",
      "fileName": "cat.jpg"
    },
    {
      "id": 3,
      "title": "Birdie",
      "fileName": "cat-food.jpg"
    }
]
App component:
import MyJSON from "./data/pets.json";
import MyComponent from "./components/MyComponent";

export default function App() {
  const ComponentArray = MyJSON.map((item) => (
    <MyComponent key={item.id} title={item.title} fileName={item.fileName} />
  ));

  return (
    <div className="App">
      <section className="grid">
        {ComponentArray}
      </section>
    </div>
  );
}
Let's analyze the code:
-
import MyJSON from "./data/pets.json": We import our JSON. -
const ComponentArraywe create a variable to hold our array of components. -
MyJSON.map()creates an array of components using the map function. This is where the Map function comes into play. -
<MyComponent>is a copy of MyComponent, the map function will create as many components as the the json needs. - Inside the JSX we put the
ComponentArrayinside curly braces{}.
MyComponent:
export default function MyComponent({ title, fileName }) {
  const imageObject = require("../images/" + fileName);
  const imageURL = imageObject.default;

  return (
    <article>
      <h2>{title}</h2>
      <img src={imageURL} alt={title} />
    </article>
  );
}
The only change
-
imageObject: Is a variable to import image combining a location in our project folder with a prop received from a parent. -
require("../images/" + fileName): require is a Node.js command to open a file from our project folder. -
imageURL: We create another variable to assign the specific key that has the image path. In this caseimageObject.default. - Finally, inside the JSX we use
{imageURL}in the<img/>source property.

Conclusion:
Congratulations this conclude the articles for the first day of React.
You can practice by refactoring your Cupcake website's product page and seeing how easy it is to organize the products. (only for the SDA students)
You can take a break before moving to the articles intended for the next day, or click here to continue your studies.
If want can to see the finished code, open this link and open the branch create-list.

Top comments (0)