If you use Google Apps Script to create Web Apps and are thinking about how to use React for it, you have come to the right place!
I'm sharing with you a base project so you can create your GAS Web Apps using the React library on the front-end. I used as a base this project here that uses React to create Modals in a spreadsheet and I adapted it to use in Web Apps.
First steps
You can start by cloning the repository to your local machine and run the command:
npm install
You'll need to use clasp to deploy after you build the application, know how to use clasp here.
With npm installed and the clasp configured, copy the script ID of your project into GAS and paste it into the .clasp.json file.
Project structure
The project structure is basically divided between Client and Server, where one corresponds to the front-end(pages, components...) and the other to the back-end(GAS functions), respectively.
In the server folder, put all your functions that will perform your script actions, I use the Controller folder to better organize my project.
Then you must map the functions to be called by the front-end in the file index.js, using global variables. Below I map the getScriptToken function as an example exported from a controller and the doGet function, it's as mandatory in Web Apps (this function will call the file app.html that will be built at the end).
Well, this is the server part of the Web App, but let's now go to the Front-end part which is what interests this post. On the client side, I created the folder pages where I save all the pages of my application and the folder utils where I save the file server.js (which will serve to call the global variables created in the server folder) and any other utility file.
The file index.html is our Web App frame, it contains a session with "index" id, where we will render our React content.
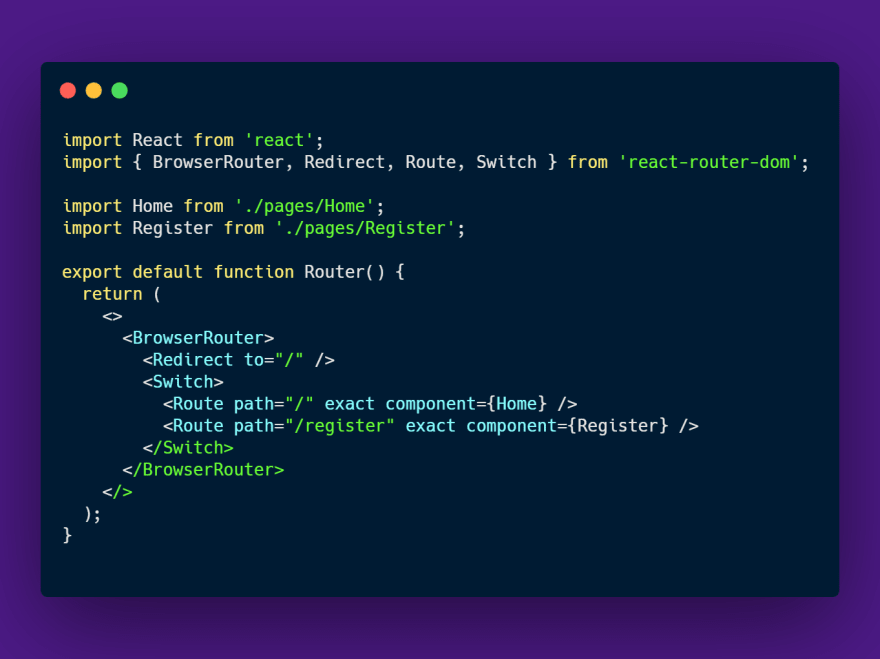
In the file Router.js is where we configure our routes, importing the pages and using the elements of the react-router-dom, this way we can navigate between pages through history, since the GAS Web Apps have no URL change.
And finally in the file App.jsx the routes of React are rendered in the html file.
I created two pages to perform a basic test, the page Home and the page Register. We can navigate through the pages through a button that calls the "useHistory" element of the react-router-dom. On the page Register I show you how to call server function getScriptToken.
After creating your pages and configuring your routes, run the command below to build and deploy in your GAS project.
npm run deploy
Now you have a Web App with React support, use your creativity to create multiple pages, components and install libraries like StyledComponents, which I'm even using in the pages, and several others, but this is subject for the next post, thanks!


Oldest comments (0)