GitHub is arguably the most popular git hosting service out there, and it's easy to see why: it's free (for open source projects), it's powerful, and because it's already familiar, it's easy to get a new project up and running without much hustle. Moreover, ever since GitHub's acquisition by Microsoft, I have noticed a growing effort to deliver a full-featured CI/CD solution. Microsoft's investment also seems to ensure the platform's longevity and stability. But this change in ownership has a flip side, too. We all remember Microsoft's hostile attitude towards both Linux and open source, and, despite their recent claims of the newfound love and appreciation for both, there is a fair share of skepticism in the community, and therefore much reluctance to put their code on GitHub.
Of course, there are alternatives. Probably the biggest contender to GitHub is GitLab, which is used by quite a number of open source projects, such as GNOME, Inkscape, and mutt to name a few. It is offered both as a paid service (although limited free tier is available for open source projects) and a self-hosted application. Interestingly, the latter comes in two flavors: free Community Edition (missing certain features), distributed under the MIT license, and Enterprise Edition, distributed under a proprietary license (even though the code is openly available). But if you read the title of this post carefully, then you know this is not about GitLab. Instead, I will talk about another git hosting platform. Gitea, as stated on their official website, is a community managed lightweight code hosting solution, and is published under the MIT license. I decided to try it out and write down my experience with setting it up for personal my use.
Keywords: git gitea digitalocean https
Objectives
Before I set out to work, I set myself a few goals. For this exercise, I wanted a self-hosted instance of Gitea (obviously), in which I could deploy my dotfiles repository. I wanted to have a domain pointed to the Gitea instance, and finally, I also wanted to connect to it via HTTPS. I divided the work into a few steps I will describe one by one in this article:
- Obtaining server instance.
- Installing and running Gitea.
- Routing a domain to the server.
- Setting up Let's Encrypt certificate.
- Creating a new repository.
Gitea Droplet
Right from the start, I cheated a bit. Having already a DigitalOcean account, I decided to spin up the smallest available droplet, which at the moment of writing cost me $5 a month, and is more than enough for this exercise. Of course, depending on your needs, you may require a larger instance or may choose to deploy Gitea on another cloud service, or your own hardware. I took the easy route and created a dedicated 1-Click App from DigitalOcean Marketplace, which easily covered both points 1 and 2 without breaking a sweat!
Installing a 1-Click App is a very easy and intuitive process, but for completeness' sake, here's a quick guide. Once logged in to your dashboard, you have to choose Droplets from the Create menu in the top right corner. In the Choose an image section, select Marketplace, and search for Gitea. At the moment of this writing, the only option available is Gitea 1.11.6 on Ubuntu 20.04. Next, you have to select your plan—I picked Standard plan with 1 GB of RAM, 1 CPU, 25 GB SSD disk, and monthly transfer of 1,000 GB for $5/mo. You have an option of adding block storage, which I skipped. Then, you have several more options, such as selecting the data center, authenticating method (SSH or password), and enabling system-level backup for additional cost. When done, just hit Create Droplet, and wait for it to start. Once it's running, you should be able to click on the item in your dashboard to get a similar view to the one below:

Write down your IP, you'll need it to connect to the server and to configure your domain. Notice a Get Started link at the top. When clicked, it shows some additional instructions from the maintainer of the Gitea 1-Click App. In particular, it instructs us what to do to finish our configuration:
Once Droplet has been created, please modify values in /var/lib/gitea/conf/app.ini to insert your DOMAIN. The password for the gitea_admin user is located in /root/.digitalocean_password please use this to connect to your Gitea install at http://\${IP}/ and login to create your new user.
Following these instructions, you have to connect to your server first:
ssh root@YOUR_IP
Retrieve your password from /root/.digitalocean_password, and go to http://YOUR_IP in your browser. Your Gitea website should now load and you should be able to log in with gitea_admin user. The first thing you want to do is to create a new account with your own password, and remove the gitea_admin user, or at least change its password. You can do that by clicking the little avatar icon in the top right corner, and selecting Site Administration. Then, go to User Accounts tab, and click Create User Account.
Congratulations, your Gitea is up and running!
Routing a Domain
Right now, both the website and the repositories are only accessible by the IP. I am assuming here that you already have a domain registered. To point it, or any of its subdomains, to the Gitea website, you'll need to access your domain registrar's DNS settings and add a resource record. For example:
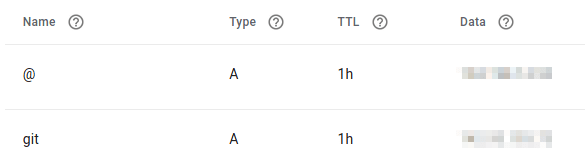
In the above configuration, @ indicates the root domain, e.g., msiedlaczek.com, while git indicates a subdomain. In either case, the Data field should contain your droplet's IP.
Note that populating the changes may take some time. For instance, Google Domains informs that it could take up to 48 h, although in my case, it took less than 24 h. Still, you won't be able to use your domain immediately.
Configuring HTTPS
Let's Encrypt is a nonprofit Certificate Authority. It makes it very easy to acquire new certificates, as well as automatically renew them. Instead of configuring Gitea to use TSL certificate directly, I chose to use a reverse proxy with nginx instead. Essentially, it means that I want to use nginx to set up HTTPS connection, which in turn will redirect the traffic to the Gitea server.
First, I changed my Gitea configuration in /var/lib/gitea/conf/app.ini to listen on localhost:3000:
[server]
PROTOCOL = http
ROOT_URL = https://git.msiedlaczek.com
DOMAIN = localhost
HTTP_PORT = 3000
Note the ROOT_URL setting, which will make all the repository links generate correctly with the domain name instead of localhost. Before we move on, we need to restart the Gitea service:
systemctl restart gitea
Now we need to install and configure nginx. We also need to adjust the firewall to allow the HTTPS request to nginx.
apt-get install nginx
sudo ufw allow 'Nginx HTTPS'
However, we'll start the configuration with HTTP only. The configuration file /etc/nginx/nginx.conf has a http block. Within that block, we need to put the following:
server {
    server_name git.msiedlaczek.com;
    location / {
        proxy_pass http://localhost:3000;
    }
}
Let's save the changes and restart nginx:
systemctl restart nginx
It might seem we only complicated the situation, because we added more configuration yet ended up exactly where we started. But these changes will make our job easier in a moment.
To set up Let's Encrypt, I recommend following this dedicated tutorial, which exactly explains each step. If you're using different operating system than Ubuntu 20.04, or want to use Apache instead of nginx, you can choose one of dozens of versions of this tutorial for different software/OS combinations. Here, I will only briefly explain what we are doing.
To automate certificate acquisition, we will use cerbot, which not only will create the certificate, but also configure nginx with a little help of the certbot-nginx plugin. It boils down to two steps. First, install certbot and the plugin:
apt-get update
apt-get install software-properties-common
add-apt-repository universe
apt-get update
apt-get install certbot python3-certbot-nginx
Then, run the following command:
sudo certbot --nginx
That's it! certbot should get and install the certificates, and modify the nginx configuration to use them. You can check out the changes made by certbot in /etc/nginx/nginx.conf. Now, go to your browser and verify that you now connect via HTTPS.
Creating a Repository
I almost didn't include this section, but in the end, I wanted to make a point, which is this: if you ever used either GitHub or GitLab, you'll feel right at home using Gitea. To create a new repository, you simply click on a familiar-looking plus sign in the top right corner, and select Repository. Then, you choose name and description, and optionally generate .gitignore, license, and README. Finally, just hit Create Repository, and you're good to go! In your repository's Code tab, you have an option to copy the link to the repository: both SSH and HTTPS links should contain you domain name.
Conclusion
By no means is this post supposed to convince anyone to replace GitHub or GitLab with self-hosted Gitea instance. Rather, it shows how easy it is to get it up and running in a few hours at a very low cost (although this will depend on one's needs). I personally find it quite reassuring that there is a fully open source, community-driven solution out there, and for that reason I am inclined to give it a fair shake.

Top comments (2)
Pretty impressive write-up! 10/10 for mentioning HTTPS 👌
Thanks, nice to hear!