
Webdriver is a tool that requires no introduction in the Selenium automation testing domain. Webdriver is an open-source collection of APIs which is used for testing web applications across different browsers and platforms to verify whether it is working as expected or not. The latest version of Selenium — Selenium 4 is W3C compliant — however it is still in the Beta phase (i.e. 4.0.0-beta-3).
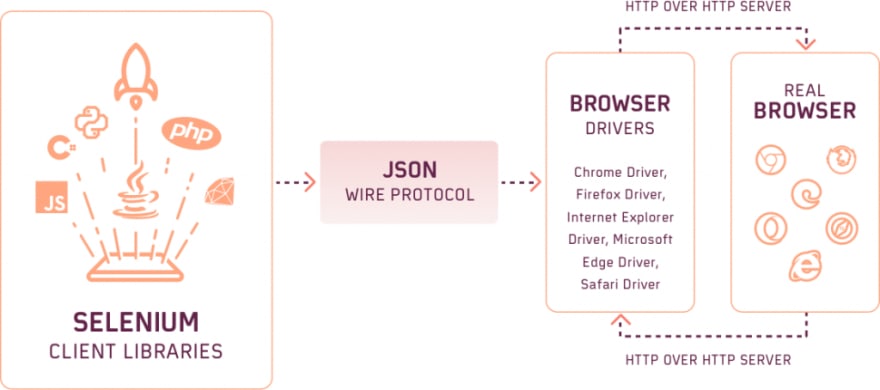
In Selenium 3, the JSON Wire Protocol is used for communicating with the web browser from the local end. In Selenium test automation with the Selenium 3 framework, API encoding & decoding is involved in the entire process since web browsers use the W3C protocol and the Selenium Client Libraries use the JSON Wire Protocol.
Selenium WebDriver allows you to communicate with various browsers to perform commands and assertions on DOM elements using which you can perform any kind of operations like sending the text, click on a button, select a radio button, select the drop-downs, etc.
However, there are scenarios where the actual Webdriver commands will not work efficiently as expected. This is where JavaScriptExecutor comes into the picture.
In this article, we will be discussing JavaScriptExecutor in Selenium WebDriver. Also I will cover everything you need to know about how to use JavaScriptExecutor in Selenium. Getting started with an overview, we will further dive into the implementation and explore different methods in JavascriptExecutor along with working examples.
Let’s get started!
What is JavaScriptExecutor in Selenium?
JavaScriptExecutor is an interface provided by Selenium Webdriver, which presents a way to execute JavaScript from Webdriver. This interface provides methods to run JavaScript on the selected window or the current page. JavaScriptExecutor is an interface which is available for all the languages that support the Selenium Framework.
As JavaScriptExecutor is a Selenium interface, there is no need for an extra plugin or add-on. You can use it directly by importing the package org.openqa.selenium.JavascriptExecutor.
Why use JavaScriptExecutor in Selenium?
Selenium Webdriver alone lets you perform operations on web elements like sending data, clicking buttons, etc. However, as said before, there are scenarios where the Webdriver commands will not work as expected due to various reasons. In these cases, we take the help of JavaScriptExecutor.
For example, traditionally to locate a web element we use different web locator strategies such as ID, Name, CSS selector, and XPath, etc. If these locators do not work as expected, or you are handling a tricky XPath, you can use JavaScriptExecutor to perform the desired operation on the WebElement..
On similar lines, to click on a WebElement, we generally use the click() method provided by Selenium Webdriver.
The WebDriver error — invalid cookie domain error, occurs if a cookie is illegally attempted to be set under a different domain from the current document.
The WebDriver error — invalid selector-error, happens when an element fetch is tried with an unknown web element selection method.
driver.findElement(By.id(“button”)).click();
At times, the click() method may not work on all the web browsers or the web controls might behave differently on different browsers. To overcome such situations, the JavaScriptExecutor interface should be used.
As we know, browsers have Javascript implementation inside them and can understand the JavaScript commands. Hence, understanding JavaScriptExecutor in Selenium will enable you to perform a range of operations more efficiently and elegantly.
Note: A scalable and reliable online testing cloud for both manual and automation testing of AngularJS websites
Introduction to JavaScriptExecutor Methods
JavaScriptExecutor in Selenium provides two methods through which we can run JavaScript on the selected window or the current page.
a) executeScript
This method executes JavaScript in the context of the currently selected window or frame in Selenium. The script will be executed as the body of an anonymous function.
b) executeAsyncScript
This method executes an asynchronous snippet of JavaScript in the context of the currently selected window or frame in Selenium. Here also, the script will be executed as the body of an anonymous function. The major difference between executeScript and executeAsyncScript is that the script invoked using the executeAsyncScript has to signal about the completion of execution using the callback function.
Invoking methods using executeAsyncScript are majorly used when sleep has to be performed in the browser under test or when tests have to be synchronized within an AJAX application.
Both the methods allow us to return a value using the ‘ return ' keyword and store them in a variable. The data types that can be returned are:
Long
String
Boolean
List
WebElement
Basic Syntax of JavaScriptExecutor in Selenium
The purpose of this section is to provide a high-level idea about the implementation steps of JavaScriptExecutor in Selenium. For demonstration, we have used Java as the prefered programming language.
Let’s take a look at the key steps.
Step 1: Import the package associated with JavascriptExecutor.
import org.openqa.selenium.JavascriptExecutor;
Step 2: Now to utilize JavascriptExecutor, create a reference for the interface and assign it to the WebDriver instance by type casting it.
JavascriptExecutor js = (JavascriptExecutor) driver;
Step 3: We have created a JavascriptExecutor reference. Now we call the executeAsyncScript/executeScript methods. The syntax for executeScript is given below:
js.executeScript(java.lang.String script, java.lang.Object... args)
Parameters:
script — The JavaScript to execute
args — The arguments to the script. May be empty.
Returns Value
Boolean/Long/Double/String/List/Map/WebElement/Null.
Now that we have covered the essentials of JavaScriptExecutor in Selenium, it’s time to get our hands dirty with some implementation! In the upcoming sections, we will check out some scenarios where we use JavaScriptExecutor in Selenium to perform test scenarios (that might not have been performed with common Selenium WebDriver commands).
Note: Test your Appcelerator Titanium CSS framework-based websites across 3000+ different desktop and mobile browsers. A scalable and reliable online testing cloud for both manual and automation testing of Appcelerator Titanium websitesJavaScript Design Patterns.
Scenarios To Use JavaScriptExecutor in Selenium
Let’s examine some scenarios we could handle using JavaScriptExecutor Interface for Selenium test automation.
-
To Click on a Button
js.executeScript("document.getElementById('enter element id').click();");
//or
js.executeScript("arguments[0].click();", okButton);
2. To Type Text in a Text Box without using sendKeys() method
js.executeScript("document.getElementById(id').value='someValue';");
js.executeScript("document.getElementById('Email').value='SeleniumTesting.com';");
3. To Handle Checkbox by passing the value as true or false
js.executeScript("document.getElementById('enter element id').checked=false;");
4. To generate Alert Pop window in Selenium Webdriver
js.executeScript("alert('Welcome To Selenium Testing');");
5. To refresh browser window using Javascript
js.executeScript("history.go(0)");
6. To get the innertext of the entire webpage in Selenium
String innerText = js.executeScript(" return document.documentElement.innerText;").toString();
System.out.println(innerText);
7. To get the Title of our webpage
String titleText =  js.executeScript("return document.title;").toString();
System.out.println(titleText);
8. To get the domain name
String domainName=  js.executeScript("return document.domain;").toString();
System.out.println(domainName);
9. To get the URL of a webpage
String url=  js.executeScript("return document.URL;").toString();
System.out.println(url);
10. To get the Height and Width of a web page
js.executeScript(“return window.innerHeight;”).toString();
js.executeScript(“return window.innerWidth;”).toString();
11. To find a hidden element in selenium using JavaScriptExecutor
js.executeScript("arguments[0].click();", element);
12. To navigate to a different page using Javascript
js.executeScript("window.location = '[https://www.lambdatest.com](https://www.lambdatest.com)");
13. To perform Scroll on an application using Selenium a) To scroll the page vertically for 500px
js.executeScript(“window.scrollBy(0,500)”);
b) To scroll the page vertically till the end
js.executeScript(“window.scrollBy(0,document.body.scrollHeight)”);
14. Adding an element in DOM
We can also add an element in DOM if required. However, as are only concerned with mimicking user interactions in the browser, this option may not be used.
js.executeScript("var btn=document.createElement('newButton');"

                     + "document.body.appendChild(btn);");
On similar lines, we can practically execute any JavaScript command using Selenium.
Note: Test your ASP.NET CSS framework-based websites across 3000+ different desktop and mobile browsers. A scalable and reliable online testing cloud for both manual and automation testing of ASP.NET websites.
JavaScriptExecutor in Selenium WebDriver Example
In the previous section, we looked at a widely-used JavaScriptExecutor in Selenium commands. Now it’s time to run an end-to-end test scenario! We will be continuing to use Java as the programming language for the demonstration JavaScript in Selenium WebDriver. Let’s dive in!
Pre-requisites
First and foremost, make sure that your system is equipped with the following:
1. Java SDK
Download and install the Java Software Development Kit (JDK) from here.
2. Eclipse or any IDE of choice.
Download the latest version of “Eclipse IDE for Java Developers” from here.
3. Selenium-Java client Driver
Download Selenium Webdriver for Java Client Driver from here.
4. Browser Drivers (only for Local Selenium Grid)
Download various browser drivers from here
Once this criterion is checked, proceed to create a ‘New Project’ in Eclipse. Don’t forget to configure the IDE with Webdriver by adding all the Jars required to the project.
Instead of the local Selenium Grid, the tests are run on a cloud based Selenium Grid by LambdaTest. It provides improved scalability, reliability, and better browser coverage since parallel tests can be run on a range of browser & OS combinations. LambdaTest Selenium Automation Grid is a cloud-based, scalable Selenium test automation platform that enables you to run your automation scripts on 2000+ different browsers and operating systems online.
You can effortlessly migrate the Selenium tests running on a local Selenium Grid to the LambdaTest Selenium Grid through a few additional configurations. After creating a LambdaTest account, make a note of the username & access-key available in the LambdaTest profile section. The browser capabilities are generated using LambdaTest Capabilities Generator.
Time to get our hands dirty with some implementation!
Test Scenario 1 (Demonstration of executeScript)
Login and generate an Alert window using JavaScriptExecutor
Our objective is to write a simple code to illustrate an example using executeScript, where we will:
Launch the web browser (Chrome — latest version on Windows 10 platform)
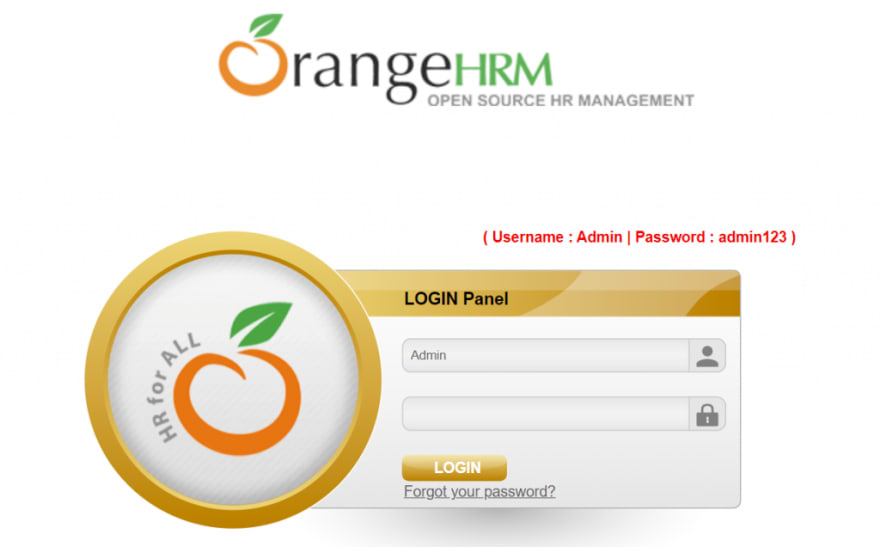
Go to URL “https://opensource-demo.orangehrmlive.com/"
Enter dummy credentials
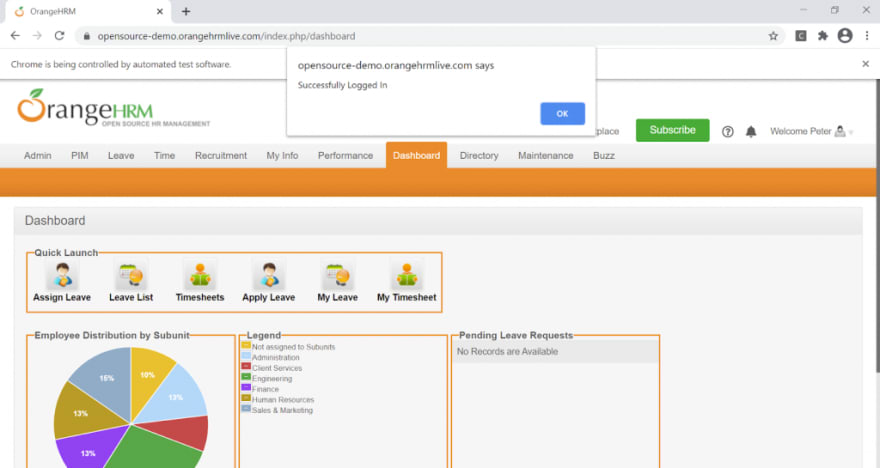
Click the login button
Print page title and domain name
Display alert window on successful login.
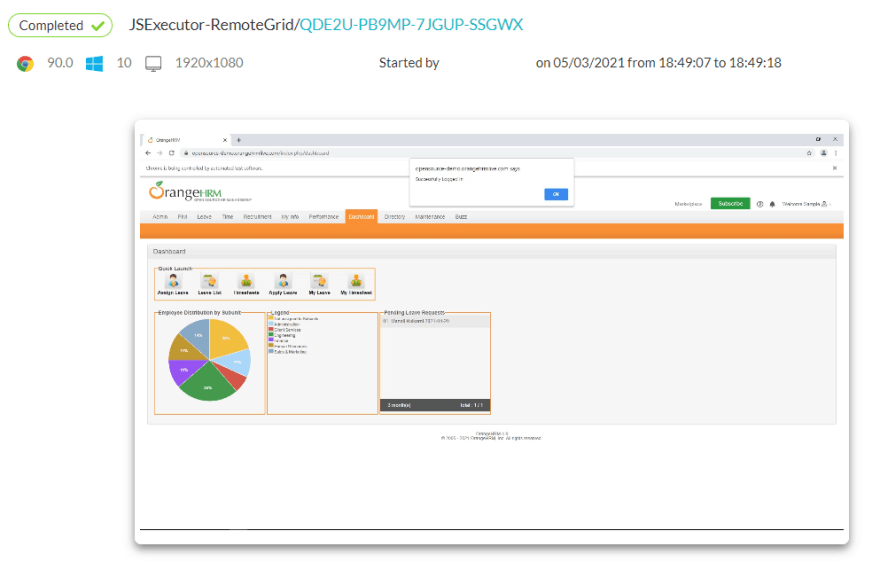
Run the script. The test gets executed successfully!
Observe the console output and output from Automation Dashboard on LambdaTest.

Test Scenario 2 (Demonstration of executeAsyncScript)
Login and generate an Alert window using JavaScriptExecutor
Our objective is to write a simple code to illustrate an example using executeAsyncScript, where we will:
Launch the web browser (Chrome — latest version on Windows 10 platform)
Go to URL “ https://www.lambdatest.com/ “
-
Wait for 10 seconds to perform a further action
Run the script. The test gets executed successfully! Here is the snapshot of the execution window (of the IDE) and automation dashboard on LambdaTest.


With this, we have successfully run our test cases on remote Selenium Grid provided by LambdaTest through a hassle-free experience!
Wrapping It Up!
JavaScriptExecutor in Selenium is an interface that is used when Webdriver commands are not working as expected. JavaScriptExecutor allows us to execute JavaScript code on the web page from Webdriver, hence enabling us to handle various operations efficiently and elegantly which is otherwise not possible with languages like Java alone.
In this blog, we learnt how to use JavascriptExecutor in Selenium WebDriver and also understood the different methods provided by JavascriptExecutor. Further we covered various scenarios to attain an effective solution using different methods along with practical examples.
Additionally, we have also performed Selenium test automation by adopting a remote Selenium Grid. If you wish to test and optimize the web application by unlocking coverage in a wider variety of platforms or browsers or versions, feel free to explore the LambdaTest platform.
Happy Testing!

Top comments (0)