
NOTE 1: This is a "repost" of a Gist made from my notes around the summer of 2019, while I was learning Ray Marching. It is then quite basic content, and can even have mistakes. For more accurate and in depth content about raymarching, I highly recommend Iñigo Quilez's blog.
NOTE 2: all of this content has been made following Sebastian Lague's fantastic explanation, so, go to his channel and give him some love ❤️
Ray marching is a rendering technique based on calculating the distance to the scene's surfaces.
Essentially, it consist in, starting from the camera's PoV, and going through each pixel, advancing blindly in safe-sized steps until we reach to a surface, and then getting the color of that point.
To determine what is a safe distance to advance, we need to know, how much we can move in the current direction without crashing with anything. That will be the smallest distance to any surface in the scene.
If, after advancing we haven't reached yet any surface, we repeat the process until we do or we get too far.
The following image exemplifies it in 2D:

Source: Sebastian Lague
Signed Distance Functions
So, the first problem is how to calculate the distance to the objects/surfaces in the scene.
Luckily for us, there are many shapes and primitives that can be easily defined with mathematical functions.
I have no idea about this, so I will refer you to Iñigo Quilez's web, where you can find a detailed list with a lot of them.
The great thing about these functions is that they don't only give us the distance to the surface, but also tell us if we are iside it (negative distance). This will come handy later to make some cool effects.
These are important, because we won't be using 3D models, and we need a way to let the shader know what it's drawing.
Let's Beggin Rendering!
Ok, so now we have the context and we are ready to begin.
The Ingredients
For this plate project we will need:
- A shape class (RayMarchingShape.cs in my repo) containing, at least, the following data:
- The shape type (sphere, cube, etc)
- The color of the surface
- The size/scale in the 3 axis
- The position in the world
- The blending operation (which cool effect will be used on it)
- A compute shader to make the heavy work.
- A camera script to coordinate everything and display the results.
The Loop
The loop that the camera script (RaymarchingManager.cs in my repo) follows for each frame is quite simple and boring. It only sets up everything and displays the output:
- Render the scene normally into a *render texture*
-
Prepare the shapes
- Get all the objects with the shape class and sort them by the blending operation
- Transform all the data from the shapes into an array of structs (This is done to be able to pass it to the shader through a buffer).
- Pass said array to a buffer.
-
Configure the shader
- Set the needed matrices
- Camera to World
- Inverse Projection
- Pass the input and output render textures
- Pass the buffer
- Calculate the appropiate size for the compute shader's grid
- Set the needed matrices
- "Launch" the shader's main kernel
- Print the output texture
- Clean the buffer
The Shader
(RayMarching.compute in my repo)
Well, this is the fun part! Here is where the real ray marching will be done.
Since this is a compute shader, it will be doing the same algorythm symultaneously for each pixel in the final image, so we will think about it in the terms of a single pixel.
1. Get the Pixel Coordinates
First, we nee to know the position of the pixel we are working with. This is quite simple, following the next formula:
xy = threadID / imageSize * 2 - 1
2. Get the ray direction and origin
With the pixel coordinates, it is super easy to get the direction of the ray connecting the camera's PoV with it.
- First we get the position of the PoV in the world. This will be the ray origin. We will obtain it simply multiplying the Camera to World matrix with the PoV camera coordinates, that is 0,0,0,1
- Then we get the position of the pixel in the world. Right now we have it in projected coordinates, (that is, in 2D), so we need to take a couple of steps first:
- Get the camera coordinates: For this, we simply multiply the Inverse Projection Matrix (It passes a point from projected to camera coordinates. The inverse of projecting it. Duh.) with the pixel coordinates [x,y,0,1].
- Now, multiply the Camera to World matrix with the result, just like we did with the PoV, and ta-dah, we have the pixel in world coordinates 😄
- Now, the direction is just the normalized substraction of both points.
Another option is, since the PoV is [0,0,0,1] in the camera coordinates, do the substraction in that system and then pass the result to the world. This is simple getting the camera coordinates of the pixel, and multiplying the Camera to World matrix with it as it was a vector [a,b,c,0].
3. The Real Ray Marching Loop
Now, with the ray defined, we can start with the ray marching itself.
The loop goes as follows:
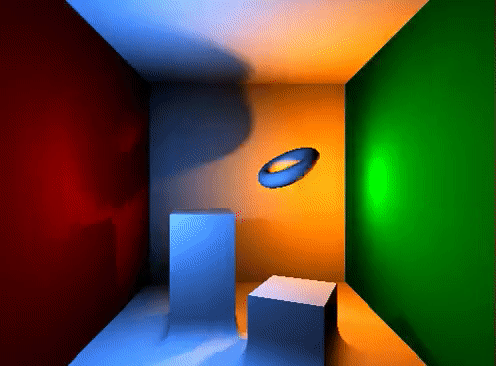
- We go through all the shapes, calculating the distance to the current point. And we get the smallest and the color of that shape.
- If the distance is smaller than a predefined threshold (EPSILON in my code), we have reached a surface, so we break out from the loop and assing the color to the output pixel.
- If it is greater, we advance as much as the distancein the direction of the ray, and repeat the process from there.
This will give us a result like this:

And that are the basics! 😄
As you can see, it is not very pretty to say it slightly. So we'll need to do some lighting.
The Lighting
So you want something with more... everything than just plain color?
Ok, let's put some light into this.
1. The light
So, first of all, we must pass the light/s data (position, color, type, etc) to the shader.
We can do it just like we passed all the needed uniforms before. No-brainer.
2. The Normals
Now you'd be asking "But wait Javi, you handsome psycho, to illuminate a 3D object we need the vertices' normals, and we don't have them. We don't even have vertices!"
To wich I would respond "You are absolutely right, you beautiful genius! But we are not doing normal rendering, we are doing RAY MARCHING! So we'll need to calculate them."
This is probably the part that I took most time to wrap my head around, but, once you get it, it is quite easy to understand, so stay with me.
For the shake of simpicity, I'll ignore the 3D and explain it as in a 2D curve/polygon.
Imagine we have a curve/polygon in 2D. To know its normal in the vertical axis in a point, we will take two points in space reeeeaally close to it by moving by a reeeeaally small amount in the horizontal axis, right and left.
Now, we have a gorgeous function that gives us the distance to the nearest function, so we'll use it with the 2 new points.
If the surface has not changed in the vertical axis between those points, the distances obtained will be equal, and it will mean that the surface is flat and its normal is 100% vertical.
If they differ, it means the surface is oriented in another direction, and we can approximate the vertical component of its normal just by substracting the distances.
Now we repeat the same process for the horizontal axis, and normalize the resulting vector, and we have the normal of the surface in that poitn! It's that simple! 😄
3. The Lighting
Here we can go as complex as we want, but I just went with a really basic diffuse lighting. (I'll probably at least add Phong, but for now, it stays like this).
To do something as basic as mine, you'll just need to multiply the shape's color by the dot product of the normal and the direction to the light.
4. The Shadows
To check if the current point is in shadow, we will just do another ray marching loop, this time towards the light, and return the shadow color if we collide with something, and 1 if not.
Then, just multiply it by the output color, and we are done!
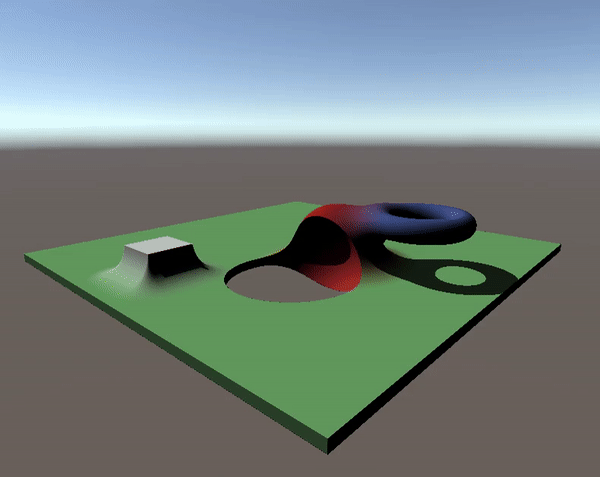
The Cool Effects
Now, the ray marching is known for the cool and weird effects it can do when shapes get too close to one another.
This is what we defined in the blend type of the shapes, and its applied when returning the distance to the nearest shape, if we don't get exactly the nearest.
I have used 4 different possible effects or blending operations:
-
Nothing: Just get the nearest shape. We do it with
min(candidateDist, currentDist) - Blending: Merge the shapes that get too close to each other. We do it by applying something called smooth minimum, that is better explained here by Iñigo.
-
Cut: The shape will be invisible and will cut holes in the shapes it intersects with. It's done with
min(-candidateDist, currentDist) -
Mask: Everything will be invisible except the intersection with this shape. It's doneby getting the furthest shape instead of the nearest.
max(candidateDist, currentDist)

Latest comments (2)
it looks very excellent work , do you have a ready unity package with a scene so i can test your work easily
Thank you! 😊
Sadly, I have no package, but the GitHub repo is public if you want to have a look: github.com/javiersalcedopuyo/Unity...
However, keep in mind it is an old project I no longer work on. There will probably be errors and suboptimal approaches.