Hello world
I know it's all too easy to fall into the trap of setting up (yet) another personal microblog, then postpone writing the first article for months, until the very existence of the blog is forgotten.
That is why this time, instead of turning around, looking for THE perfect introduction, I decided to simply share the small Processing sketch I wrote last night.
I am by no mean a Processing expert, as I don't use it very often, but it's one of those tools/frameworks I always feel compelled to come back to, every now and then. My love for generative art, and for the strange arcane arts of procedural content generation (or PCG — What is this?) can only stay unsatisfied for so long.
So what's the deal?
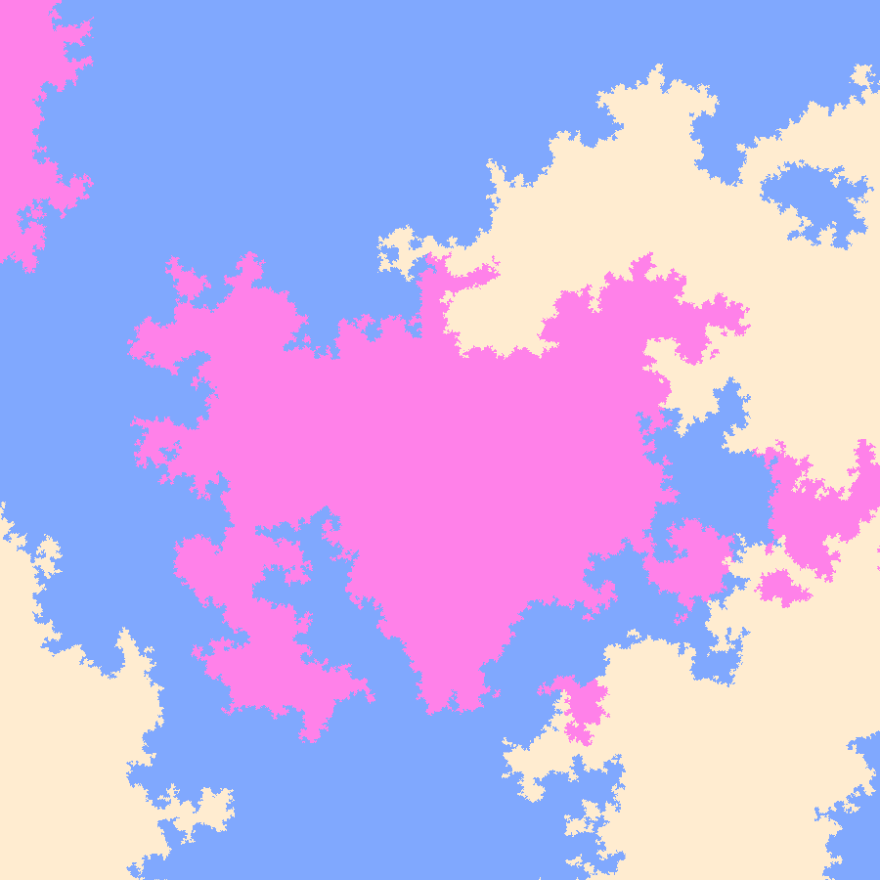
The goal of this tutorial is to generate this kind of randomly generated images (though you'll probably be better at finding a nice colour palette 😊):

A new planet surface, only one click away

Another example, with a lower detail level, for the block-lovers
How does that work?
The theory comes from this article written by the developers of Cuberite, a free and open-source Minecraft server. The article describes many terrain and biome generation techniques, but this tutorial will only focus on one of them, which the article calls Grown biomes.
The idea is the following
Start with a grid of 3x3 squares, each holding an arbitrary integer, which will later be associated to whatever meaning we want to give it (in our case, a colour)
"Explode" the grid so that a new square is inserted between each existing square, resulting in a grid of size:
size of grid in stage 1 * 2 - 1

Let's consider 4 neighbouring squares of the original 3x3 grid...

First we _explode each group of 4 neighbours..._

Finally, we assign values to the newly created squares, based on their neighbours
If we iterate over our grid with the same method a few times, we end up with our map!
You said we were going to do some Processing!!!
Yes! Let's open Processing now, and start implementing the algorithm.
NB: I'll be using Processing v3 for this tutorial
First of all, let's lay the foundations:
void setup() {
  size(900, 900);
  background(0);

  displayMap();
}

void displayMap() {
}
Now, we need to start with a 3x3 grid, so let's create a function that creates a nested list. We'll store a random integer in each "square", which we want to map to a colour eventually, so let's also declare our palette.
color[] PALETTE = {
  #ffecd0,
  #80a8fe,
  #ff81e9,
  #8aea6a,
  #222321
};

int[][] generateInitialGrid(int size) {
  int[][] grid = new int[size][size];

  for (int i = 0; i < size; i++) {
    for (int j = 0; j < size; j++) {
      // Assign a random index of PALETTE
      grid[i][j] = int(random(PALETTE.length));
    }
  }

  return grid;
}
Now we'd like to display our initial grid. Let's edit the function we created earlier:
void displayMap(int[][] grid) {
  // Divide the canvas to get the size of each square
  // (see below for the reason of the double canvas size)
  int cubeSize = height * 2 / grid.length;

  for (int i = 0; i < grid.length; i++) {
    for (int j = 0; j < grid.length; j++) {
      color c = PALETTE[grid[i][j]];
      stroke(c);
      fill(c);
      square(i * cubeSize, j * cubeSize, cubeSize);
    }
  }
}
Note: we use the
heightvalue provided by Processing, to retrieve the height (in pixels) of the canvas.When I started implementing the algorithm, I merely divided the window size by the amount of squares in a side of the grid. However, the following problem appears later on: as we increase the amount of square per side in each iteration, we very quickly end up with divisions with a remainder non-equal to zero. Since we're defining a size in pixels, there is simply no way to redistribute the remainder of this division. Basically, we are stuck with integers, so the size of the grid will be reduced, little by little.
Finally, since each iteration generates a new grid which is "twice as big minus one", we often end up with prime numbers so... yeah, tough luck.
To circumvent the issue, I decided to let the canvas grow over the borders of the window, which works perfectly fine for my own purpose.
Edit the setup function to pass our initial grid:
int INITIAL_GRID_SIZE = 3;

void setup() {
  size(900, 900);
  background(0);

  int[][] initialGrid = generateInitialGrid(INITIAL_GRID_SIZE);
  displayMap(initialGrid);
}
Run the sketch, and you should see your initial grid, somewhat similar to this:
Not bad! You can already frame this and display it in your living-room!
Now comes the tricky part. Let's explode our grid and randomise the newly inserted squares:
int[][] furtherDetailGrid(int[][] original) {
  int size = original.length * 2 - 1;
  int[][] grid = new int[size][size];

  // Insert the existing 4 neighbours from the original grid
  // We go 2 by 2, which leaves space between each square, for the new values
  for (int i = 0; i < size; i += 2) {
    for (int j = 0; j < size; j += 2) {
      grid[i][j] = original[i / 2][j / 2];
    }
  }

  // Now we fill the remaining space
  for (int i = 1; i < size - 1; i += 2) {
    for (int j = 1; j < size - 1; j += 2) {
      // We implement the conditions described in the figure above
      grid[i][j] = grid[oneOf(i - 1, i + 1)][oneOf(j - 1, j + 1)];
      grid[i - 1][j] = grid[i - 1][oneOf(j - 1, j + 1)];
      grid[i + 1][j] = grid[i + 1][oneOf(j - 1, j + 1)];
      grid[i][j - 1] = grid[oneOf(i - 1, i + 1)][j - 1];
      grid[i][j + 1] = grid[oneOf(i - 1, i + 1)][j + 1];
    }
  }

  return grid;
}

// Return a random element from a given array
int oneOf(int[] options) {
  return options[int(random(options.length))];
}

// Return one of both given elements, randomly
int oneOf(int option1, int option2) {
  int[] options = { option1, option2 };
  return oneOf(options);
}
Now let's use this function before we display the map:
void setup() {
  size(900, 900);
  background(0);

  int[][] initialGrid = generateInitialGrid(INITIAL_GRID_SIZE);
  displayMap(furtherDetailGrid(initialGrid));
}

"Now we get a 5x5 square grid, similar to this one"
If you run the sketch a few times, you may notice that in some cases, the algorithm renders big blocks of a single colour, or renders only two different colours on the whole grid.
Since we keep on iterating over the same grid, the initial step determines a lot of the final "look and feel" of the map.
I notice that starting with a 5x5 grid leads to more appealing results, as we introduce a bit more variety from the start.
To achieve this, change the value we defined earlier:int INITIAL_GRID_SIZE = 5;
To render a grid with an interesting look, we'll need a couple more iterations. Let's refactor our function so it can run a certain amount of times:
// Add a parameter to determine the amount of iterations
int[][] furtherDetailGrid(int[][] original, int iterations) {
  int size = original.length * 2 - 1;
  int[][] grid = new int[size][size];

  // Insert the existing 4 neighbours from the original grid
  // We go 2 by 2, which leaves space between each square, for the new values
  for (int i = 0; i < size; i += 2) {
    for (int j = 0; j < size; j += 2) {
      grid[i][j] = original[i / 2][j / 2];
    }
  }

  // Now we fill the remaining space
  for (int i = 1; i < size - 1; i += 2) {
    for (int j = 1; j < size - 1; j += 2) {
      // We implement the conditions described in the figure above
      grid[i][j] = grid[oneOf(i - 1, i + 1)][oneOf(j - 1, j + 1)];
      grid[i - 1][j] = grid[i - 1][oneOf(j - 1, j + 1)];
      grid[i + 1][j] = grid[i + 1][oneOf(j - 1, j + 1)];
      grid[i][j - 1] = grid[oneOf(i - 1, i + 1)][j - 1];
      grid[i][j + 1] = grid[oneOf(i - 1, i + 1)][j + 1];
    }
  }

  // return the final grid once we've run all iterations
  if (iterations <= 1) {
    return grid;
  }

  // otherwise continue refining the grid
  return furtherDetailGrid(grid, iterations - 1);
}
Update the setup function as well:
// A value between 6-8 usually works well, depending on your tastes
int ITERATIONS = 8;

void setup() {
  size(900, 900);
  background(0);

  int[][] initialGrid = generateInitialGrid(INITIAL_GRID_SIZE);
  displayMap(furtherDetailGrid(initialGrid, ITERATIONS));
}

"Example result with 8 iterations"
You will notice that setting
ITERATIONSto a value above 8 will not render anything, as we reach an amount of squares bigger than the amount of available pixels in the canvas
There you are!
Below is the entire code of the sketch, with a few additions, to allow you to recreate a new map with a simple click.
color[] PALETTE = {
  #ffecd0,
  #80a8fe,
  #ff81e9,
  #8aea6a,
  #222321
};
int INITIAL_GRID_SIZE = 5;
int ITERATIONS = 8;

void setup() {
  size(900, 900);
  background(0);

  createMap();
}

void mouseClicked() {
  createMap();
}

// Without the draw function, Processing will not process input events
// because it runs a single process, instead of running the update loop
void draw() {}

void createMap() {
  clear();
  int[][] initialGrid = generateInitialGrid(INITIAL_GRID_SIZE);
  displayMap(furtherDetailGrid(initialGrid, ITERATIONS));
}

void displayMap(int[][] grid) {
  int cubeSize = height * 2 / grid.length;

  for (int i = 0; i < grid.length; i++) {
    for (int j = 0; j < grid.length; j++) {
      color c = PALETTE[grid[i][j]];
      stroke(c);
      fill(c);
      square(i * cubeSize, j * cubeSize, cubeSize);
    }
  }
}

int[][] generateInitialGrid(int size) {
  int[][] grid = new int[size][size];

  for (int i = 0; i < size; i++) {
    for (int j = 0; j < size; j++) {
      // Assign a random index of PALETTE
      grid[i][j] = int(random(PALETTE.length));
    }
  }

  return grid;
}

// Add a parameter to determine the amount of iterations
int[][] furtherDetailGrid(int[][] original, int iterations) {
  int size = original.length * 2 - 1;
  int[][] grid = new int[size][size];

  // Insert the existing 4 neighbours from the original grid
  // We go 2 by 2, which leaves space between each square, for the new values
  for (int i = 0; i < size; i += 2) {
    for (int j = 0; j < size; j += 2) {
      grid[i][j] = original[i / 2][j / 2];
    }
  }

  // Now we fill the remaining space
  for (int i = 1; i < size - 1; i += 2) {
    for (int j = 1; j < size - 1; j += 2) {
      // We implement the conditions described in the figure above
      grid[i][j] = grid[oneOf(i - 1, i + 1)][oneOf(j - 1, j + 1)];
      grid[i - 1][j] = grid[i - 1][oneOf(j - 1, j + 1)];
      grid[i + 1][j] = grid[i + 1][oneOf(j - 1, j + 1)];
      grid[i][j - 1] = grid[oneOf(i - 1, i + 1)][j - 1];
      grid[i][j + 1] = grid[oneOf(i - 1, i + 1)][j + 1];
    }
  }

  // return the final grid once we've run all iterations
  if (iterations <= 1) {
    return grid;
  }

  // otherwise continue refining the grid
  return furtherDetailGrid(grid, iterations - 1);
}

// Return a random element from a given array
int oneOf(int[] options) {
  return options[int(random(options.length))];
}

// Return one of both given elements, randomly
int oneOf(int option1, int option2) {
  int[] options = { option1, option2 };
  return oneOf(options);
}


Top comments (0)