
Overview
Thanks to community effort, we can programmatically access Nintendo Switch App's API at zero cost. This allows us to build apps capable of communicating with games connected to Nintendo Switch Online (NSO), as well as getting user information like games played and playtime.

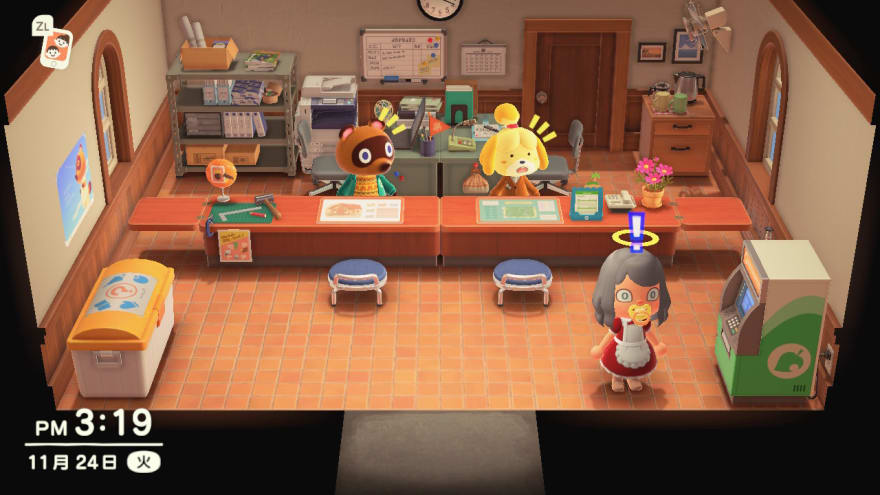
Type messages or use reactions in Animal Crossing with API requests!
Accessing the API
- Getting Nintendo Session Token from Nintendo's Website
- Getting Web Service Token
- Using Web Service Token to get game-specific session cookies
- Access API through session cookies
1. Nintendo Session Token
When someone logins to Nintendo's special authorization link, Nintendo redirects the browser to a url containing the session token.
To generate this link, we need to include a S256 code challenge in base64url format. No need to worry if you don't know what this means right now. Put simply, we are handing over the hashed value of our key to Nintendo, and later we will use the original key as proof we are the same person who logged in.
$npm install base64url, request-promise-native, uuid
const crypto = require('crypto');
const base64url = require('base64url');

let authParams = {};

function generateRandom(length) {
    return base64url(crypto.randomBytes(length));
  }

function calculateChallenge(codeVerifier) {
    const hash = crypto.createHash('sha256');
    hash.update(codeVerifier);
    const codeChallenge = base64url(hash.digest());
    return codeChallenge;
}

function generateAuthenticationParams() {
    const state = generateRandom(36);
    const codeVerifier = generateRandom(32);
    const codeChallenge = calculateChallenge(codeVerifier);
    return {
        state,
        codeVerifier,
        codeChallenge
    };
}

function getNSOLogin() {
    authParams = generateAuthenticationParams();
    const params = {
      state: authParams.state,
      redirect_uri: 'npf71b963c1b7b6d119://auth&client_id=71b963c1b7b6d119',
      scope: 'openid%20user%20user.birthday%20user.mii%20user.screenName',
      response_type: 'session_token_code',
      session_token_code_challenge: authParams.codeChallenge,
      session_token_code_challenge_method: 'S256',
      theme: 'login_form'
    };
    const arrayParams = [];
    for (var key in params) {
      if (!params.hasOwnProperty(key)) continue;
      arrayParams.push(`${key}=${params[key]}`);
    }
    const stringParams = arrayParams.join('&');
    return `https://accounts.nintendo.com/connect/1.0.0/authorize?${stringParams}`;
}

const loginURL = getNSOLogin();
console.log(loginURL);
Beginner's Tip: type the following commands to quickly run JavaScript on your Terminal:
$touch myApp.jsto create the file.$nano myApp.jsto modify the contents.$node myApp.jsto run the program.
You should get a URL similar to this:
https://accounts.nintendo.com/connect/1.0.0/authorize?state=[SessionStateReturnedHere]&redirect_uri=npf71b963c1b7b6d119://auth...
Visit the URL on your browser and login to your Nintendo Account. You will be directed to this page.
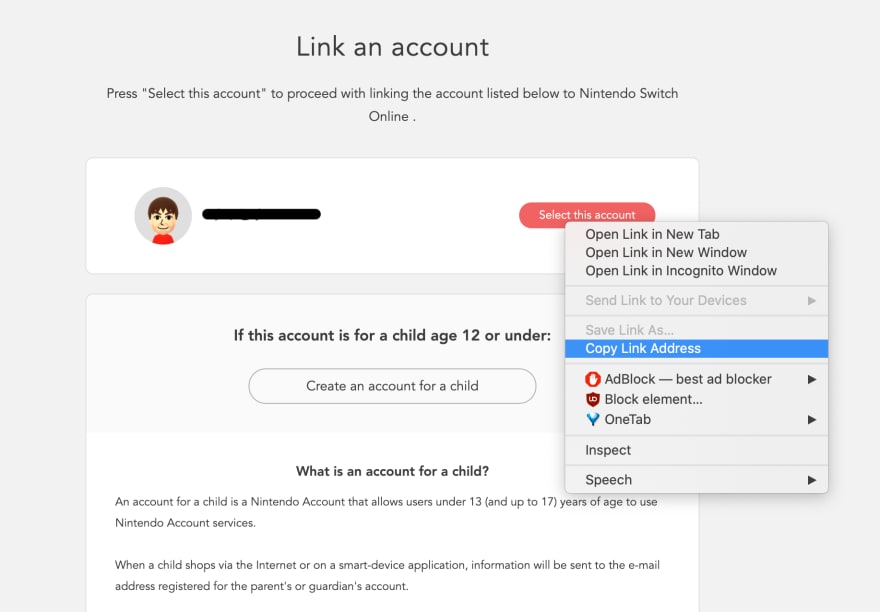
Right click on the Select this account button and copy the redirect link. It will be in this format:
npf71b963c1b7b6d119://auth#session_state=[SessionStateReturned]&session_token_code=[SessionTokenCodeReturned]&state=[StateReturned]
Instead of the usual HTTP or HTTPS protocol, the returned link's protocol is npf71b963c1b7b6d119, which is why you can't simply click and have the browser redirect you.
To build an app for this, we can either have the user right click -> copy and tell us their redirect url, or we could subscribe to the npf protocol and automatically redirect the user back to our app.
We can then extract the Session Token Code from this redirect url.
const params = {};
redirectURL.split('#')[1]
        .split('&')
        .forEach(str => {
          const splitStr = str.split('=');
          params[splitStr[0]] = splitStr[1];
        });
// the sessionTokenCode is params.session_token_code
With the Session Token Code, we can make a request to Nintendo to obtain the Nintendo Session Token.
At the time of this writing, the NSO app version is 1.9.0, which changes around 1~2 times a year. Check this repo for updates.
const request2 = require('request-promise-native');
const jar = request2.jar();
const request = request2.defaults({ jar: jar });

const userAgentVersion = `1.9.0`; // version of Nintendo Switch App, updated once or twice per year

async function getSessionToken(session_token_code, codeVerifier) {
  const resp = await request({
    method: 'POST',
    uri: 'https://accounts.nintendo.com/connect/1.0.0/api/session_token',
    headers: {
      'Content-Type': 'application/x-www-form-urlencoded',
      'X-Platform': 'Android',
      'X-ProductVersion': userAgentVersion,
      'User-Agent': `OnlineLounge/${userAgentVersion} NASDKAPI Android`
    },
    form: {
      client_id: '71b963c1b7b6d119',
      session_token_code: session_token_code,
      session_token_code_verifier: codeVerifier
    },
    json: true
  });

  return resp.session_token;
}
2. Web Service Token
Here are the steps to get the Web Service Token:
I. Get API Token with Session Token
II. Get userInfo with API Token
III. Get the f Flag [NSO]
IV. Get the API Access Token with f Flag [NSO] and userInfo
V. Get the f Flag [App] with API Access Token
VI. Get Web Service Token with API Access Token and f Flag [App]
This may look daunting, but in implementation is simply a sequence of async server requests.
const { v4: uuidv4 } = require('uuid');

async function getWebServiceTokenWithSessionToken(sessionToken, game) {
    const apiTokens = await getApiToken(sessionToken); // I. Get API Token
    const userInfo = await getUserInfo(apiTokens.access); // II. Get userInfo

    const guid = uuidv4();
    const timestamp = String(Math.floor(Date.now() / 1000));

    const flapg_nso = await callFlapg(apiTokens.id, guid, timestamp, "nso"); // III. Get F flag [NSO]
    const apiAccessToken = await getApiLogin(userInfo, flapg_nso); // IV. Get API Access Token
    const flapg_app = await callFlapg(apiAccessToken, guid, timestamp, "app"); // V. Get F flag [App]
    const web_service_token =  await getWebServiceToken(apiAccessToken, flapg_app, game); // VI. Get Web Service Token
    return web_service_token;
  }
Now implement those requests.
const userAgentString = `com.nintendo.znca/${userAgentVersion} (Android/7.1.2)`;

async function getApiToken(session_token) {
    const resp = await request({
        method: 'POST',
        uri: 'https://accounts.nintendo.com/connect/1.0.0/api/token',
        headers: {
        'Content-Type': 'application/json; charset=utf-8',
        'X-Platform': 'Android',
        'X-ProductVersion': userAgentVersion,
        'User-Agent': userAgentString
        },
        json: {
        client_id: '71b963c1b7b6d119',
        grant_type: 'urn:ietf:params:oauth:grant-type:jwt-bearer-session-token',
        session_token: session_token
        }
    });

    return {
        id: resp.id_token,
        access: resp.access_token
    };
}

async function getHash(idToken, timestamp) {
  const response = await request({
    method: 'POST',
    uri: 'https://elifessler.com/s2s/api/gen2',
    headers: {
      'User-Agent': `yournamehere` // your unique id here
    },
    form: {
      naIdToken: idToken,
      timestamp: timestamp
    }
  });

  const responseObject = JSON.parse(response);
  return responseObject.hash;
}

async function callFlapg(idToken, guid, timestamp, login) {
    const hash = await getHash(idToken, timestamp)
    const response = await request({
        method: 'GET',
        uri: 'https://flapg.com/ika2/api/login?public',
        headers: {
        'x-token': idToken,
        'x-time': timestamp,
        'x-guid': guid,
        'x-hash': hash,
        'x-ver': '3',
        'x-iid': login
        }
    });
    const responseObject = JSON.parse(response);

    return responseObject.result;
}

async function getUserInfo(token) {
const response = await request({
    method: 'GET',
    uri: 'https://api.accounts.nintendo.com/2.0.0/users/me',
    headers: {
    'Content-Type': 'application/json; charset=utf-8',
    'X-Platform': 'Android',
    'X-ProductVersion': userAgentVersion,
    'User-Agent': userAgentString,
    Authorization: `Bearer ${token}`
    },
    json: true
});

return {
    nickname: response.nickname,
    language: response.language,
    birthday: response.birthday,
    country: response.country
};
}

async function getApiLogin(userinfo, flapg_nso) {
    const resp = await request({
        method: 'POST',
        uri: 'https://api-lp1.znc.srv.nintendo.net/v1/Account/Login',
        headers: {
        'Content-Type': 'application/json; charset=utf-8',
        'X-Platform': 'Android',
        'X-ProductVersion': userAgentVersion,
        'User-Agent': userAgentString,
        Authorization: 'Bearer'
        },
        body: {
        parameter: {
            language: userinfo.language,
            naCountry: userinfo.country,
            naBirthday: userinfo.birthday,
            f: flapg_nso.f,
            naIdToken: flapg_nso.p1,
            timestamp: flapg_nso.p2,
            requestId: flapg_nso.p3
        }
        },
        json: true,
        gzip: true
    });
    return resp.result.webApiServerCredential.accessToken;
}


async function getWebServiceToken(token, flapg_app, game) {
  let parameterId;
    if (game == 'S2') {
      parameterId = 5741031244955648; // SplatNet 2 ID
    } else if (game == 'AC') {
      parameterId = 4953919198265344; // Animal Crossing ID
    }
  const resp = await request({
    method: 'POST',
    uri: 'https://api-lp1.znc.srv.nintendo.net/v2/Game/GetWebServiceToken',
    headers: {
      'Content-Type': 'application/json; charset=utf-8',
      'X-Platform': 'Android',
      'X-ProductVersion': userAgentVersion,
      'User-Agent': userAgentString,
      Authorization: `Bearer ${token}`
    },
    json: {
      parameter: {
        id: parameterId,
        f: flapg_app.f,
        registrationToken: flapg_app.p1,
        timestamp: flapg_app.p2,
        requestId: flapg_app.p3
      }
    }
  });

  return {
    accessToken: resp.result.accessToken,
    expiresAt: Math.round(new Date().getTime()) + resp.result.expiresIn
  };
}
Now call the functions to get our Web Service Token.
(async () => {
    const sessionToken = await getSessionToken(params.session_token_code, authParams.codeVerifier);
    const webServiceToken = await getWebServiceTokenWithSessionToken(sessionToken, game='S2');
    console.log('Web Service Token', webServiceToken);
})()
This is what the returned Web Service Token looks like.


Congratulations for making it this far! Now the fun with Nintendo API begins :)
Accessing SplatNet for Splatoon 2
To access SplatNet (Splatoon 2), we will use the Web Service Token to obtain a cookie called iksm_session.
(async () => {
    const sessionToken = await getSessionToken(params.session_token_code, authParams.codeVerifier);
    const webServiceToken = await getWebServiceTokenWithSessionToken(sessionToken, game='S2');
    await getSessionCookieForSplatNet(webServiceToken.accessToken);
    const iksmToken = getIksmToken();
    console.log('iksm_token', iksmToken);
})()

const splatNetUrl = 'https://app.splatoon2.nintendo.net';

async function getSessionCookieForSplatNet(accessToken) {
  const resp = await request({
    method: 'GET',
    uri: splatNetUrl,
    headers: {
      'Content-Type': 'application/json; charset=utf-8',
      'X-Platform': 'Android',
      'X-ProductVersion': userAgentVersion,
      'User-Agent': userAgentString,
      'x-gamewebtoken': accessToken,
      'x-isappanalyticsoptedin': false,
      'X-Requested-With': 'com.nintendo.znca',
      Connection: 'keep-alive'
    }
  });

  const iksmToken = getIksmToken();
}

function getCookie(key, url) {
    const cookies = jar.getCookies(url);
    let value;
    cookies.find(cookie => {
        if (cookie.key === key) {
            value = cookie.value;
        }
        return cookie.key === key;
    });
    return value;
}

function getIksmToken() {
    iksm_session = getCookie('iksm_session', splatNetUrl);
    if (iksm_session == null) {
        throw new Error('Could not get iksm_session cookie');
    }
    return iksm_session
}
With this cookie, we can directly visit SplatNet on the browser by modifying the iksm_session cookie.
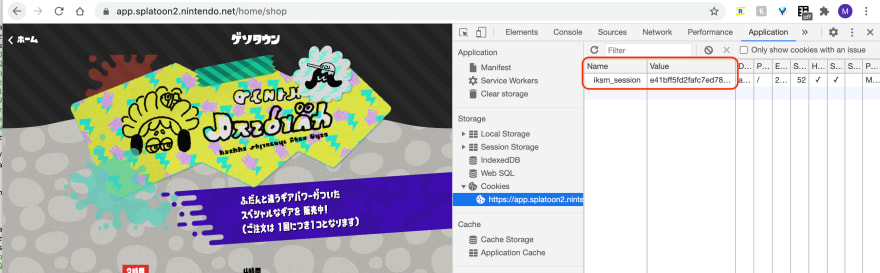
Beginner's Tip: To modify cookies on Chrome, press F12 for Developer Tools -> Applications Tab -> Storage. You can edit, add, and remove cookies there.
We can monitor the network tab in Developer tools while browsing SplatNet and see the APIs being called.

We can then use these APIs for our app. Once we make a request with the web token, the cookie will be set to the request object.
const userLanguage = 'en-US';
(async () => {
..
const iksmToken = getIksmToken();
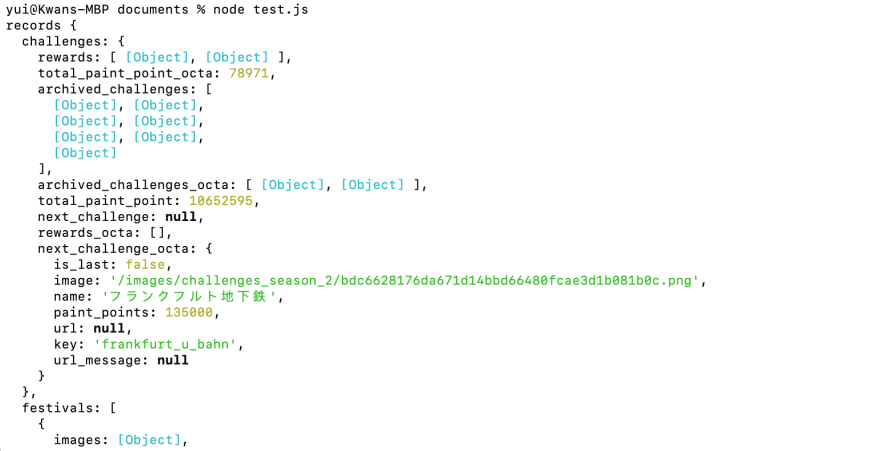
const records = await getSplatnetApi('records');
console.log('records', records);
async function getSplatnetApi(url) {
const resp = await request({
method: 'GET',
uri: `${splatNetUrl}/api/${url}`,
headers: {
Accept: '*/*',
'Accept-Encoding': 'gzip, deflate',
'Accept-Language': userLanguage,
'User-Agent': userAgentString,
Connection: 'keep-alive'
},
json: true,
gzip: true
});
return resp;
}
Here is the result for running the records API endpoint.
Common SplatNet Endpoints
- /results shows the most recent 50 matches.
- /coop_results shows the most recent 50 Salmon Run matches.
- /schedules shows the coming rotations.
- /coop_schedules shows the coming Salmon Run rotations.
- /x_power_ranking/201101T00_201201T00/summary shows the current highest X Power on the leaderboard as well as your current X Power.
Accessing Animal Crossing
To access Animal Crossing, we need to first get its Web Service Token.
(async () => {
    const sessionToken = await getSessionToken(params.session_token_code, authParams.codeVerifier);
    const webServiceToken = await getWebServiceTokenWithSessionToken(sessionToken, game='AC');
    const acTokens = await getCookiesForAnimalCrossing(webServiceToken.accessToken);
Once we access the Animal Crossing Endpoint, the Web Service Token will be stored as the _gtoken. We need this cookie to access the User API for another cookie called _park_session as well as an authentication bearer token.
const ACUrl = 'https://web.sd.lp1.acbaa.srv.nintendo.net';
let ACBearerToken;
let ACHeaders = {
    'Accept': 'text/html,application/xhtml+xml,application/xml;q=0.9,*/*;q=0.8',
    'Accept-Encoding': 'gzip,deflate',
    'Content-Type': 'application/json; charset=utf-8',
    'User-Agent': userAgentString,
    'x-isappanalyticsoptedin': false,
    'X-Requested-With': 'com.nintendo.znca',
    'DNT': '0',
    Connection: 'keep-alive'
}

async function getCookiesForAnimalCrossing(accessToken) {
    const resp = await request({
        method: 'GET',
        uri: ACUrl,
        headers: Object.assign(ACHeaders, {'X-GameWebToken': accessToken}),
    });
    const animalCrossingTokens = await getAnimalCrossingTokens();
    return animalCrossingTokens;
}

async function getAnimalCrossingTokens() {
    const gToken = getCookie('_gtoken', ACUrl)
    if (gToken == null) {
        throw new Error('Could not get _gtoken for Animal Crossing');
    }
    jar.setCookie(request2.cookie(`_gtoken=${gToken}`), ACUrl);
    const userResp = await request({
        method: 'GET',
        uri: `${ACUrl}/api/sd/v1/users`,
        headers: ACHeaders,
        json: true
      });
      if (userResp !== null) {
        const userResp2 = await request({
            method: 'POST',
            uri: `${ACUrl}/api/sd/v1/auth_token`,
            headers: ACHeaders,
            form: {
                userId: userResp['users'][0]['id']
            },
            json: true
          });
          const bearer = userResp2;
          const parkSession = getCookie('_park_session', ACUrl);
          if (parkSession == null) {
              throw new Error('Could not get _park_session for Animal Crossing');
          }
          if (bearer == null || !bearer['token']) {
            throw new Error('Could not get bearer for Animal Crossing');
          }
         ACBearerToken = bearer['token']; // Used for Authorization Bearer in Header
         return {
             ac_g: gToken,
             ac_p: parkSession
         }
      }
}
Now we can call Animal Crossing's API!
Note: Not all of Animal Crossing's API requires the Bearer Token and the _park_session cookie. If the string "users" are a part of the request url, for example /api/sd/v1/users, we only need to provide the _g_token.
Here is the result of the /sd/v1/friends endpoint which lists all your best friends.
(async () => {
    ..
    const acTokens = await getCookiesForAnimalCrossing(webServiceToken.accessToken);
    const bestFriends = await getAnimalCrossingApi('sd/v1/friends');
    console.log('Best Friends', bestFriends);
})()

async function getAnimalCrossingApi(url) {
    const resp = await request({
      method: 'GET',
      uri: `${ACUrl}/api/${url}`,
      headers: Object.assign(ACHeaders, { Authorization: `Bearer ${ACBearerToken}`}),
      json: true,
      gzip: true
    });
    return resp;
}

Common Animal Crossing Endpoints
- /sd/v1/users shows user's name, island, passport photo.
- /sd/v1/users/:user_id/profile?language=en-US shows the passport of one user.
- /sd/v1/lands/:land_id/profile shows island data.
- /sd/v1/friends lists best friends and their information.
- /sd/v1/messages sends message or reaction in-game with a POST query.
POST request body for sending messages:
{
  "body": "Sweet",
  "type": "keyboard"
}

POST request body for sending reactions:
{
  "body": "Aha",
  "type": "emoticon"
}
Refreshing Tokens & Cookies
Once the Web Service Token has expired, we can obtain a new one with our initial Nintendo Session Token. There is usually no need to login again.
Summary
- Nintendo Switch API enables apps to communicate with game and user information.
- User authentication is required to get an access token, which can be used to acquire a Web Service Token.
- With the Web Service Token, we can generate game-specific cookies to access game API.
Example Projects
Splatnet/Music Bot: A Discord bot that allows users to show their Animal Crossing Passport and their Splatoon 2 ranks.
Squid Tracks: A full-feature desktop client for Splatoon 2. I recently helped update the authentication logic for this app to get it running again.
Splatnet Desktop: A simple electron application I wrote to access SplatNet on desktop with straightforward authentication.
Splatoon2.Ink: Website that shows current Splatoon 2 stages.
Streaming Widget: A widget that shows Splatoon 2 match results.

Notes
- The current method involves making a request to a non-Nintendo server (for the f flags)
- You can manually obtain the game cookies with mitmproxy

Top comments (10)
I was getting this error : StatusCodeError: 400 - {"error_description":"The provided session_token_code is invalid","error":"invalid_request"
}
Did you parse your redirect npf URL to get the correct session token code?
Yes , I try relogin the nitendo account not working too.
npf71b963c1b7b6d119://auth#session_state=84d51f9aae98fa60a820518ae22d4b8e337b67a21c93c743be5b4f5c85fxxxxx&session_token_code=xxxxxGciOiJIUzI1NiJ9.eyJhdWQiOiI3MWI5NjNjMWI3YjZkMTE5Iiwic3RjOm0iOiJTMjU2Iiwic3RjOmMiOiJPUWY0aWRaMmt0eEw4bmNHSWhUamRGRDBjaFdxTWVBbHI0d1FPS0oxRjJrIiwiZXhwIjoxNjA2OTIyMzcxLCJzdGM6c2NwIjpbMCw4LDksMTcsMjNdLCJ0eXAiOiJzZXNzaW9uX3Rva2VuX2NvZGUiLCJqdGkiOiIyODgyMTk2NDc5NyIsInN1YiI6ImYwMWQ5NTk1YTdjMGEyNTAiLCJpc3MiOiJodHRwczovL2FjY291bnRzLm5pbnRlbmRvLmNvbSIsImlhdCI6MTYwNjkyMTc3MX0.RfWkHpYWf0cnPDnM3soRksiQabrG8uvc0Ludn_vqSuU&state=xxxxxxVX4PH_8kOd_yQnpua-pFmz6TMnGpWHuyySr_jHOdWJ
The output sessionTokenCode is xxxxx...SuU in logging. looks good but get 400 :(
I'm not going to use your token right now, but you should try running this repo and console logging the tokens step by step. You can run it with npm install and npm start.
github.com/mathewthe2/splatnet-des...
This looks pretty cool. I didn't know they have an API.
Yeah, not a lot of people do, and it requires a bit of digging through code and issues on github.
Cool post, thank you!
I'm glad that this was useful! 😂
Thanks for the heads up, Patrick. Updated the post.