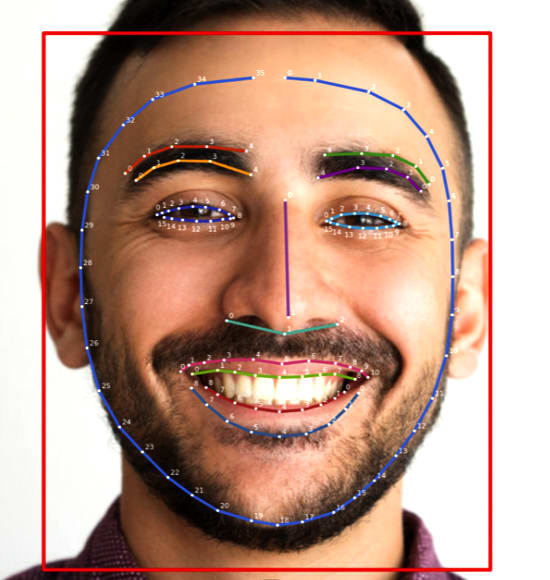
Apple introduced the new vision library used to which is used for various purposes. One of the best features is used to detect face with the landmark of the faces. It can recognize the eyes, brows, ear, nose, and mouth. Using this library developer can crop the detected face, and even a developer can maintain the different condition where it will crop only faces from the whole body.
Even this library can detect the mustaches, glass, and hat. For face detection, the only landmark is not enough a developer might need to create some model to train the model using CoreML to make it advance features. Where developer needs to enroll for CoreML model, upload and train the model for face detection If more the face images uploaded in the cloud then, more will be accuracy. In the vision, the most important is Request, Request Handler, and the Result of the request.
Face detection is not an easy task. There are only a few libraries available in the market to detect face but integrating, with iOS is a big challenge for the developers. So far, the most useful component in the market is OpenCV, but there is limited space, and it is difficult to integrate into iOS app development. During face, crop developer should take a minimum of 20 images at a time to train the model more accurately then zip it and upload in the cloud server. Once the model trained, then the developer needs to capture the uploaded pic to match with a particular user.
Facial recognition is a big challenge and more tedious task for the developer to detect the face and get the 90-100% accuracy, but once it developed then, it can be leveraged in various industry, collages, hotel, and company, etc. This solution is more efficient, and it will minimize the long queue and optimize the system. Even it will make an easier life in many places.
Implementation for Face Detection:
Step 1:
A developer needs to create the request to detect face images using, VNDetectFaceRectanglesRequest then developer need to create the request for VNImageRequestHandler where the developer needs to take care of image type to pass on it.
var facehandlerRequest: VNDetectFaceRectanglesRequest = {
 let facedetect = VNDetectFaceRectanglesRequest(completionHandler: self.facehandlerRequest)
 return facedetect
}()
var facehandlerrequest = VNImageRequestHandler(cgImage: cgImage, options: [: ])
do {
 try handler.perform([self.facehandlerRequest])
} catch {
 print("server error.\n\(error.localizedDescription)")
}

func FaceDetectionHandler(request: VNRequest, error: Error ? ) {
 guard
 let observations = request.results as ? [VNFaceObservation]
 else {
  print("unexpected result type from VNFaceObservation")
  return
 }
 DispatchQueue.main.async {
  for face in observations {
   let view = self.createBoxView(withColor: UIColor.red)
   view.frame = self.transformRect(fromRect: face.boundingBox, toViewRect: self.yourImageView)
   self.yourImageView.addSubview(view)
  }
 }
}
Step 2:
A developer needs to get the array of observations from VNFaceobservation and then need to draw a square/rectangle shape on faces to crop it.
func facelandamrktransformRect(fromRect: CGRect , toViewRect :UIView) -> CGRect {
    var RectDetect = CGRect()
  RectDetect.size.width = fromRect.size.width * toViewRect.frame.size.width
    RectDetect.size.height = fromRect.size.height * toViewRect.frame.size.height
    RectDetect.origin.y =  (toViewRect.frame.height) - (toViewRect.frame.height * fromRect.origin.y )
    RectDetect.origin.y  = toRect.origin.y -  toRect.size.height
    RectDetect.origin.x =  fromRect.origin.x * toViewRect.frame.size.width
    return RectDetect
}

func createBoxView(withColor: UIColor) - > UIView {
 let view = UIView()
 view.layer.borderColor = withColor.cgColor
 view.layer.borderWidth = 2
 view.backgroundColor = UIColor.clear
 return view
}
Step 3:
After face detection, a developer needs to crop the face from the detected face then only face will be visible and other parts of the body get eliminated from the image’s using the logic, and it can be handled using the code.
public enum FaceCropResultSet {
  case success([T])
  case notFound
  case failure(Error)
}

public struct FaceDetectCropper {
  let detectable: T
  init(_ detectable: T) {
    self.detectable = detectable
  }
}
public protocol FaceCroppable {}
public extension FaceCroppable {
 var face: FaceDetectCropper < Self > {
  return FaceDetectCropper(self)
 }
}
public extension FaceDetectCropper where T: CGImage {
  func crop(_ completion: @escaping(FaceCropResultSet < CGImage > ) - > Void) {
    guard# available(iOS 11.0, *)
    else {
     return
    }
    let req = VNDetectFaceRectanglesRequest { request, error in
      guard error == nil else {
        completion(.failure(error!))
        return
      }

       let faceImages = request.results?.map({ result -> CGImage? in
        guard let face = result as? VNFaceObservation else { return nil }

        let context = UIGraphicsGetCurrentContext()

        // draw the image
        context?.scaleBy(x: 1.0, y: -1.0)

        let width = face.boundingBox.width * CGFloat(self.detectable.width)
        let height = face.boundingBox.height * CGFloat(self.detectable.height)
        let x = face.boundingBox.origin.x * CGFloat(self.detectable.width)
        let y = (1 - face.boundingBox.origin.y) * CGFloat(self.detectable.height) - height

        let croppingRect = CGRect(x: x, y: y, width: width, height: height)
        let faceImage = self.detectable.cropping(to: croppingRect)

        context?.saveGState()
        context?.setStrokeColor(UIColor.black.cgColor)
        context?.setLineWidth(8.0)
        context?.addRect(croppingRect)
        context?.drawPath(using: .stroke)
        context?.restoreGState()

        return faceImage
      }).flatMap { $0 }

      guard let result = faceImages, result.count > 0 else {
        completion(.notFound)
        return
      }

      completion(.success(result))
    }

    do {
      try VNImageRequestHandler(cgImage: self.detectable, options: [:]).perform([req])
    } catch let error {
      completion(.failure(error))
    }
  }
}

public extension FaceDetectCropper where T: UIImage {
 func crop(_ completion: @escaping(FaceCropResultSet < UIImage > ) - > Void) {
  guard# available(iOS 11.0, *)
  else {
   return
  }
  self.detectable.cgImage!.face.crop {
   result in
    switch result {
     case.success(let cgFaces):
      let faces = cgFaces.map {
       cgFace - > UIImage in
        return UIImage(cgImage: cgFace)
      }
     completion(.success(faces))
     case.notFound:
      completion(.notFound)
     case.failure(let error):
      completion(.failure(error))
    }
  }
 }
}
extension NSObject: FaceCroppable {}
extension CGImage: FaceCroppable {}
Step 4:
The developer needs to create the custom camera where he can take minimum 20 pics, crop faces and zip it. Once cropping is done then pics can be uploaded in the cloud for CoreML training. Once a model trained with crop face images, then it can be compared in the next step by calling the CoreML API and pass the image in CoreML API. If successful, the face is found, if not found, the message will appear and retry the option will be CoreML.
func imagePickerController(_ picker: UIImagePickerController, didFinishPickingMediaWithInfo info: [UIImagePickerController.InfoKey: Any]) {
 let image = info[UIImagePickerController.InfoKey.originalImage]
 let image1 = info[UIImagePickerController.InfoKey.originalImage] as!UIImage
 image1.face.crop {
  result in
  switch result {
    case.success(let faces):
     for i in 0.. < faces.count {
      self.capturedImages.append(faces[i])
     }
    print("capturedImages", self.capturedImages)
    print("capturedImages", faces.count)
    let string1: String = TrainModelViewController.userID!
     if self.capturedImages.count == 10 {
     self.cameraTimer.invalidate()
     for i in 0.. < self.capturedImages.count {
      let documentsPath1 = NSURL(fileURLWithPath: NSSearchPathForDirectoriesInDomains(.documentDirectory, .userDomainMask, true)[0])
      print("documentsPath1", documentsPath1)
      let folderPath = NSSearchPathForDirectoriesInDomains(.documentDirectory, .userDomainMask, true).first!+"/" + string1 + "/"
      try ? FileManager.default.createDirectory(at: URL(fileURLWithPath: folderPath), withIntermediateDirectories: false, attributes: nil)
      let filePath = folderPath + "\(String(describing:i))" + ".png"
      print("filepath", filePath)
      let imageData = (image as!UIImage).jpegData(compressionQuality: 0.5)
      FileManager.default.createFile(atPath: filePath, contents: imageData, attributes: nil)

      if try !FileManager.default.contentsOfDirectory(atPath: folderPath).count == self.capturedImages.count {
       do {
        let zipFilePath =
         try Zip.quickZipFiles([URL(fileURLWithPath: folderPath)], fileName: string1)
        print("zip file path", zipFilePath)
        ZipImageViewController.zipfilepath1 = zipFilePath as URL

       } catch {
        print("Something went wrong")
       }
      }
     }
    }
    break
    case.notFound:
     let alert = UIAlertController(title: "Face not detected", message: "Please choose another image", preferredStyle: UIAlertController.Style.alert)
    alert.addAction(UIAlertAction(title: "Ok", style: UIAlertAction.Style.default, handler: nil))
    self.present(alert, animated: true, completion: nil)
    break
    case.failure(let error):
     let alert = UIAlertController(title: "Face not detected", message: "Please choose another image", preferredStyle: UIAlertController.Style.alert)
    alert.addAction(UIAlertAction(title: "Ok", style: UIAlertAction.Style.default, handler: nil))
    self.present(alert, animated: true, completion: nil)
    break
   }
 }
 if !cameraTimer.isValid {
  finishAndUpdate()
 }
}
Step 5:
Sample image: Once image get detected then Cropping will be done by red rectangular area

Top comments (0)