A little over a week ago, Marcel Pociot launched his latest product called Expose. Expose is a beautiful, open source, tunnel application that allows you to share your local websites with others via the internet.
As I’ve been a paying customer for ngrok without using it too much, this was a trigger for me to take a dive into setting up Expose on a custom domain. The setup was pretty easy, besides a few things I had to search for. So hopefully it saves a few of you the trouble of finding out yourself ;-)
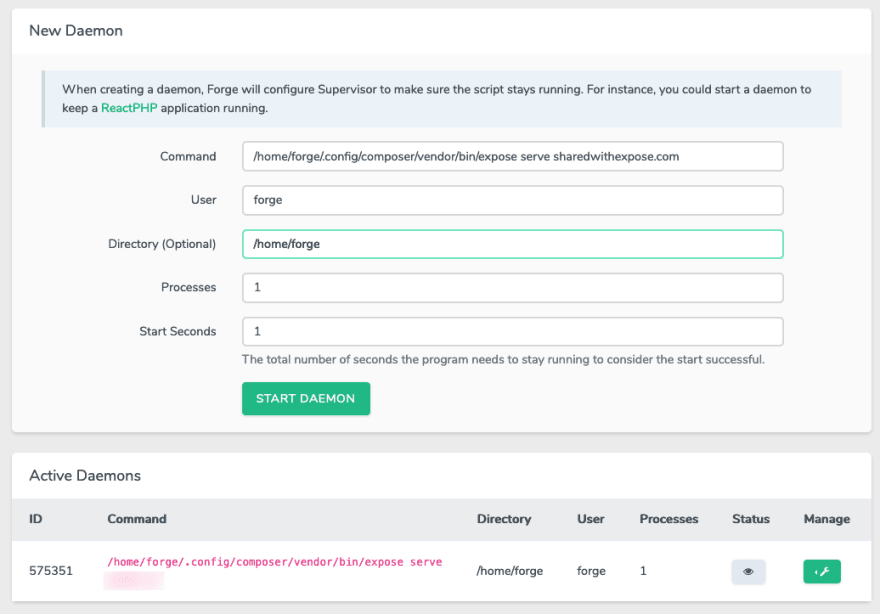
Note: I’ve used sharedwithexpose.com as an example domain in the screenshots. Might be knocking on an open door here, but don’t forget to replace this with your own custom domain!
Preparing your domain
First things first: we need to setup the domain you want to use. In this guide I’ll assume you want your Expose installation to run over https. In Laravel Forge you are able to add a wildcard Let’s Encrypt certificate using one of these DNS providers: Cloudfare, DigitalOcean, DNSimple, Linode and OVH.

In my case I used DigitalOcean to manage the DNS for a domain I already bought. Instructions for DigitalOcean can be found at https://www.digitalocean.com/docs/networking/dns/. Don’t forget to create both the @ and * A-records and direct them to your Droplets IP.
Setting up the Forge server and site
Second step: create a server in Forge using the provider of your choice. Be sure to at least choose PHP 7.3 since Expose does not run on lower versions. Of course, don’t forget to save your sudo password in a password manager!
Let’s proceed to adding the domain to the server using the sites tab in Forge. The single most important thing to do is to check “Allow Wildcard Sub-Domains”, since we need those for the sites shared via Expose.

After you’ve added your site, let’s continue by installing a Let’s Encrypt certificate. Under your site’s dashboard in Forge, choose SSL from the side menu and click Let’s Encrypt. Since we’re requesting a certificate for a wildcard domain we need to provide an API token for the provider of choice. After inserting the token click the green Obtain Certificate button and wait for a bit until installation is finished.

Installing Expose on the server
Installing Expose on the server is a breeze, since Forge servers come pre-installed with the tools we are about to use! All we need to do is SSH into the server and globally install Expose:
composer global require beyondcode/expose
After composer is done installing Expose, we’re ready to configure the Expose servers settings and creating a daemon script in Forge which monitors the process and restarts it whenever it has failed.
First of all, we need to copy the expose config file to another directory for supervisor to be able to correctly load the settings. From within the /home/forge directory execute the following two commands:
php /home/forge/.config/composer/vendor/bin/expose publish
ln -s .expose/config.php .expose.php
After that you can edit the .expose.php file to your liking. I’ve notice that the settings you enter in the Expose admin panel don’t persist whenever Supervisor had to restart my daemon script. I’m not sure if this is intended, but for now I would suggest to configure the .expose.php config file correctly instead of using the admin panel.
Setting up nginx and deamon script
Next up are setting up nginx, this is perfectly described in the Expose docs under SSL support. The only thing you have to do is replace Forge’s default:
location / {
    try_files $uri $uri/ /index.php?$query_string;
}
With:
location / {
    proxy_pass http://127.0.0.1:8080;
    proxy_read_timeout 60;
    proxy_connect_timeout 60;
    proxy_redirect off;

    # Allow the use of websockets
    proxy_http_version 1.1;
    proxy_set_header Upgrade $http_upgrade;
    proxy_set_header Connection 'upgrade';
    proxy_set_header X-Real-IP $remote_addr;
    proxy_set_header X-Forwarded-For $proxy_add_x_forwarded_for;
    proxy_set_header X-Forwarded-Proto https;
    proxy_set_header Host $host;
    proxy_cache_bypass $http_upgrade;
}
Last step is to create the daemon script which monitors the process for us. Go to your server in Forge, choose Daemons and create a record like the one below.
Creating users
If everything went well, you should now be presented with Expose’s placeholder page at the root of your selected domain name. Also, Expose’s admin panel should be available at https://expose.yourdomain.com.
You most likely want to prevent random users from using your custom domain. Which means you should create users from the Expose admin panel. Also make sure you’ve set validate_auth_tokens to true in your .expose.php config file. After creating a user you are presented with their API token. This token needs to be set in your local installations config.
Note: Some users seem to be having issues when visiting the users page of the Expose admin panel. As far as I’ve seen this is due to an error reading the SQLite database. In the .expose.php configuration file you can manually set the location for database to /home/forge/.expose/expose.db. See this Github Issue: https://github.com/beyondcode/expose/issues/18#issuecomment-646485519
Installing and configuring the client
The last steps are as easy as 1, 2, 3. We start off again by installing Expose globally using composer.
composer global require beyondcode/expose
After that we publish the configuration file use
expose publish
Next up is modifying the configuration file, using the editor of your choice to open the file and at least be sure you’ve correctly entered the host and auth_token in this file. Both are used to connect to the right host and of course to provide the correct credentials. More info about local client configuration can be found in the Expose docs.
That’s it!
That should be it, you are now ready to share your first local website using your own custom Expose domain!
If you find yourself having any trouble getting Expose installed or you think I’ve missed a step, don’t hesitate to write down a comment. If you think you’ve found a bug, please use Expose’s Git issues instead.
Last but not least I want to thank Marcel Pociot for creating Expose and users filipac (https://github.com/filipac) and ahmedash95 (https://github.com/ahmedash95) for their help in a few issues over at Github that lead me to a working installation!
Pendo
My name is Joshua de Gier, I’m owner of Pendo — a digital agency located in Maastricht, the Netherlands. Our main focus is development of custom web applications and websites using Laravel. Feel free to reach out to us if you are looking for a development agency or temporary extra hands for your project.
https://pendo.nl
(+31) 043–302 00 01
info@pendo.nl

Top comments (2)
Thanks for sharing this, it helped me set it up on my server :)
just one thing, you should replace quotes in nginx example
instead of proxy_set_header Connection ‘upgrade’ it should be proxy_set_header Connection 'upgrade'
(for easier copy/paste because it didn't work for me with the original quotes).
UPDATE:
github.com/beyondcode/expose/issue... this should also be taken into account because it wouldn't work for me until I manually set db location for --validateAuthTokens
Hi Kristjan,
thanks for your reply! I've editted the nginx example so it's ready to be copy-pasted!
As for your update, under "Creating users" there's a note that stated that already. I've added your link for further information.