This is my first DEV.to post. If I'm using wrong tags or doing some weird formatting, please tell me. It'd be much appreciated.
I have a small Ubuntu Server-powered server. A nettop[1] with a 40 GB disk drive which I use for experimenting with Linux stuff (because I don't care that much if it breaks) and hosting a GitLab instance.
The 40 GB disk is actually an old laptop one, this nettop came with a 300 GB one which I put into my old laptop (perhaps not a that good idea) and now I'm too lazy to replace the drives again and reinstall all software (especially on my laptop). A side effect is that the server is way slower than before because it's running off that old SATA I drive that's really starting to show its age (not to mention it's also overheating all the time).
[1] Nettops are small PCs meant to serve as a multimedia storage device or a set top box. They were very common about 10 years ago before streaming services went mainstream and people wanted to be able to watch movies on their TVs without having to burn them to DVDs.
So this is going to be a writeup about the things I usually do when attempting to free up some space on Ubuntu-powered servers. Maybe it'll be useful to someone 😉.
The first thing I'll do is to SSH into the server and check the space available:
ssh redcreator37@192.168.xxx.xxx
df -h
Here I'm checking the disk space with df -h command. The -h switch is used to display the space in GBs instead of blocks. Here's the output:
If you look closer, you can see that there are 26 GBs of free space available on the disk:
/dev/sda2 37G 9.5G 26G 28% /
You've probably noticed that the full disk capacity is 37 GBs although the disk is labeled as a 40 GB one (here we have to take a number of things into account).
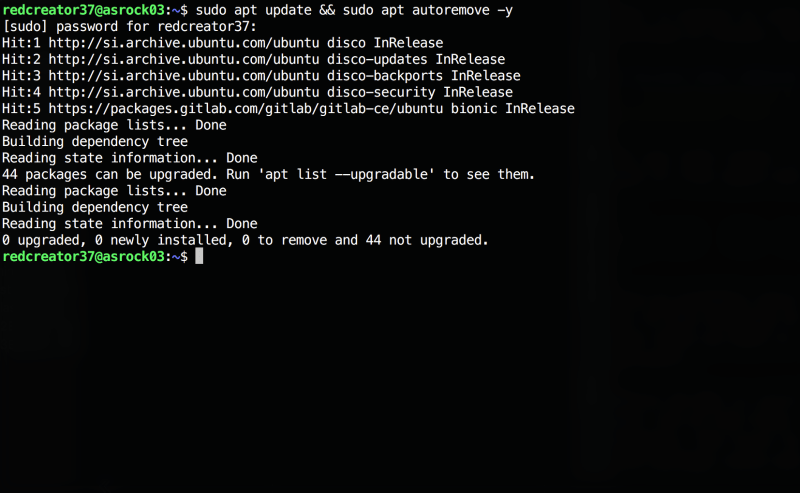
While 26 GBs is still a lot of storage, I want to get rid of old files and packages I don't use anymore. Many of these are libraries I've installed to compile a program and two then forgot to remove them after I've stopped playing with those programs. The first thing we will do here is to update the package cache and remove unused packages (the autoremove command).
Apparently there are no unused packages to remove, but 44 packages can be upgraded. I'll do that later because I'll remove the things I don't need anymore first (so I won't be upgrading the stuff and removing it just a moment later). If you've been paying attention, you've probably noticed the -y switch at the end of command. This switch just tells apt to skip any confirmation prompts, which can be sometimes do more harm than good so use it wisely (and feel free to modify the apt commands I'm using here, especially if there's something wrong with them).
At this point we can either figure out all the names of packages we want to remove and do it with sudo apt remove or use a tool like Aptitude to search for packages and also check for any broken dependencies.
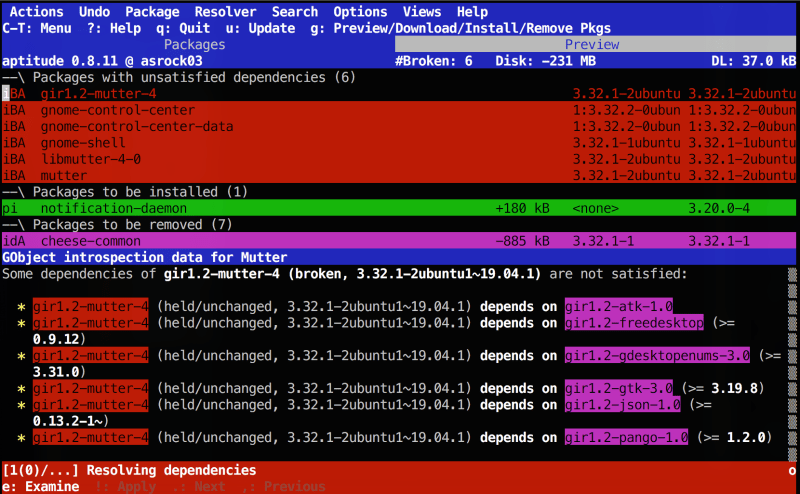
Run Aptitude with sudo aptitude (you can install it with sudo apt install aptitude -y). Navigate through the package list with arror keys and mark packages for deletion with - (hyphen). I've selected some packages that I know I won't use anymore and now there are 6 broken packages... 😐 I've chosen to examine the packages and I'm starting to notice I should really put the original drive back - it started to go through the database checking for package relations and it has really taken a good amount of time for it.
To make it all worse, it even hung at some point. Guess I'm just going to let it remove the packages, broken dependencies or not. I've tried pressing g to start the operations (remove the packages) and nothing. It just put a message "Trying to fix broken packages..." in front of me and froze completely. Even the little progress indicator on the right side of that red status bar at the bottom stopped working, the cursor has disappeared and menu shortcut (CTRL + T) isn't working... Well, time to restart it... Surprisingly, pressing CTRL + C a few times did work and terminate the Aptitude process. I've started Aptitude again and this time disabled automatic package resolving in settings (CTRL + T, choose Options menu, Preferences)
Now I can just hope this solves the problem. Let's try again (in case your computer isn't as slow as this one and still responds, press g to start the operations). That did work - this time instead of just displaying the message, there was an Apply button which I've pressed to skip the scanning process. Now I at least know which packages are causing the problems:
I've told it to remove the broken packages by selecting each one and pressing - (minus). As I'm removing all GUI-related stuff here these are going to be useless anyway. You can also choose other actions from the Package menu (menus are accessed through CTRL + T in case you've missed). Now we're ready to go (press g again and it should work). You can usually just let it do its stuff unless there's something really bad going on with your package configuration (in which case you may need to confirm a few things).
After waiting for a while it should work and remove all selected packages (and, of course, do everything else you've instructed it). You can run df -h again if you want to see how much space we've freed, but don't be surprised if there won't be any huge improvement just yet. We can now (finally) upgrade the packages. Do a quick sudo apt upgrade && sudo apt dist-upgrade. After that, run sudo apt clean && sudo apt autoclean && sudo apt autoremove (you can also append the -y switch to those to skip any confirmation prompts or run them separately if you want).
At this point we're pretty much done with the package management part. Something else you can do is to run dpigs (from debian-goodies package) to find out which packages take up the most disk space.
Last but not least, we can free up a significant amount of space by hunting down huge files and directories. A good utility to find such space hogs is ncdu (an ncurses version of the du command). Run ncdu / to start scanning for big files. This can take a while as it has to scan the entire / drive.
You can navigate through the directory structure to find the biggest files in each directory. If you find a really huge file you want to delete just press d, select yes and it should be gone.
One of the most common space hogs are old versions of the Linux kernel and logs, which can pile up if you don't have some neat script checking and deleting them. As for kernels, always keep one or two old versions as a fallback in case there are some problems with the latest one. Any proper package manager should take care of that but if it doesn't for some reason and you end up with many outdated kernels you may delete them (you're doing this on your own risk so don't blame Linux for magically not working anymore) and make sure you reconfigure GRUB to avoid boot issues afterwards.
I hope this post will be helpful to someone although it's not much. This is my first post on DEV.to and I'm open to any suggestions. If you have a questions or just found an error in my article, feel free to leave a comment 🙂


Top comments (2)
Nice post! Welcome to Dev.to!
You put a lot more effort into keeping your distros clean than I do. I would just wipe the drive and start over!
Thanks! I'm still getting into the blog thing and the community on DEV.to is awesome 🙂. So many nice people sharing their knowledge...
About that "start from scratch" thing, you probably should do this from time to time anyway 😉