You might be familiar with the usage of gradients as background-image or background shorthand property in CSS.
But, have you ever tried using gradients as text color or border color?
If you have, you might also know that CSS gradients don't work with color property, they can only be used as image.
But, what if you want to use gradients for text color, or use a colorful gradient for borders?
That gets a little bit tricky with CSS. There are a couple of ways to go about it, having their pros and cons.
Let's discuss these methods.
Method 1: Use border-image CSS Property
You can use border-image-source and border-image-slice CSS Property together to apply a gradient on the border. You can also combine those two using border-image shorthand property.
<style>
.border-gradient {
    border: 5px solid transparent;
    padding: .5rem;
    border-radius: 5px;
    border-image-source: linear-gradient(to right, red 0%, blue 100%);
    border-image-slice: 5;
    /* Shorthand */
    /* border-image:
        linear-gradient(to right, red 0%, blue 100%) 1;
    */
}
</style>
<div class="border-gradient">
    A div with gradient border using border-image property.
</div>
Let's understand what's going on here.
First, the border-image-source property specifies the image to be used for the border.
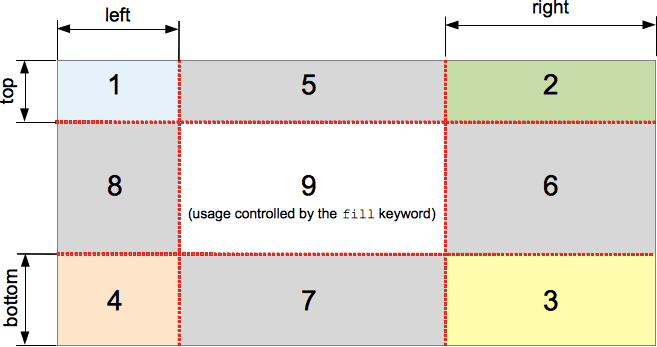
Now, the border-image specified by border-image-source property is sliced into 9 parts - 4 corners, 4 sides, and 1 middle area. You can specify the slicing behavior by using border-image-slice property. Middle area is transparent by default. You can use fill keyword to use the image for middle area as well.
border-image-slice property specifies how each of these parts should be used to form the actual border. We have specified a single value i.e 5, for all sides (top, right, left and bottom). This means we are slicing equal 5px from each side to form the border.
For more on border-image-slice property, see MDN Docs.
Pros
- The middle part can be left transparent or filled using
border-image-slice. - You can slice each part of border differently (useful when you want some special patterns with borders).
Cons
- We cannot make border-image rounded, even if we give some amount of
border-radius, that's not going to work.
Method 2: Use background-origin with background-image
<style>
.border-gradient-rounded {
    padding: .5rem;
    border: 4px solid transparent;
    border-radius: 7px;
    background:
        linear-gradient(to right, white, white),
        linear-gradient(15deg, red , blue);
    background-clip: padding-box, border-box;
    background-origin: padding-box, border-box;
}
</style>
<div class="border-gradient-rounded">
    A container with rounded corners and gradient borders.
</div>
Before we understand what's going on here, it's better to first understand background-clip and background-origin CSS properties at MDN, if you're not familiar.
Here, We are using two background images, one is the gradient that we intend to use for borders, and the other one is a solid white color.
Since specifying solid color (#ffffff) would apply background-color which cannot be clipped and its origin cannot be changed, so we use linear-gradient to generate that solid color as image.
Next, We are positioning the linear-gradient background relative to the corner under borders, using background-origin: border-box. While keeping the other background (which is solid white) starts from the corner of padding-box.
But if we don't have any border specified, both padding-box and border-box remains the same. So, we use a transparent border of required width so that we can have our gradient background bleeding out from under the solid white background.
We are not done yet, still, both the backgrounds overlap each other. To clip these backgrounds to their specific region we use background-clip property to clip these two backgrounds to their respective regions so that linear gradient is overlayed by the solid background and we have gradient borders.
Pros
- You can use rounded borders, works like a charm.
Cons
- You cannot have a transparent background. You can mimic the transparent background by using the same color as of background, but this breaks down when your background is not a solid color.
That's all, folks!
I hope this post helped you learn something. If you have any questions or any corrections, leave them in the comments below.
Thank You!


Top comments (1)
thank you so much❤