The amount of data produced by people and companies is prodigiously increasing. By serving as the foundation for descriptive, diagnostic, predictive, and prescriptive analytical solutions that support autonomous systems and decision-making by offering real-time insights into existing and emerging trends, this data drives enterprises and other organizations.
Organizations can choose from a wide variety of technologies and approach for data analytics, which frequently calls for knowledge across various systems and intricate integration of administrative and infrastructure processes. Data engineers, data analysts, data scientists, and other professionals who need to work with data can benefit from a consolidated and integrated experience provided by Azure Synapse Analytics, which offers a single, cloud-scale platform that supports different analytical tools.
Step 1 Select the Azure Synapse Analytical Service

Step 2 Select the Basic Setting Option
Create a Synapse workspace to develop an enterprise analytics solution in just a few clicks.

Step 3 Select the security Option.
Configure security options for your workspace.
Authentication
Choose the authentication method for access to workspace resources such as SQL pools. The authentication method can be changed later.
Create the SQL Server Instance for Storing the Data in the Db

Step 4 Select the networking Option.
Configure networking options for your workspace.
Managed virtual network.
Choose whether to set up a dedicated Azure Synapse-managed virtual network for your workspace.

Step 5 Select the tags Options.
Tags are name/value pairs that enable you to categorize resources and view consolidated billing by applying the same tag to multiple resources and resource groups.
Note that if you create tags and then change resource settings on other tabs, your tags will be automatically updated.

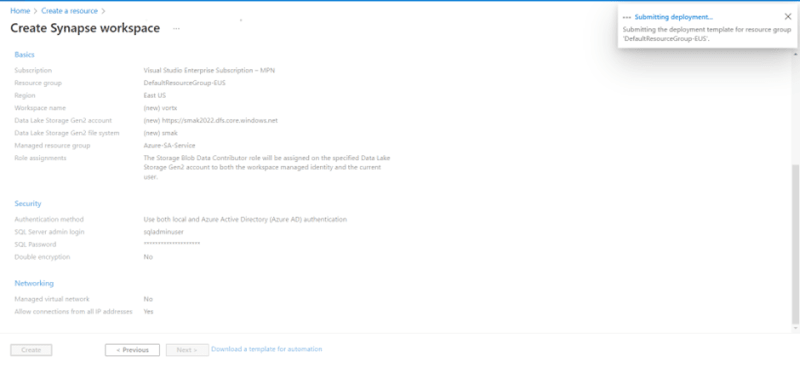
Step 7 Review and Create
By clicking Create, I (a) agree to the legal terms and privacy statement(s) associated with the Marketplace offering(s) listed above; (b) authorize Microsoft to bill my current payment method for the fees associated with the offering(s), with the same billing frequency as my Azure subscription; and (c) agree that Microsoft may share my contact, usage and transactional information with the provider(s) of the offering(s) for support, billing, and other transactional activities. Microsoft does not provide rights for third-party offerings.


Step 8 Initial Deployment
Cloud Instance Initial Deployment is In Progress.

Step No 9 Deployment Done
Deployment of the Application Has been Done.

Ready To Use
Now we can use Azure Cloud Instance for our Apps


Top comments (0)