In this tutorial, we will see how you can deploy a simple server side rendered Next.js application on ScaleDynamics.
Introduction
Next.js is a powerful React framework for building production ready applications that provides built-in features like routing, hot reload, or static generation, that ease the development. In this tutorial we focus on the Server Side Rendering (SSR) feature. Using SSR, the server is in charge of rendering the pages on each request. SSR is ideal for SEO, because search engines can easily index and crawl content because it can be rendered before the page is loaded.
Goals
Our goal is to create a simple Next.js application using SSR and TypeScript, and deploy it using ScaleDynamics cloud platform that provides free cloud resources for testing. We'll learn how simple it is to configure your cloud resource and deploy your application.
Prerequisites
To follow along, you will need:
- Basic knowledge of Javascript / TypeScript
- Basic knowledge of React and Next.js
- Node.js and yarn / npm installed. You can go here to download the latest version of Node.js and npm.
Building the app
Let's use Next.js CLI to create an app called next-ssr:
# you can remove --typescript if you want only Javascript
# just ignore the typing in the following of the tutorial
yarn create next-app --typescript
To fill our app with some fake data, let's install axios to fetch them:
yarn add axios
We will use JSONPlaceholder to provide some fake user data.
To activate the SSR, we need to use a specific function called getServerSideProps and add it to our main page. So let's rewrite our pages/index.tsx file:
// pages/index.tsx
import axios from "axios";
import type { GetServerSideProps, NextPage } from "next";
import Head from "next/head";
import styles from "../styles/Home.module.css";

type HomeProps = {
  users: User[];
};

const Home = ({ users }: HomeProps): JSX.Element => {
  return (
    <div className={styles.container}>
      <Head>
        <title>Next SSR with ScaleDynamics</title>
        <meta name="description" content="Simple SSR app deploy with ScaleDynamics platform" />
        <link rel="icon" href="/favicon.ico" />
      </Head>

      <main className={styles.main}>
        <h1 className={styles.title}>Welcome to my SSR App</h1>
        <pre>{JSON.stringify(users, null, 2)}</pre>
      </main>
    </div>
  );
};

export const getServerSideProps: GetServerSideProps = async () => {
  const { data } = await axios.get("https://jsonplaceholder.typicode.com/users");

  return {
    props: {
      users: data,
    },
  };
};

export default Home;
You will probably get an error from your IDE concerning the type User. Create a folder name domain and add a file called user.d.ts:
// domain/user.d.ts
type User = {
  id: number;
  name: string;
  username: string;
  email: string;
  address: {
    street: string;
    suite: string;
    city: string;
    zipcode: string;
    geo: {
      lat: string;
      lng: string;
    };
  };
  phone: string;
  website: string;
  company: {
    name: string;
    catchPhrase: string;
    bs: string;
  };
};
Now we can see the result by running the application in dev mode:
yarn dev
You should optain:

Cool! So now we are fetching data but we are displaying them as JSON data using the JSON.stringify function. Let's make that a bit prettier with a component and some css.
Create a folder called components and two files:
// components/user.tsx
import styles from "./user.module.css";

type UserProps = {
  user: User;
};

const User = ({ user }: UserProps): JSX.Element => {
  return (
    <div className={styles.container}>
      <div className={styles.infos}>
        <span>Name: {user.name}</span>
        <span>Username: {user.username}</span>
        <span>Email: {user.email}</span>
        <span>Phone: {user.phone}</span>
      </div>
      <div className={styles.address}>
        <span>Street: {user.address.street}</span>
        <span>Suit: {user.address.suite}</span>
        <span>City: {user.address.city}</span>
        <span>Zipcode: {user.address.zipcode}</span>
      </div>
    </div>
  );
};

export default User;
/* user.module.css */
.container {
  display: flex;
  flex-direction: row;
  align-items: flex-start;
  padding: 0;
  margin: 0;
  background-color: #fafafa;
  border: 1px solid #e0e0e0;
  border-radius: 4px;
  padding: 10px;
  margin: 10px;
  width: 500px;
  max-width: 500px;
}

.infos {
  display: flex;
  flex-direction: column;
  align-items: flex-start;
  justify-content: flex-start;
  padding: 10px;
  margin: 0;
  width: 100%;
}

.address {
  display: flex;
  flex-direction: column;
  align-items: flex-start;
  justify-content: flex-start;
  padding: 10px;
  margin: 0;
  width: 100%;
}
Now we need to modify our pages/index.tsx file to use our brand new component:
// pages/index.tsx
import axios from "axios";
import type { GetServerSideProps } from "next";
import Head from "next/head";
import styles from "../styles/Home.module.css";
import User from "../components/user/user";

type HomeProps = {
  users: User[];
};

const Home = ({ users }: HomeProps): JSX.Element => {
  const usersDisplay = users.map((user: User): JSX.Element => <User key={user.id} user={user} />);

  return (
    <div className={styles.container}>
      <Head>
        <title>Next SSR with ScaleDynamics</title>
        <meta name="description" content="Simple SSR app deploy with ScaleDynamics platform" />
        <link rel="icon" href="/favicon.ico" />
      </Head>

      <main className={styles.main}>
        <h1 className={styles.title}>Welcome to my SSR App</h1>
        {usersDisplay}
      </main>
    </div>
  );
};

export const getServerSideProps: GetServerSideProps = async () => {
  const users = await (await axios.get("https://jsonplaceholder.typicode.com/users")).data;

  return {
    props: {
      users,
    },
  };
};

export default Home;
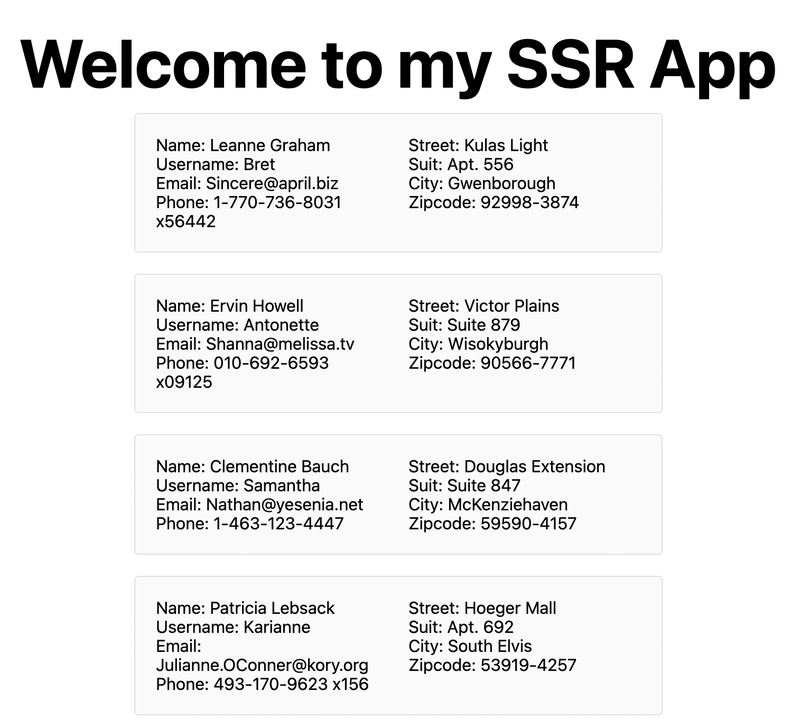
With the dev mode running, the app should look like this:
The application is ready, now let's look at the deployment part !
Account creation and ressource selection
To deploy this application on ScaleDynamics's cloud, you need an account and create an environment with a ressource for it. The cloud resource provides virtual CPU and storage capacities used to execute the app. In this tutorial we will use a free shared resource available on ScaleDynamics’s cloud. These are the best one for testing. In this tutorial we will see later how you can upgrade to a dedicated production resource on the public cloud provider and region of your choice.
If you don't have an account, feel free to create one here (it's free and no credit card are required). Once your account is created, sign in.
Let's create a project and an environment on the ScaleDynamics's console. Select your organization, create a new project, then create a new environmnent. Now we need to choose what kind of service we need for our deployment. There are four types:
- managed HTTP docker
- managed Node.js server
- managed Node.js module
- static assets hosting
For our Next.js server side rendered, we need a server. Let's pick the managed Node.js server. You can learn more on the other types in the ScaleDynamics documentation.

Deployment
The environment is ready to run our application, let's deploy on it.
Configuration file
First, let's add a configuration to tell the SDK what type of application we want to deploy. At the root of the project, create a warp.config.js file:
// warp.config.js
module.exports = {
  server: "next-ssr",
};
Build
Build the project to let Next optimize and bundle everything for us:
yarn build
Login
Log into your account and select your organization via the prompt:
npx warp login
Deploy
Finally, we can run the deployment command:
npx warp deploy ./
This command will dump something like this:

You can see that a server was detected from your configuration file. Now follow the prompt, select the project you created, then the environment. The prompt will also ask you for a hostname, you can leave it blank for a random name or use the one you want. Finally, you can select a host.
The deployment will be done in a few minutes. At the end, the command will dump something like this:

You can now open your browser and go to the URL and TADA ! Your Next.js application is live !
Go further: dedicated resources
If you want to use dedicated resources, you can upgrade dynamically to a non shared resource. As shown below it's as simple as a few mouse clicks.

Next steps
At this stage, you have a fully functional application. You can learn more on the ScaleDynamics documentation, like how to get the logs of your server, use a custom domain, implement a CI/CD pipeline, etc.
Enjoy !

Top comments (0)