
📚 Git & GitHub Series
➡️ You're reading Part 5
⬅️ Part 4: Branching, Merging, Squashing & Rebasing
Working with Pull Requests & Conflict Resolution
Pull Requests (PRs) are the heart of collaborative coding. Whether you're working solo or on a team, understanding how to open, review, and resolve conflicts in PRs is a crucial skill.
What is a Pull Request?
A Pull Request (PR) is a request to merge code from one branch into another (usually into main). PRs are managed on platforms like:
- GitHub
- GitLab
- Bitbucket
Think of a PR as saying:
“Hey team, I’ve finished some work. Can you review and approve it before we add it to the main codebase?”
Creating a Pull Request on GitHub
Step 1: Create a Feature Branch and Push Your Changes
git checkout -b feat/user-login
git add .
git commit -m "Add user login feature"
git push --set-upstream origin feat/user-login
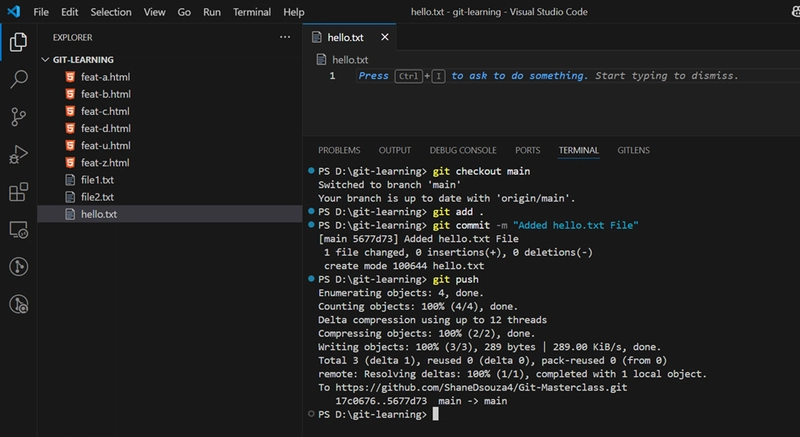
We then check the commit history:

Step 2: Visit GitHub
GitHub will show:
“This branch is X commits ahead of main. Compare & pull request.”

Click Compare & pull request
Fill in:
- A clear title
- A description of what the PR does (Markdown and checklists work great!)
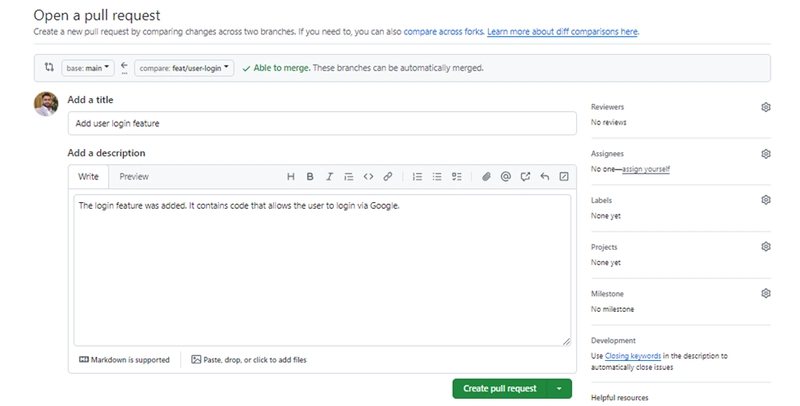
Click Create Pull Request
What Happens After Creating a PR?
- Your teammates review your code
- They may **comment, request changes, or **approve*
- Once approved, it gets merged into
main(usually with a regular or squash merge)
Conflict Resolution in Git
Conflicts happen when two branches change the same part of a file differently. Git can’t decide which version to keep, so it flags a merge conflict.
Resolving Conflicts Safely in a PR
Sometimes your PR shows conflicts with main after it's already created.
Strategy: Merge main into your PR branch
This keeps the PR alive and lets you fix conflicts cleanly.
Option A: Fix Inside Your PR Branch
git checkout feat/user-auth
git pull origin main
# Resolve conflicts
git add .
git commit -m "Resolve conflicts with main"
git push
Option B: Fix Using a Temporary Helper Branch
This is cleaner and more review-friendly.
# Step 1: Switch to your PR branch
git checkout feat/user-auth

# Step 2: Create a helper branch
git checkout -b feat/user-auth-merge-fix

# Step 3: Merge main into it
git merge main
# OR rebase if preferred:
# git rebase main

# Step 4: Resolve conflicts
# Step 5: Commit the resolution
git add .
git commit -m "Resolved conflicts with main"

# Step 6: Push the helper branch
git push origin feat/user-auth-merge-fix
Then, create a new PR from feat/user-auth-merge-fix → feat/user-auth.
Once merged, your original PR is conflict-free and ready to go.
Why This Strategy Works
- Keeps your PR branch clean
- Lets you resolve conflicts independently
- Makes the fix reviewable as a separate PR
Simulating a Merge Conflict
1. From main, create a shared file:
echo "Hello World" > hello.txt
git add hello.txt
git commit -m "Initial hello.txt"
git push
2. Branch A (Developer A):
git checkout -b feat/greeting
echo "Hello from branch A" > hello.txt
git commit -am "Branch A greeting"

3. Branch B (Developer B):
git checkout main
git checkout -b feat/salutation
echo "Hi from branch B" > hello.txt
git commit -am "Branch B greeting"

4. Now merge both into main. The second merge will trigger:
CONFLICT (content): Merge conflict in hello.txt
Automatic merge failed; fix conflicts and then commit the result.

Fixing the Merge Conflict
1. Open the conflicted file. You'll see:

2. Edit the file to combine or choose changes:

3. Mark it as resolved:

git add hello.txt
4. Commit the resolved merge:
git commit -m "Resolve merge conflict between feat/greeting and feat/salutation"

Best Practices for Conflict Resolution
- Pull often from main to stay up-to-date:
git pull origin main --rebase
- Keep PRs small and focused
- Use clear commit messages when fixing conflicts
- Avoid editing the same file as others if possible
Wrapping Up
In this article, you learned:
- What a Pull Request is and how to open one
- How to handle team feedback and approvals
- What merge conflicts are and how to resolve them
- How to handle conflicts cleanly with helper branches
- Best practices to reduce and manage merge conflicts
Using PRs effectively will help you collaborate confidently, maintain a clean main branch, and avoid headaches when merging code.
📚 More from the Series
- Part 1: Why Git & GitHub Matter
- Part 2: Setting Up Git and GitHub
- Part 3: Creating Commits & Exploring the .git Folder
- Part 4: Branching, Merging, Squashing & Rebasing
- ✅ Part 5: You're here!
Enjoyed this post?
Found this helpful? Drop a comment, share it with your team, or follow along for the next deep dive.

Top comments (0)