This article is about installing Android SDK in Windows system and run React Native App without Android Studio. Android SDK is required to build, run and debug Android Apps on your machine. So I needed it too to build and run React Native app for android in my windows system.
But Android SDK comes with Android Studio!!! Yes, you are right but not every system can handle Android Studio :) My system is also behind the minimum system requirements so I had to go for Android SDK separately.
Step 1: Install Chocolatey
In the official React Native Documentation, Chocolatey is recommended for downloading Node and Java. If you already have that downloaded and configured then you can skip this step.
You can either follow the complete Chocolatey Installation Doc or just run below command in your Windows Powershell Window.
Set-ExecutionPolicy Bypass -Scope Process -Force; [System.Net.ServicePointManager]::SecurityProtocol = [System.Net.ServicePointManager]::SecurityProtocol -bor 3072; iex ((New-Object System.Net.WebClient).DownloadString('https://chocolatey.org/install.ps1'))
You will get Chocolatey installed and Environment Variables set.
Step 2: Install Java
As per the official React Native Documentation, You can use Chocolatey to install Java. If you already have that, skip this step. Just run below command in command prompt to install Node and Java. You can skip the package you have already installed.
choco install -y nodejs.install openjdk8
Now you must have JAVA_HOME set in your environment variables, if not then you can set. To go to environment variable you can follow below steps:
2: Go to Advance System Settings
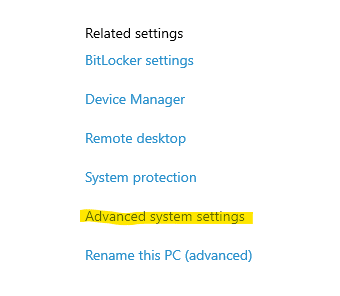
3: Go to Environment Variables

4: List of Environment Variables can be accessed here
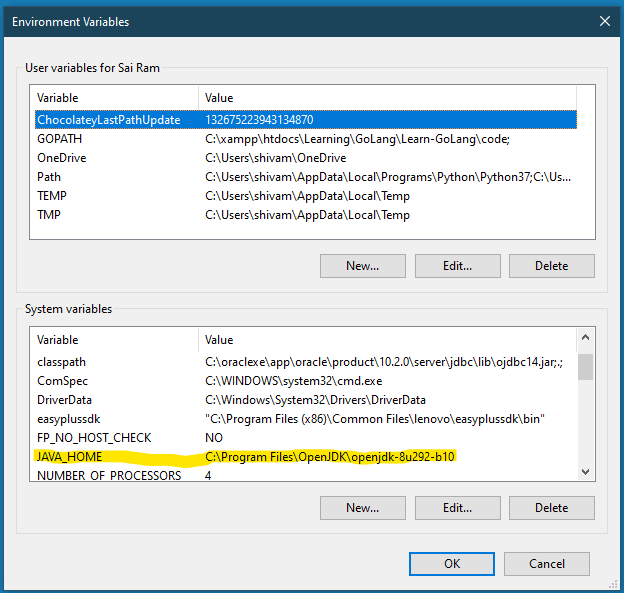
Step 3: Install SDK Manager
Now firstly we need to install Android SDK Manager to install Android SDK and other tools. For that visit the official site.
1. Download sdkmanager compressed file.

2. Now you need to create a folder, where you want to keep your all SDK packages. I created C:\Android for my case. Unzip the downloaded folder in this directory. Now I'm having the folder structure as C:\Android\cmdline-tools\<unzipped files>.
3. IMPORTANT: Now, we need to move all the unzipped files in a single folder. the name of the folder will be determined by the source.properties file's content, which is one of these unzipped files. Open this file and It'll be looked like this:
Pkg.Revision=4.0
Pkg.Path=cmdline-tools;4.0
Pkg.Desc=Android SDK Command-line Tools
Notice the first line, the value 4.0 is going to be our folder name.
So create a folder named as 4.0 inside C:\Android\cmdline-tools\ and move all other files into this folder. So now full directory structure will be C:\Android\cmdline-tools\4.0\<bin | lib>.
4. Now we'll set 2 Environment variables: ANDROID_HOME and Path for cmdline-tools.
Set
ANDROID_HOMEto the path of the directory you made in above point 2, in my case it'sC:\Android.
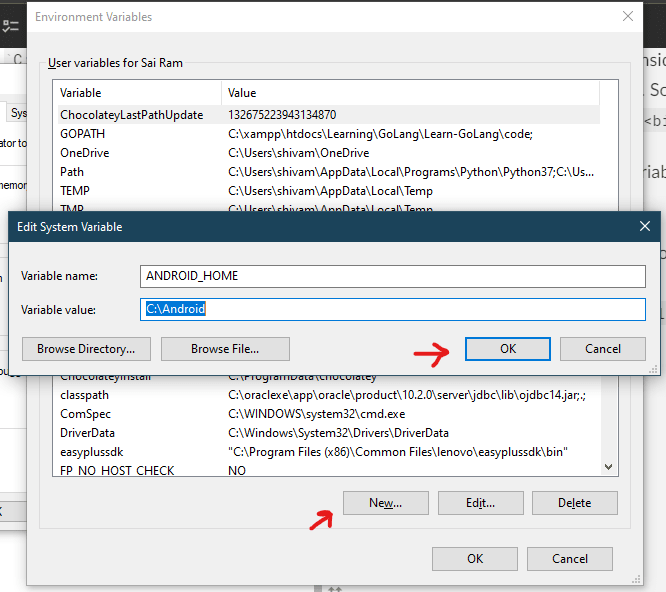
Add
C:\Android\cmdline-tools\4.0\binandC:\Android\cmdline-tools\4.0inPathVariable.
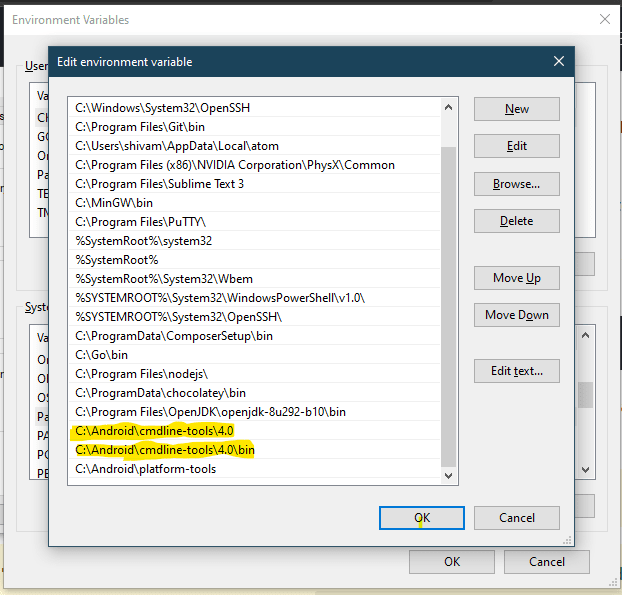
Step 4: Install Android SDK packages
We'll now install the required packages via sdkmanager. For that, open Command Prompt.
1. Install Platform Tools (ADB & Fastboot)
Firstly we need to install adb, for that we can install platform-tools pkg via sdkmanager. Run below command or get it from here.
sdkmanager "platform-tools"
Now add path of platform-tools in Environment Variable Path which is C:\Android\platform-tools in my case.
2. Install Platform
Use the below command to install the Android 10 (API level 30) using the SDK manager. You can download any API level by changing the name.
sdkmanager "platforms;android-30"
Aceept T&C and it'll be installed.
3. Add System Image
I am adding the most recent default 64-bit system image by running below command. Accept T&C and it'll be installed.
sdkmanager "system-images;android-30;google_apis;x86_64"
There are some projects which need Google Play Services. We need system image specific to Google Play Services. We can add that via command as shown below.
sdkmanager "system-images;android-30;google_apis_playstore;x86_64"
4. Install Build Tools
I am adding the most recent build-tools 30.0.3 via below command.
sdkmanager "build-tools;30.0.3"
5. Install Emulator (Optional)
If you want to run your apps inside emulator instead of physical device then you can install emulator and system images to run that. But obviously, it requires good system specs. We'll cover this in very short, please comment if you want detailed article on that.
1. Install Emulator
sdkmanager --channel=3 emulator
2. Create emulator
// Create the emulator with name em30 using default system image
avdmanager create avd -n em30 -k "system-images;android-30;google_apis;x86_64" -g "google_apis"

// Create emulator with name em30ps using Google Play Services system image
avdmanager create avd -n em30ps -k "system-images;android-30;google_apis_playstore;x86_64"
This will ask many questions, answer as per yoyr need.
3. Add emulator path in Path environment variable, in my case it's C:\Android\emulator.
4. List emulator devices installed
emulator -list-avds
5. Run emulator
// Run Emulator named em30
emulator -avd em30
6. How to use my device instead of emulator
You can follow the official documentation here and a related troubleshooting here. I'll be adding article for my version of the same soon.
So everything is set now and you'll be having Android SDK set up in your system. Below are some other related and useful commands.
// list all packages available in sdkmanager
sdkmanager --list

// list installed packages via sdkmanager
sdkmanager --list_installed

// Update installed packages
sdkmanager --update

// Uninstall packages
sdkmanager --uninstall <package name>

// Delete Emulator
avdmanager delete avd -n <emulator name>
Cover Photo by Denny Müller on Unsplash



Top comments (6)
I did everything as you wrote. but I tried to follow official doc to use my device, but it's saying adb is not recognised!
I also add this line to the path "C:\Android\platform-tools" but it doesnt work
what can i do?
An update here: to run the commands with sdkmanager, you have to create a folder named "latest" inside cmdline-tools and to move the other content inside the recent created folder.
Mujhe react native learn karna hai please help me bro WhatsApp me 8764311422
You can start by taking an udemy course... ZTM courses are also good at udemy
WhatsApp me 8764311422
Which build tool did you use to finally package the APK ? is it Gradle ?