
Introduction
In this article, we will look at an overview of what NPM is. When we usually run 'npm install', we know that certain packages are being created inside the 'node_modules' folder. Let us look at what they mean and what role they play in order to support running your web application.
We will look at the following topics in detail:
- What is npm, Registry, and CLI?
- How to initialize your project with NPM?
- A detailed overview of 'package.json' and it's important properties.
- How to install and publish your packages?
- Version management of packages.
This article is based on my learnings from Tyler Mcginnis's course on React which you find over here.
What is NPM?
For a long time, I assumed 'NPM' meant 'Node Package Manager'. But, strangely and funnily it's not. 'npm, Inc.' is a for-profit, venture-backed company founded in 2014 and was acquired by Github in March of 2020.
npm.inc is behind the creation and management of the following components:
- Node Package Manager
- Registry
- npm CLI
But before, we jump into the details of the above components, let us take a step back and find out what problem NPM solves.
Why do we need a Package Manager?
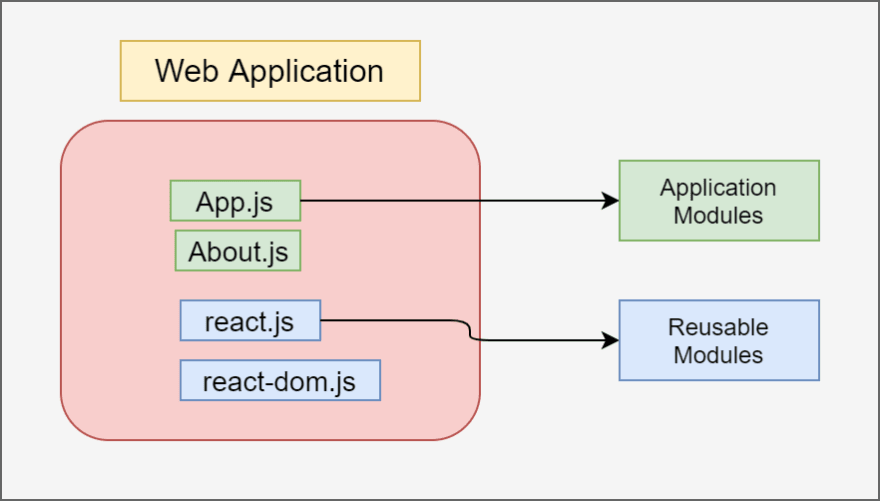
Whenever we write any web application, it is generally composed of individual modules that are often bundled together.
If we have to use a certain package with our application, the traditional way of doing it is using the 'script' tag as shown below:
<body>

  ...

<script src="https://maxcdn.bootstrapcdn.com/bootstrap/3.3.7/js/bootstrap.min.js"></script>
<script src="libs/jquery2.1.4.min.js"></script>
</body>
While the above works, there are the following disadvantages using the above approach:
- If the CDN network is down, then your application cannot access the resource.
- In the JQuery import example above, while you have downloaded the library to your application. Managing version related changes are left up to us in terms of manually fetching the latest version and replacing them in our code, which is far from ideal.
- Finally, the biggest them of all is the order of script tags placed inside the body tag which is required in order for them to be referenced appropriately inside your application.
'npm' precisely solves the above problems and more in terms of managing the way your packages are referenced, versioning, and more.
Node Package Manager

The node package manager manages the below-mentioned points and does it well:
- Provides a way to package your program for others to consume.
- Provides a way to download the packages from a centralized repository.
- Makes it easier for you to manage & switch versions.
Registry
The registry is a centralized repository that contains a list of all npm packages that have been published by others.
npm CLI
npm CLI provides you a way for you to install & publish the packages using the command-line interface.
How to install npm?
'npm' comes with Node. Hence, if you have installed NodeJS, then you should already have npm as it comes with it. You can install Node from here or if you are using Windows, I have a detailed article on how to install Node using a node version manager or 'nvm' over here.
If Node and npm are installed correctly, you should be able to run the following commands in your terminal to check which versions you have installed.
node -v # My installed version: v11.10.0
npm -v # My installed version: 6.9.0
Now that you should have Node and npm installed successfully, we will look at how to initialize your project with NPM and the important components associated with the node package manager.
How to initialize your Project with npm?
The first step to use npm is navigating to your project folder (e.g. myProject) and run the command 'npm init' command from the command terminal.
$ root> cd myproject

$ root/myproject> npm init
The above command will perform the initialization process and you’ll notice that you have a brand new package.json file and an empty node_modules directory.
node_modules
Whenever you install a package, the source code for that package will be put inside of the node_modules directory. Then, whenever you import a module into your project that isn’t a file path, i.e. import React from 'react', your app will look to node_modules for the source.
package.json
The 'package.json' file contains all of the meta-information for your project. It contains information like the project’s name, author, description, and most importantly, the list of packages (as well as what versions) that your project depends on and how to run your project.
Here's a sample of the 'package.json' file:
{
   "name":"Example Project",
   "version":"1.0.0",
   "description": "An Example Project demonstrating Node Package Manager",
   "author":"Skay",
   "license":"ISC",
   "homepage":"https://github.com/skaytech",
   "keywords":[
      "react",
      "react-router",
      "babel",
      "webpack"
   ],
   "repository":{
      "type":"git",
      "url":"https://github.com/skaytech/webpack-example.git"
   },
   "main":"index.js",
   "dependencies":{
      "prop-types":"^15.7.2",
      "query-string":"^6.2.0",
      "react":"^16.8.3",
      "react-dom":"^16.8.3",
      "react-icons":"^3.4.0",
      "react-router-dom":"^4.3.1"
   },
   "devDependencies":{
      "@babel/core":"^7.3.4",
      "@babel/plugin-proposal-class-properties":"^7.3.4",
      "@babel/preset-env":"^7.3.4",
      "@babel/preset-react":"^7.0.0",
      "babel-loader":"^8.0.5",
      "babel-plugin-syntax-dynamic-import":"^6.18.0",
      "copy-webpack-plugin":"^5.0.0",
      "css-loader":"^2.1.0",
      "html-webpack-plugin":"^3.2.0",
      "style-loader":"^0.23.1",
      "webpack":"^4.29.5",
      "webpack-cli":"^3.2.3",
      "webpack-dev-server":"^3.2.1"
   },
   "scripts":{
      "start":"webpack-dev-server --open",
      "build":"NODE_ENV='production' webpack"
   }
}
Let us look at a few of those properties in detail:
dependencies
The list of packages listed under the 'dependencies' property is the ones your application needs in order to run. When you install a new package, the source for the package will be placed inside the 'node_modules' directory. The name & version of that package will automatically be added to the 'dependencies' property in your 'package.json' file.
devDependencies
'devDependencies' is exactly like the 'dependencies' in the sense the source will be placed inside the 'node_modules' directory. However, these 'dependencies' will only be made available to your application while running them in your development environment.
In other words, these 'dependencies' will not be required to run in the production environment.
scripts
The 'scripts' property defines the set of commands you can provide to the node package manager to run any kind of automation tasks. In the above example, we have two scripts, namely the 'start' and 'build'.
The general syntax to run any script is:
$ root > npm run [SCRIPT NAME]
In the above example, if you run the to start the 'webpack-dev-server', you can run the script 'start' using the following command:
$ root/myproject> npm run start
NPM Registry and How to install packages from the registry?
Now, that we've looked at the basics of 'npm' and the 'package.json'. We will look at how you can install certain packages from the 'npm registry'.
As I had introduced earlier, the registry is a centralized repository where all the packages are published and are available for downloads.
For Example, if you want to install 'react', you can run the following command:
$ root/myproject> npm install react
The general syntax to install any package is:
$ root> npm install [PACKAGE NAME]
Running 'npm install', will do the following things:
- It will put the 'react' package inside of your 'node_modules' directory.
- It will add 'react' as a property on your 'dependencies' object inside your package.json file.
Install your dependency as a Dev Dependency
In order to tell 'npm' that your dependency needs to be added only as a 'dev dependency', i.e., the package needs to be made only for development purposes, you should run the following command:
$ root> npm install webpack --save-dev
The key differentiator is the '—save-dev' flag while running the 'npm install' command for installing the package as a dev dependency.
How to publish your package to NPM?
NPM has over a million packages as of the date and it wouldn't be possible if it wasn't easy to publish one. You need to have the following to publish a package on npm:
- An account on npm
- A package.json file with 'name', 'version', and 'main' (which points to the entry point of your package) properties.
Once you have the above, in your command line run the following commands:
$ root/myPackage > npm login

$ root/myPackage > npm publish
That's all there's to it! There are more advanced features that you can check out their official guide.
Versioning
If you remember, at the start of our post, we had discussed managing the different versions of our packages. Thankfully npm CLI provides a very nice way to manage it as well.
Typically each package on the npm registry follows semantic versioning. There are three parts to semantic versioning, major versions, minor versions, and patch versions.
For example, if your package version is v1.2.3, the following is the break-up:
- Major Version - 1 - If you had a breaking change, you'll increment the major version.
- Minor Version - 2 - If you had a non-breaking feature, you'll increment the minor version.
- Patch Version - 3 - Everything else, you'll increment the patch version.
Why is this important? We want to avoid having our app break because we installed the wrong version of a package. npm gives us some tools to prevent this.
The '^' operator in your Version number
Let us look at the 'dependencies' inside your 'package.json' file again:
"dependencies":{
      "prop-types":"^15.7.2",
      "query-string":"^6.2.0",
      "react":"^16.8.3",
      "react-dom":"^16.8.3",
      "react-icons":"^3.4.0",
      "react-router-dom":"^4.3.1"
}
You’ll notice that before each version number, there’s a little ^ or a 'carrot' symbol.
The ^ instructs npm to install the newest version of the package with the same major version.
Let's take, for example, the 'react' package released v16.9.0. After the new version of the package is released and you run 'npm install' inside your project, then that version of the package will be available to your project.
If 'react' released a v17.0.0, which means it's breaking change and you run 'npm install', the breaking change won't be installed and made available to your project.
The '~' operator in your version number
If your requirement is to only update your package only for updates for the same major and minor versions, then you'll use the '~' operator.
In the above example, if you change the 'prop-types' package to have the '~' operator:
"dependencies":{
      "prop-types":"~15.7.2",
}
If you run 'npm install', a new package will only be installed if 'v15.7.3' is released. If 'v16.0.0' or 'v15.8.0' came out, neither would be installed.
Exact version
Finally, the simplest and direct use-case of having the exact version of what’s listed in your package.json file, you'll just need to remove all 'symbols' before your version number and only list only the version number as shown below:
"dependencies":{
      "prop-types":"15.7.2",
}
Now if you run 'npm install' anytime, only the version 'v15.7.2' will ever be installed.
conclusion
A quick summary of what we discussed in this article:
- What is npm, Registry, and CLI?
- How to initialize your project with NPM?
- A detailed overview of 'package.json' and it's important properties.
- How to install and publish your packages?
- Version management of packages.
I hope you enjoyed the article. Don't forget to subscribe to my newsletter and connect with me on Twitter @skaytech
You will also enjoy the following articles:
- Why you should learn 'React'?
- The React Ecosystem
- Async/Await explained in JavaScript
- What are JavaScript Promises
- JavaScript Callbacks Explained
- Everything you need to know about JavaScript Objects
- Everything you need to know about JavaScript Funtions
- ES6 - Higher Order Functions
- ES6 - Spread Operator
- ES6 - Understanding Destructuring
- ES6 - Arrow Functions
- What is Currying in JavaScript?
- Understanding Hoisting
- Introduction to Big O Notation, Time & Space Complexity

Latest comments (0)