This tutorial walks you through deploying a Django app using Docker on DigitalOcean’s App Platform.
Objectives
Set up a basic Django project
Dockerize the app
Configure a PostgreSQL database with Docker
Prepare the app for production
Deploy to DigitalOcean App Platform using Docker
Prerequisites
Before starting, make sure you have:
Python installed (preferably managed with pyenv)
Git installed and a GitHub account
Docker and Docker Compose installed
A DigitalOcean account
Step 1 - Create the Project Locally
Set your Python version (using pyenv) and create a virtual environment:
pyenv local 3.13.3
python -m venv .venv
source .venv/bin/activate
Install Django and start your project:
pip install Django==5.2
django-admin startproject project .
Run the development server:
python manage.py runserver
Visit http://localhost:8000 in your browser. You should see the default Django welcome page.
First Git Commit
Stop the server (Ctrl+C) and initialize a Git repository:
git init
Create a .gitignore file:
touch .gitignore
Add the following to .gitignore:
.venv/
__pycache__/
db.sqlite3
Then:
git add .
git commit -m "Initial commit"
Hello World Page
Start a new Django app:
python manage.py startapp my_app
1. Add the app to INSTALLED_APPS in project/settings.py:
INSTALLED_APPS = [
    ...,
    'my_app.apps.MyAppConfig',  # new
]
2. Update project/urls.py to include your app's URLs:
from django.contrib import admin
from django.urls import include, path  # new

urlpatterns = [
    path('admin/', admin.site.urls),
    path('', include('my_app.urls')),  # new
]
3. Create a "Hello, world" view in my_app/views.py:
from django.http import HttpResponse


def hello_world(request):
    return HttpResponse("Hello, world")
4. Set up URLs for your app in my_app/urls.py:
from django.urls import path

from . import views

urlpatterns = [
    path('', views.hello_world, name='hello_world'),
]
Run the server again:
python manage.py runserver
Visit http://localhost:8000 — you should now see your "Hello, world" message.
Final commit:
Stop the server (Ctrl+C) and commit:
git add .
git commit -m "Added hello world page"
Step 2 - Dockerize the Application
Let’s containerize the Django app using Docker.
Generate requirements.txt
Run the following command to capture your project dependencies:
pip freeze > requirements.txt
Create a Dockerfile
touch Dockerfile
Add the following content:
FROM python:3.13.3-alpine

# Set work directory
WORKDIR /usr/src/app

# Prevent Python from writing .pyc files to disc and enable stdout/stderr logging
ENV PYTHONDONTWRITEBYTECODE=1
ENV PYTHONUNBUFFERED=1

# Install dependencies
RUN pip install --upgrade pip
COPY requirements.txt .
RUN pip install -r requirements.txt

# Copy project files
COPY . .

# Start Django server
CMD [ "python", "manage.py", "runserver", "0.0.0.0:8000" ]
Build the Docker Image
docker build . -t tuto
Run the Container
docker run -p 8000:8000 tuto
Visit http://localhost:8000 in your browser — your app should be up and running inside a container!
Add a .dockerignore File
touch .dockerignore
Paste the following into it:
.venv/
__pycache__/
db.sqlite3
This prevents unnecessary files from being copied into your Docker image.
Commit Your Work
git add .
git commit -m "Added Dockerfile"
Use Docker Compose
Why?
Docker Compose lets you define your app’s setup in one file — services, ports, volumes, and more. It simplifies commands and makes starting your app as easy as docker compose up. Ideal for development and collaboration.
Create a Docker Compose file:
touch compose.yml
Add the following content:
services:
  web:
    build: .
    volumes:
      - .:/usr/src/app/
    ports:
      - 8000:8000
Run your app using Docker Compose:
docker compose up
Visit http://localhost:8000 again to confirm it's working.
Stop the app (Ctrl+C), then commit:
git add .
git commit -m "Added Docker Compose"
Step 3 - Add a Database (PostgreSQL)
Let’s move away from SQLite and connect the Django app to a PostgreSQL database using Docker.
Install Dependencies
Install PostgreSQL adapter and environment-based config:
pip install psycopg2-binary==2.9.10 dj-database-url==2.3.0
Then update your requirements.txt:
pip freeze > requirements.txt
Update Django Settings
In project/settings.py, update the DATABASES setting:
import os
import dj_database_url  # make sure this is at the top with other imports

DATABASES = {
    'default': dj_database_url.parse(os.environ.get("DATABASE_URL")),
}
This tells Django to read your database connection string from an environment variable called DATABASE_URL.
Update compose.yml
services:
  web:
    build: .
    volumes:
      - .:/usr/src/app/
    ports:
      - 8000:8000
    env_file:
      - ./.env.docker
    depends_on:
      - db
  db:
    image: postgres:17.4-alpine
    volumes:
     - postgres_data:/var/lib/postgresql/data/
    env_file:
      - .env.db
volumes:
  postgres_data:
What’s happening here?
web is your Django app container.
db is a PostgreSQL container.
env_file loads environment variables for each service.
volumes keeps your database persistent even if the container is restarted.
Create Environment Files
.env.db (PostgreSQL config)
touch .env.db
Add:
POSTGRES_USER=postgres
POSTGRES_PASSWORD=password
POSTGRES_DB=tuto
.env.docker (Django config)
touch .env.docker
Add:
DATABASE_URL=postgresql://postgres:password@db:5432/tuto
The db in the URL (@db:5432) refers to the name of the service defined in compose.yml, not a hostname. Docker Compose makes this link automatically.
Ignore Environment Files
Update both .gitignore and .dockerignore:
.venv/
__pycache__/
db.sqlite3
.env.db
.env.docker
Run the project
docker compose up --build
The --build flag forces the rebuilding of images before starting the containers.
Visit http://localhost:8000 — your app should still work.
However, you'll see a warning in the terminal:
You have 18 unapplied migration(s).
Apply the Migrations
To fix this, open a new terminal (leave the first one running), then run:
docker compose exec web sh
Inside the container shell, run:
python manage.py migrate
Then exit the shell:
exit
Now, return to the first terminal, stop the containers (Ctrl+C), and restart:
docker compose up
The migration warning should be gone!
Final Commit
Stop the containers (Ctrl+C) and commit:
git add .
git commit -m "Uses a PostgreSQL database"
Step 4 - Prepare for Deployment
Let’s prepare the Django project for a real-world production environment.
Set Up Environment Variables
Update your settings.py to pull critical values from environment variables:
SECRET_KEY = os.environ.get("SECRET_KEY")
DEBUG = os.environ.get("DEBUG", "0") in ["1", 1, "True", "true"]
ALLOWED_HOSTS = os.environ.get("DJANGO_ALLOWED_HOSTS").split(",")
Update your .env.docker:
DATABASE_URL=postgresql://postgres:password@db:5432/tuto
DEBUG=1
SECRET_KEY=FfAW8SOkA2_E_ZqE4z5yhuPvZMqpMYYt9UiwURoRqXQ
DJANGO_ALLOWED_HOSTS=localhost,127.0.0.1
Create a .env.example file to share the variable structure without exposing secrets:
touch .env.example
Add the following to .env.example:
DATABASE_URL=postgresql://user:password@db:5432/db_name
DEBUG=0
SECRET_KEY=your-secret-key
DJANGO_ALLOWED_HOSTS=localhost,127.0.0.1
Configure Static Files with Whitenoise
Install Whitenoise:
pip install whitenoise==6.9.0
Update settings.py:
INSTALLED_APPS = [
    ...
    'whitenoise.runserver_nostatic',  # new
    'django.contrib.staticfiles',
    ...
]
MIDDLEWARE = [
    'django.middleware.security.SecurityMiddleware',
    'whitenoise.middleware.WhiteNoiseMiddleware',  # should be placed directly after the Django SecurityMiddleware
    ...
]
STATIC_ROOT = BASE_DIR / "staticfiles"  # new
STORAGES = {  # new
    "staticfiles": {
        "BACKEND": "whitenoise.storage.CompressedManifestStaticFilesStorage",
    },
}
Create an empty static directory so Git will track it:
mkdir static && touch static/.keep
Add Gunicorn for Production
Why?
runserver is for development only. Gunicorn is a production-ready server that handles multiple requests efficiently and keeps your Django app stable and responsive in real-world use.
pip install gunicorn==23.0.0
Update your requirements.txt:
pip freeze > requirements.txt
Update the Dockerfile
Let’s use a multi-stage build for development and production:
Why use a multi-stage build?
A multi-stage Docker build lets us separate development and production setups in one Dockerfile. This keeps the production image clean and optimized, while still allowing flexibility for local development.
FROM python:3.13.3-alpine AS base

# Set work directory
WORKDIR /usr/src/app

# Prevent Python from writing .pyc files to disc and enable stdout/stderr logging
ENV PYTHONDONTWRITEBYTECODE=1
ENV PYTHONUNBUFFERED=1

# Install dependencies
RUN pip install --upgrade pip
COPY requirements.txt .
RUN pip install -r requirements.txt

# Copy project files
COPY . .

# Development stage
FROM base AS development
CMD [ "python", "manage.py", "runserver", "0.0.0.0:8000" ]

# Production stage
FROM base AS production
RUN chmod +x /usr/src/app/entrypoint.sh
ENTRYPOINT ["/usr/src/app/entrypoint.sh"]
CMD [ "gunicorn", "project.wsgi:application", "--bind", "0.0.0.0:8000" ]
Add entrypoint.sh
touch entrypoint.sh
Paste this content into entrypoint.sh:
#!/bin/sh

python manage.py migrate --noinput
python manage.py collectstatic --noinput

exec "$@"
This script runs database migrations and collects static files automatically on deployment.
Update compose.yml for Local Development
services:
  web:
    build:
      target: development  # this chooses the "development" stage of the Dockerfile
    volumes:
      - .:/usr/src/app/
    ports:
      - 8000:8000
    env_file:
      - ./.env.docker
    depends_on:
      - db
  db:
    image: postgres:17.4-alpine
    volumes:
     - postgres_data:/var/lib/postgresql/data/
    env_file:
      - .env.db
volumes:
  postgres_data:
Note: The compose.yml file is only used for local development.
In production (on DigitalOcean App Platform), only the final stage of the Dockerfile (the production stage) will be used.
Final Touches
Commit your changes:
git add .
git commit -m "prepared for deployment"
Then push everything to GitHub:
git remote add origin https://github.com/your-username/your-repo.git
git branch -M main
git push -u origin main
Your project is now production-ready and hosted on GitHub!
Next step: we’ll deploy it to DigitalOcean App Platform.
Step 5 – Deploy to DigitalOcean’s App Platform
Now that your Django app is production-ready, let’s deploy it to the DigitalOcean App Platform.
Create Your App on DigitalOcean
Go to https://cloud.digitalocean.com/projects and create an account if you don't already have one.
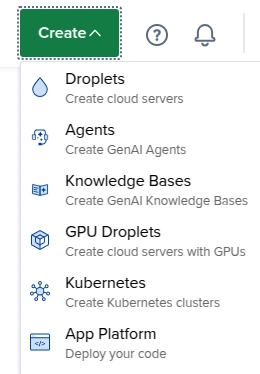
Click on "Create", then "App Platform".
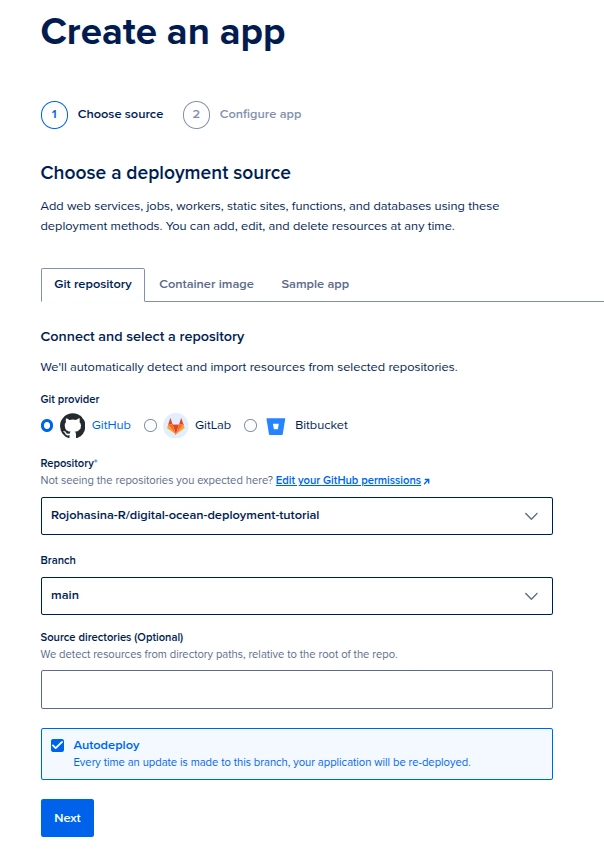
Choose “GitHub Repository” as the deployment source.
Connect your GitHub account and select your repository + branch.
Check Autodeploy to redeploy the app automatically when you push.
Click Next.
Select the Docker Build
On the next screen:
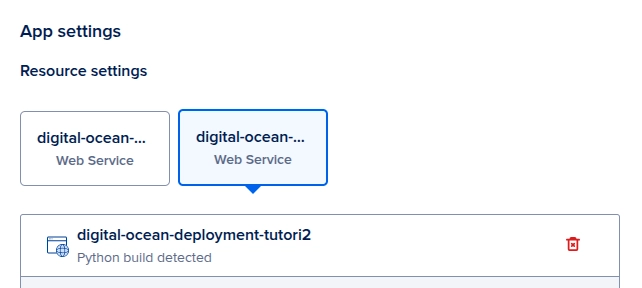
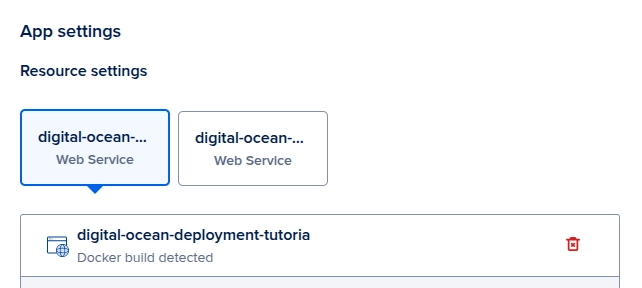
You’ll see two detected components: one for Python, one for Docker.
Delete the one with “Python build detected”.
Keep only the “Docker build detected” — this uses your Dockerfile.
Configure the Web Service
- Set the Public HTTP Port to 8000 — it must match the port defined in your Dockerfile.
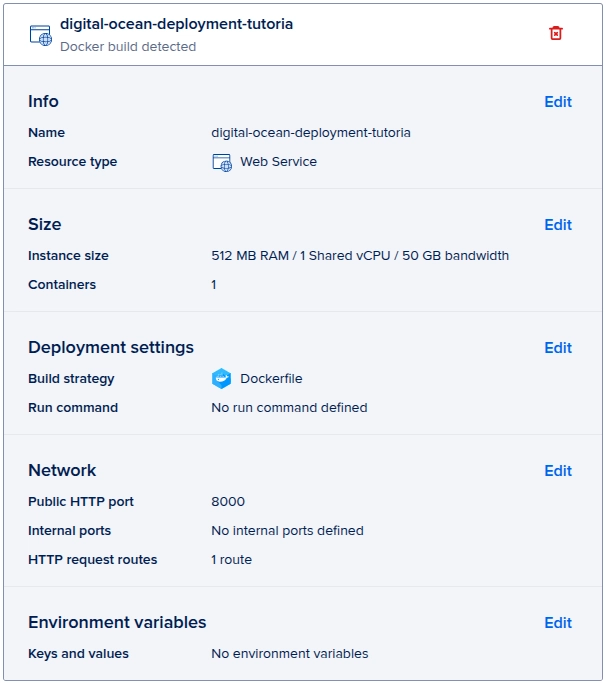
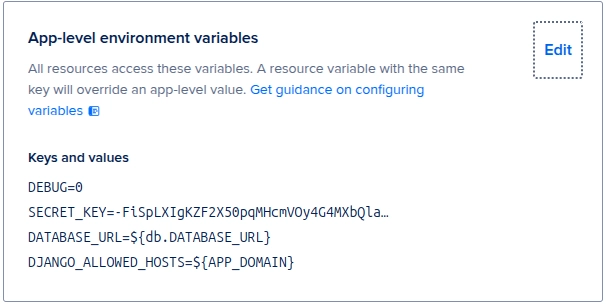
- Add the following app-level environment variables (based on .env.example):
DEBUG=0
SECRET_KEY=generate-a-secret-key
DATABASE_URL=${db.DATABASE_URL}
DJANGO_ALLOWED_HOSTS=${APP_DOMAIN}
Notes: Set DEBUG=0 in production.
Generate a secure SECRET_KEY using:python -c "import secrets; print(secrets.token_urlsafe())"
${db.DATABASE_URL} will automatically point to your database once you create it (next step).
${APP_DOMAIN} is a built-in variable that represents your app’s domain (e.g., yourapp.ondigitalocean.app).
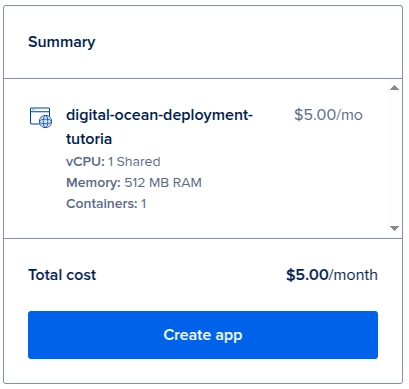
- Choose any region, app name, and project as you want.
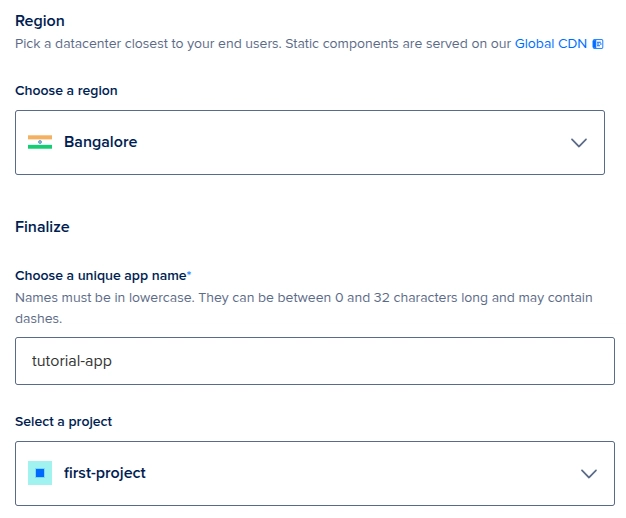
- Click on "Create app"
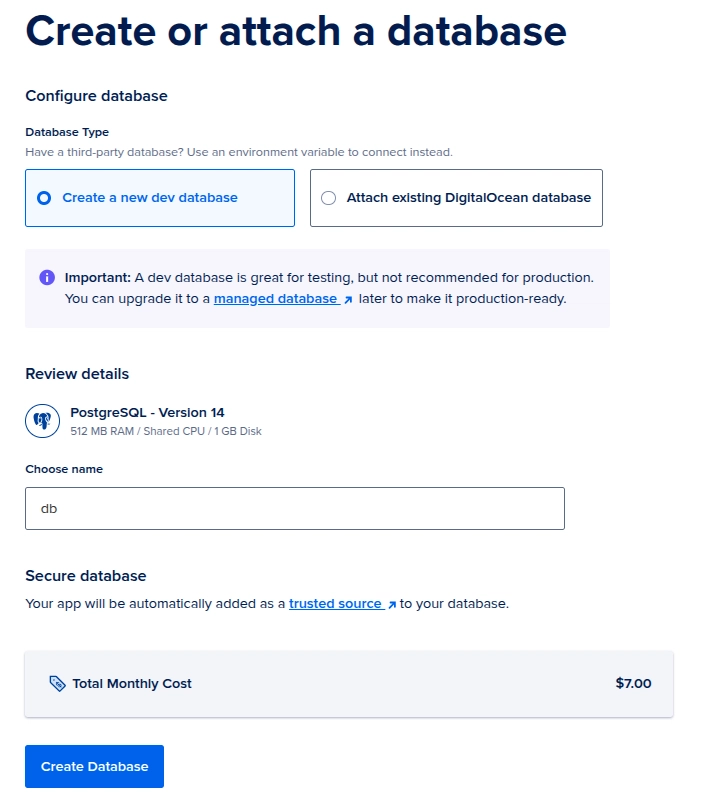
Add a PostgreSQL Database
Why use a managed PostgreSQL database?
It’s more reliable and secure than running it in a container. DigitalOcean handles backups, scaling, and maintenance for you.
- Click on "Add resources", then "Create or attach database"
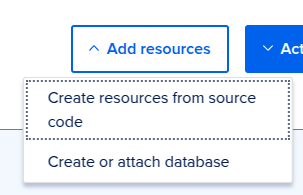
Leave the name as db (so ${db.DATABASE_URL} works).
Click on "Create Database" — App Platform will redeploy automatically.
Check Your Live App
Once the build finishes, click the "Live App" button — you should see your "Hello, world" page online!
Create a Superuser
From your App Dashboard, open the Console tab.
Run the following command:
python manage.py createsuperuser
- Provide a username, email, and password.

Fix the CSRF Error
When logging into /admin, you will get a CSRF error.
Fix it by:
- Adding the following line in settings.py file:
CSRF_TRUSTED_ORIGINS = os.environ.get("CSRF_TRUSTED_ORIGINS").split(",")
- Adding the variable to both .env.docker and .env.example:
CSRF_TRUSTED_ORIGINS=http://localhost,http://127.0.0.1
- And in App Platform, update your app’s environment variables:
CSRF_TRUSTED_ORIGINS=https://${APP_DOMAIN}
- Commit and Push
git add .
git commit -m "Get CSRF_TRUSTED_ORIGINS from an environment variable"
git push
- Wait until the deployment is complete, visit /admin, log in with the superuser credentials, and you should be in!
Congratulations, your app has been successfully deployed!
Conclusion
You’ve built, containerized, and deployed a Django app with PostgreSQL on DigitalOcean’s App Platform. You now have a solid, production-ready setup — well done!
Thanks for reading! 😊
I’m Thierry, a freelance Django developer. I share tutorials and dev tips on LinkedIn — feel free to connect or drop me a message if you have questions.
👉 Check out the complete code here: GitHub Repository

Top comments (5)
pretty cool seeing every step laid out like this - makes me want to spin one up myself and see if i can actually get it all working
@nevodavid Thanks! Glad it inspired you, feel free to reach out if you get stuck!
The topic is well broken down into clear and detailed steps. It even includes the setup of Postgres, which might be more valuable if mentioned in the title.
Thanks a lot for the feedback! I've just updated the title. Really appreciate your suggestion! 🙏
I'll need to specify the version in each
pip installcommand to make sure it always works in the future