This project focuses on building a website solution for a team of developers that will help a in day to day activities in managing, developing, testing, deploying, and monitoring different projects.
ARCHTECTURAL DESIGN
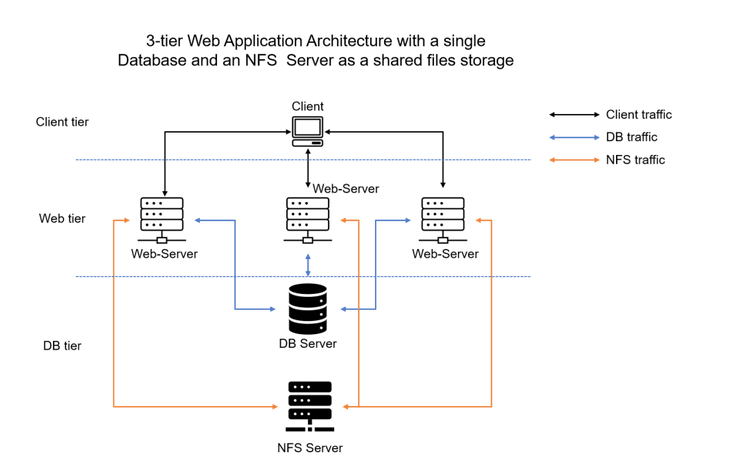
NFS SERVER
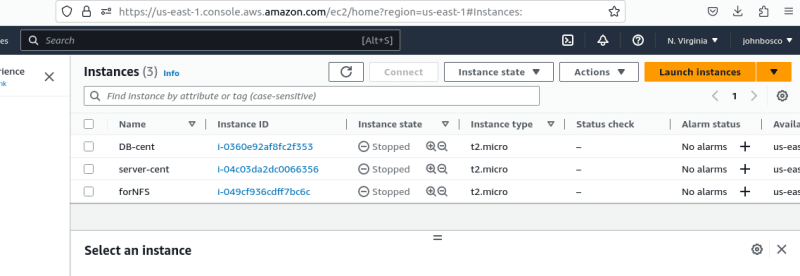
Create a new Redhat 8 ec2 linux instance and save the keypair as a .pem file for connection for Linux/Windows Terminal
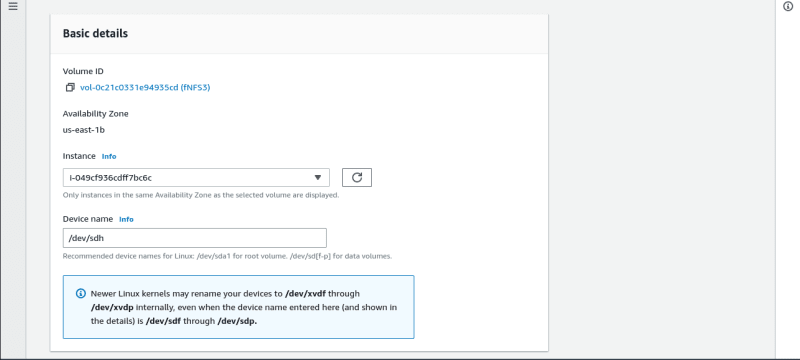
Create 3 volumes of 10G each

Attach the volumes to the instance one after another
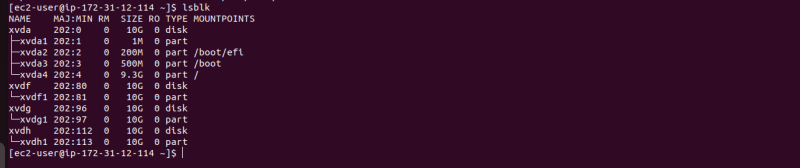
Open the linux/windows terminal and checked the attached disks. Run:
lsblk

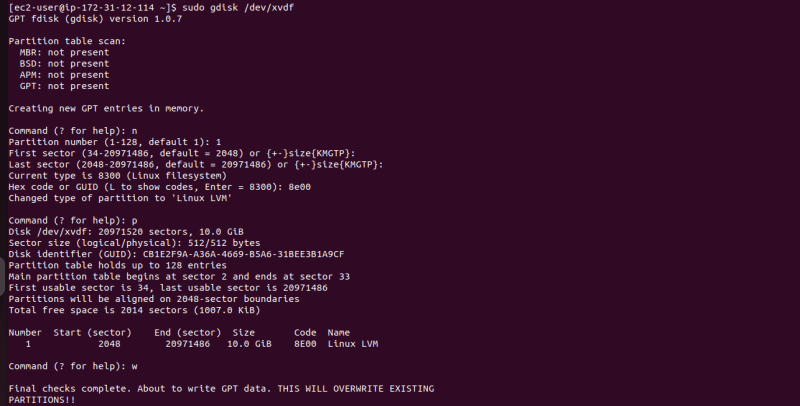
Create Partitions on each disk. Run
sudo gdisk /dev/xvdg
sudo gdisk /dev/xvdf
sudo gdisk /dev/xvdh
Type n, to create new partition, enter 1 to create 1 partition, p to see the partition details and w to write the created partition. Select yes to finish
Check the Partitions created
lsblk
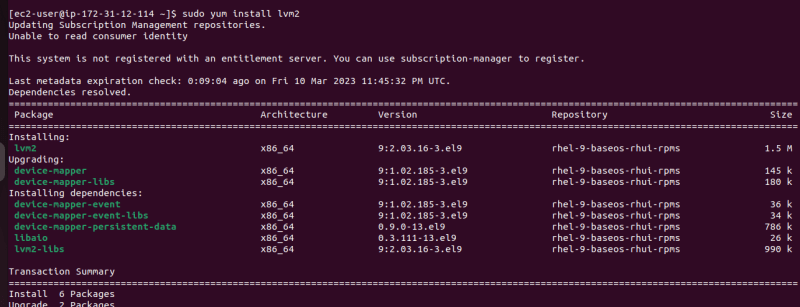
Intall lvm2
sudo yum install lvm2
Check the available partitions. Run
sudo lvmdiskscan

Create Physical volume by marking 3 of the partitioned disks with pvcreate
sudo pvcreate /dev/xvdf1
sudo pvcreate /dev/xvdg1
sudo pvcreate /dev/xvdh1

Verify the created physical volumes
sudo pvs

Create a volume group to contain all 3 of the created physical volumes with vgcreate. In this case the name is nfs-vg
sudo vgcreate nfs-vg /dev/xvdf1 /dev/xvdg1 /dev/xvdh1

Verify the created volume group
sudo vgs
![]()
Create 3 Logical Volumes. lv-opt lv-apps, and lv-logs using the lvcreate utility. Allocate 9G each to them. The lv-apps will store website data, lv-gos will store web logs.
sudo lvcreate -n lv-apps -L 9G nfs-vg
sudo lvcreate -n lv-logs -L 9G nfs-vg
sudo lvcreate -n lv-opt -L 9G nfs-vg

Confirm the logical volumes
sudo lvs

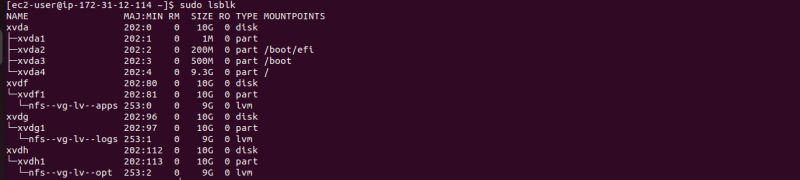
Verify the entire set-up
lsblk
Format the disk logical volumes with mfks.xfs
sudo mkfs -t xfs /dev/nfs-vg/lv-apps
sudo mkfs -t xfs /dev/nfs-vg/lv-logs
sudo mkfs -t xfs /dev/nfs-vg/lv-opt
Create /mnt/apps directory to store files
sudo mkdir -p /mnt/apps for website files
sudo mkdir -p /mnt/logs for log files
sudo mkdir -p /mnt/opt to be used for jedkins in the next project
Mount lv-apps of /mnt/apps; lv-logs on /mnt/log and lv-opt on /mnt/opt
sudo mount /dev/nfs-vg/lv-apps /mnt/apps
sudo mount /dev/nfs-vg/lv-logs /mnt/logs
sudo mount /dev/nfs-vg/lv-opt /mnt/opt

Update /etc/fstab file
Run
sudo blkid
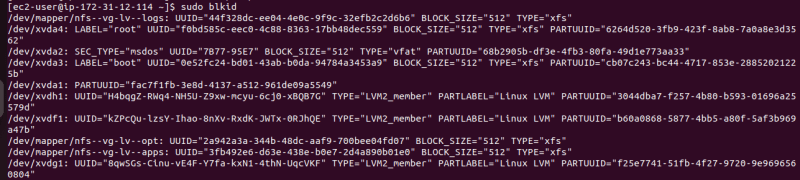
coppy the mount ids and update:
sudo vi /etc/fstab

Test the configuration and reload the daemon
sudo mount -a
sudo systemctl daemon-reload
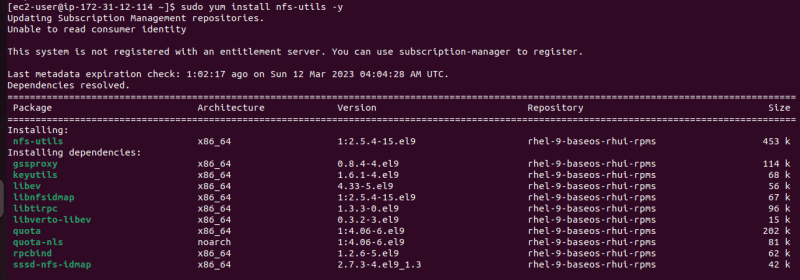
Install nfs server, configure and make sure it starts on system reboot
sudo yum -y update
sudo yum install nfs-utils -y
sudo systemctl start nfs-server.service
sudo systemctl enable nfs-server.service
sudo systemctl status nfs-server.service

set up permission that will allow our Web servers to read, write and execute files on NFS:
sudo chown -R nobody: /mnt/apps
sudo chown -R nobody: /mnt/logs
sudo chown -R nobody: /mnt/opt
sudo chmod -R 777 /mnt/apps
sudo chmod -R 777 /mnt/logs
sudo chmod -R 777 /mnt/opt

sudo systemctl restart nfs-server.service

Check your subnet cidr – open your EC2 details in AWS web console and locate ‘Networking’ tab and open a Subnet link:
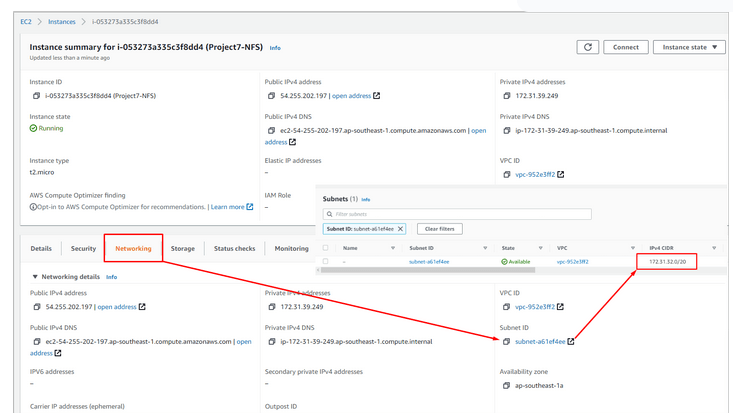
Configure access to NFS for clients within the same subnet using the subnet cidr we got above
sudo vi /etc/exports

/mnt/apps <Subnet-CIDR>(rw,sync,no_all_squash,no_root_squash)
/mnt/logs <Subnet-CIDR>(rw,sync,no_all_squash,no_root_squash)
/mnt/opt <Subnet-CIDR>(rw,sync,no_all_squash,no_root_squash)

Esc + :wq!

sudo exportfs -arv


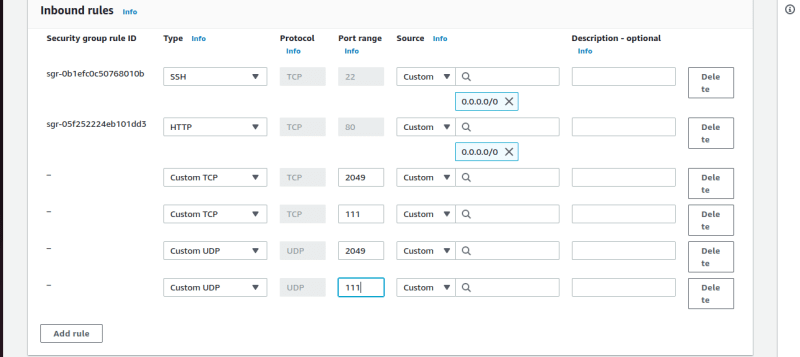
Check which port is used by NFS and open its port in security group setting
rpcinfo -p | grep nfs

Open port TCP 2049 inbound security group and also, In order for NFS server to be accessible from your client, you must also open following ports: TCP 111, UDP 111, UDP 2049
CONFIGURE DATABASE
Configure ec2 instance type ubuntu and do these:
Install MySQL server
sudo apt install mysql-server
Create a database and name it tooling
Create a database user and name it webaccess
Grant permission to webaccess user on tooling database to do anything only from the webservers subnet cidr
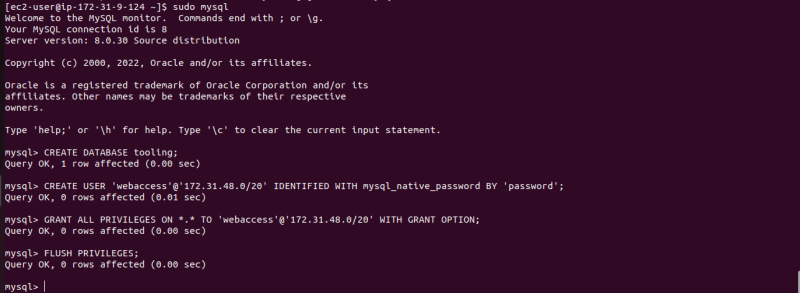
Dont forget to edit bind address for database to 0.0.0.0 so our DB can be accessible for our servers
sudo vi /etc/mysql/mysql.conf.d/mysqld.cnf

WEBSERVERS
Spin up a new REHL 8 ec2 instance in the same subnet as the nfs server
Install NFS client
sudo yum install nfs-utils nfs4-acl-tools -y
Mount /var/www/ and target the NFS server’s export for apps
sudo mkdir /var/www
sudo mount -t nfs -o rw,nosuid <NFS-Server-Private-IP-Address>:/mnt/apps /var/www
![]()
Use df -h to confirm the mount

Edit /etc/fstab file
sudo vi /etc/fstab
Add the following to the file setting
<NFS-Server-Private-IP-Address>:/mnt/apps /var/www nfs defaults 0 0

Install Remi’s repository, Apache and PHP
sudo yum install httpd -y

sudo yum install https://dl.fedoraproject.org/pub/epel/epel-release-latest-9.noarch.rpm

sudo yum install http://rpms.remirepo.net/enterprise/remi-release-9.rpm

sudo dnf module reset php

sudo dnf module enable php:remi-7.4

sudo dnf install php php-opcache php-gd php-curl php-mysqlnd

sudo systemctl start php-fpm

sudo systemctl enable php-fpm

Sudo setsebool -P httpd_execmem 1
Repeat steps 1-5 for another 2 Web Servers.
Verify that Apache files and directories are available on the Web Server in /var/www and also on the NFS server in /mnt/apps. If you see the same files – it means NFS is mounted correctly.

In our webserver /var/www directory. Run
sudo touch text.txt
![]()
![]()
We can see the text.txt file created inside our nfs server /mnt/apps directory. So they are communicating perfectly.
Create directory for apache log and mount it on the /mnt/logs directory of our NFS server
sudo mkdir -p /var/log/httpd

sudo mount -t nfs -o rw,nosuid <NFS-Server-Private-IP-Address>:/mnt/logs /var/log/httpd
![]()
Edit the /etc/fstab file so that it persists even after reboot
sudo vi /etc/fstab

Fork the tooling source code from Darey.io Github Account to your Github account.
Download git
sudo yum install git
Clone the repository you forked the project into
git clone <repository link>
Deploy the tooling website’s code to the Webserver. Ensure that the html folder from the repository is deployed to /var/www/html
cd tooling

sudo cp -r html/* /var/www/html/
Open TCP port 80 on the Web Server
If you encounter 403 Error:
check permissions on /var/www/html folder
Disable SELinux sudo setenforce 0
To make this change permanent, open selinux config file and set SELINUX=disabled then restrt httpd.
sudo vi /etc/sysconfig/selinux
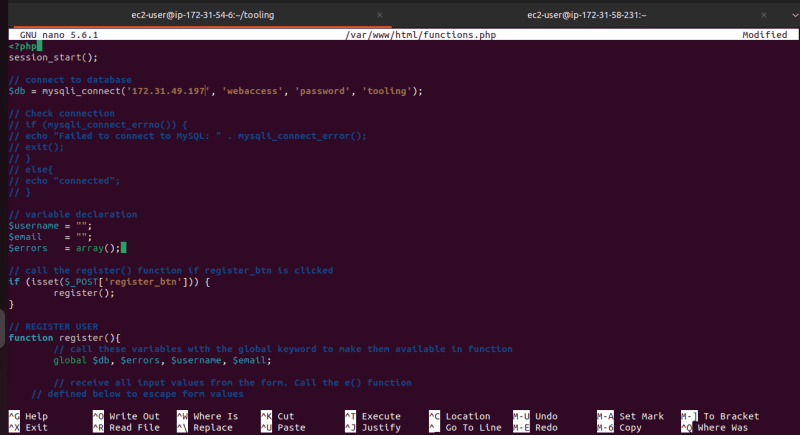
Update the website’s configuration to connect to the database
sudo vi /var/www/html/functions.php
Apply tooling-db.sql script to your database using this command:
mysql -h <databse-private-ip> -u <db-username> -p <db-pasword> < tooling-db.sql
Now we can open our web browser and enter
<webserver-public-ip>
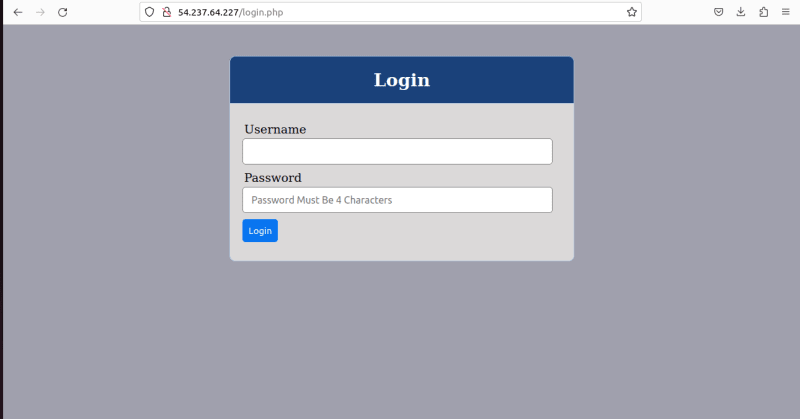
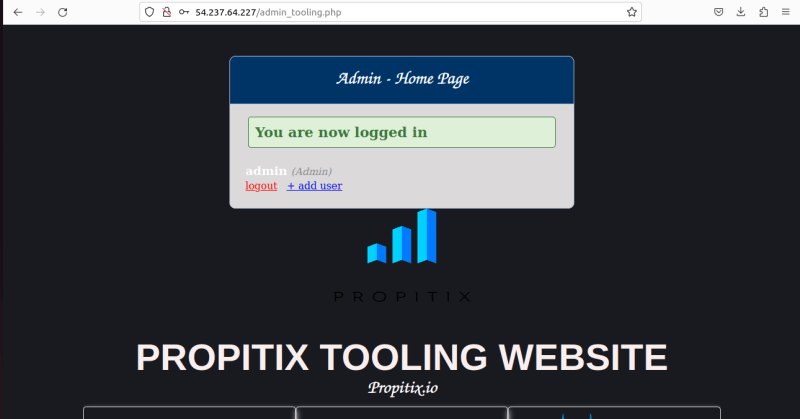
We have just successfully implemented a web solution for a DevOps team using LAMP stack with remote Database and NFS servers.

Top comments (0)