Python has in recent years rapidly become one of the most popular languages for backend development, thanks to its flexibility and rich library support.
In this blog post, I will demonstrate how to use OceanBase in a Python project. By combining OceanBase with popular Python libraries such as FastAPI, SQLAlchemy (ORM), and Uvicorn (server), we will create a REST API that serves as the backend of a headless e-commerce application.
Throughout the tutorial, we will explore the capabilities of OceanBase in a Python project and showcase how to make CRUD operations to items and stores in the database. With the integration of OceanBase in our e-commerce application, we can ensure that our backend is capable of handling massive amounts of data and traffic while maintaining optimal performance.
OceanBase is a high-performance, distributed relational database system designed to provide exceptional scalability and ACID capability. OceanBase, which is open source, is an ideal choice for businesses seeking a robust and reliable distributed database solution for their applications.
What we are going to build: A headless e-commerce API
In this tutorial, we will create a FastAPI application that provides access to items and store resources for a headless e-commerce API, connected to an OceanBase database.
Headless e-commerce is an innovative approach to online sales that involves decoupling the frontend and backend components of an e-commerce application. By separating the presentation layer (the "head") from the underlying business logic and data management (the "body"), headless e-commerce enables businesses to achieve greater flexibility, scalability, and customization in their online stores.
Our OceanBase-powered headless e-commerce app consists of an Item module and a Store module, where all items belong to their corresponding store. Features of this API include:
-
Item Management
- Create an item: Users can create new items with details such as name, price, description, and the associated store.
- Retrieve items: Fetch all items from the store.
- Update an item: Update an item's details by its ID.
- Delete an item: Delete an item by its ID.
-
Store Management
- Create a store: Users can create new stores with a name.
- Retrieve stores: Fetch all stores or filter stores by name.
- Update a single store: Update a store by its ID.
- Delete a store: Delete a store by its ID.
-
Database Integration:
- The application uses SQLAlchemy as the ORM to interact with an OceanBase database. It defines models, schemas, and repositories to manage items and stores in the database.
-
Documentation:
- The application is self-documented using FastAPI's built-in support for OpenAPI and Swagger UI. Users can interact with the API through the automatically generated Swagger UI.
In this tutorial, we will only build a basic headless API to demonstrate the capabilities of OceanBase in a Python application. However, a complete headless e-commerce API would typically include additional features and integrations to provide a more comprehensive solution. For example, essential e-commerce features like user authentication and authorization, cart management, order management, and shipping management are missing from this demo.
Again, the codebase for this project is uploaded to GitLab. You can read the last section of this post about how to set up your own project using this codebase.
Prerequisites
You'll need Python 3 with virtualenv installed. Virtualenv is a package and virtual environment manager that uses pip with features like version locking and dependency isolation between projects.
To follow this demo project, you also need a running OceanBase cluster. You have several options for doing so. You can install OceanBase in your local environment, spin up a virtual machine in the cloud to run it, or use OceanBase Cloud in the AWS marketplace to set up your cluster in just a few clicks.
In this project, I’m going to use the EC2 approach and the demo server for simplicity. In production, please follow OceanBase’s official guide on deploying in a Kubernetes cluster.
Setup and installation
Start by creating a folder called python-fastapi-oceanbase-api in any directory on your disk for the project:
$ mkdir python-fastapi-oceanbase-api
$ cd python-fastapi-oceanbase-api
Navigate to the project folder and activate the virtual environment:
python3 -m venv venv
source venv/bin/activate
Install the required dependencies using pip:
pip install fastapi uvicorn sqlalchemy
As the initial setup, this command installs FastAPI for building the API, Uvicorn as the ASGI server, and SQLAlchemy as the ORM.
As we dive into the project, we may have to install some additional packages. In the final Gitlab repo, I will also include a requirements.txt file that contains all the necessary packages.
Set up the OceanBase connection
Create a new file called db.py in the project root directory and add the following code to configure the database connection using SQLAlchemy:
import os
from dotenv import load_dotenv
from sqlalchemy import create_engine
from sqlalchemy.orm import sessionmaker
from sqlalchemy.ext.declarative import declarative_base
load_dotenv()

DATABASE_URL = os.environ.get('DB_URL')
print(DATABASE_URL)
engine = create_engine(DATABASE_URL) # type: ignore
SessionLocal = sessionmaker(autocommit=False, autoflush=False, bind=engine)

Base = declarative_base()

def get_db():
    db = SessionLocal()
    try:
        yield db
    finally:
        db.close()
Here we will use a .env file to store our OceanBase database connection string. Since OceanBase is compatible with MySQL, and SQLAlchemy currently doesn’t support OceanBase, we can use the MySQL protocol instead. Here is what the connection string in the .env file looks like:
DB_URL = mysql+pymysql://user:password@EC2_IP:port/database_name
The db.py file will import the necessary packages to create the SQLAlchemy engine and database session for OceanBase, create the SQLAlchemy engine for OceanBase, and define the SessionLocal class, which represents a database session.
Finally, a Base class was created using declarative_base(), which will be inherited by each of the database models or ORM classes. The get_db() function creates an independent database session for each request.
Designing database models
In this section, we will develop database models for storing and organizing our data. Our application requires two database models: Item and Store, along with their respective repositories. We will use db.py, which we created in the previous section, to develop our SQLAlchemy models. This file includes a class called Base that serves as a declarative base for defining our models.
Create a folder named database and add two files: models.py and repositories.py. We will define all database entities in models.py and their corresponding repositories in repositories.py.
The content of the models.py file should be like this:
from sqlalchemy import Column, ForeignKey, Integer, String, Float
from sqlalchemy.orm import relationship

from db import Base

class Item(Base):
    __tablename__ = "items"

    id = Column(Integer, primary_key=True,index=True)
    name = Column(String(80), nullable=False, unique=True,index=True)
    price = Column(Float(precision=2), nullable=False)
    description = Column(String(200))
    store_id = Column(Integer,ForeignKey('stores.id'),nullable=False)
    def __repr__(self):
        return 'ItemModel(name=%s, price=%s,store_id=%s)' % (self.name, self.price,self.store_id)

class Store(Base):
    __tablename__ = "stores"
    id = Column(Integer, primary_key=True,index=True)
    name = Column(String(80), nullable=False, unique=True)
    items = relationship("Item",primaryjoin="Store.id == Item.store_id",cascade="all, delete-orphan")

    def __repr__(self):
        return 'Store(name=%s)' % self.name
The models.py code creates and manages the Item and Store database models. It begins by defining the Item class and mapping it to the 'items' table in our database. The table columns and their data types are specified, with store_id serving as a Foreign key reference for Stores.
A relationship is established using the SQLAlchemy ORM, which virtually contains values from related tables. Finally, additional helper methods are added to display the Store object at runtime.
The repositories.py file includes a collection of reusable functions that facilitate interaction with the data stored in the database.
from sqlalchemy.orm import Session
from . import models, schemas

class ItemRepo:

 async def create(db: Session, item: schemas.ItemCreate):
        db_item = models.Item(name=item.name,price=item.price,description=item.description,store_id=item.store_id)
        db.add(db_item)
        db.commit()
        db.refresh(db_item)
        return db_item

 def fetch_by_id(db: Session,_id):
     return db.query(models.Item).filter(models.Item.id == _id).first()

 def fetch_by_name(db: Session,name):
     return db.query(models.Item).filter(models.Item.name == name).first()

 def fetch_all(db: Session, skip: int = 0, limit: int = 100):
     return db.query(models.Item).offset(skip).limit(limit).all()

 async def delete(db: Session,item_id):
     db_item= db.query(models.Item).filter_by(id=item_id).first()
     db.delete(db_item)
     db.commit()


 async def update(db: Session,item_data):
    updated_item = db.merge(item_data)
    db.commit()
    return updated_item

class StoreRepo:

    async def create(db: Session, store: schemas.StoreCreate):
            db_store = models.Store(name=store.name)
            db.add(db_store)
            db.commit()
            db.refresh(db_store)
            return db_store

    def fetch_by_id(db: Session,_id:int):
        return db.query(models.Store).filter(models.Store.id == _id).first()

    def fetch_by_name(db: Session,name:str):
        return db.query(models.Store).filter(models.Store.name == name).first()

    def fetch_all(db: Session, skip: int = 0, limit: int = 100):
        return db.query(models.Store).offset(skip).limit(limit).all()

    async def delete(db: Session,_id:int):
        db_store= db.query(models.Store).filter_by(id=_id).first()
        db.delete(db_store)
        db.commit()

    async def update(db: Session,store_data):
        db.merge(store_data)
        db.commit()
The repositories.py file defines helper methods that facilitate CRUD operations on both the Item and Store database models. These functions enable efficient interaction with the data stored in the database, streamlining the process of managing and accessing information within the application.
Create schema
We will now create a file named schemas.py within the database folder. This file will house the Pydantic models that correspond to our SQLAlchemy models. Essentially, these Pydantic models will outline the schema or the valid data structure for our application. Pydantic takes care of all data validations automatically.
The Item schema represents an individual item in a store. The schema is based on the ItemBase class, which contains the following attributes:
-
name(str): The name of the item. -
price(float): The price of the item. -
description(Optional[str]): An optional description of the item, which can beNoneif not provided. -
store_id(int): The ID of the store where the item is available. -
id(int): The unique identifier of the item.
from typing import List, Optional
from pydantic import BaseModel

class ItemBase(BaseModel):
    name: str
    price : float
    description: Optional[str] = None
    store_id: int

class ItemCreate(ItemBase):
    pass

class Item(ItemBase):
    id: int

    class Config:
        orm_mode = True
The Store schema represents a store containing items. The schema is based on the StoreBase class, which contains the following attribute:
-
name(str): The name of the store. -
id(int): The unique identifier of the store. -
items(List[Item]): A list of items available in the store, represented by theItemschema. By default, the list is empty.
class StoreBase(BaseModel):
    name: str

class StoreCreate(StoreBase):
    pass

class Store(StoreBase):
    id: int
    items: List[Item] = []

    class Config:
        orm_mode = True
The API
With the OceanBase connection set up, let's build a FastAPI interface to interact with our database. In the root folder, we will create a main.py file.
This file should provide a REST API interface for managing Items and Stores in OceanBase, allowing clients to interact with the resources using standard HTTP methods. FastAPI takes care of generating the appropriate Swagger documentation and handling request/response validation.
The file will do the following:
Import necessary packages and models, and then create the FastAPI app.
from fastapi import Depends, FastAPI, HTTPException
from fastapi.responses import JSONResponse
from database import models
from db import get_db, engine
import database.models as models
import database.schemas as schemas
from database.repositories import ItemRepo, StoreRepo
from sqlalchemy.orm import Session
import uvicorn
from typing import List,Optional
from fastapi.encoders import jsonable_encoder

app = FastAPI(title="Sample FastAPI Application",
    description="Sample FastAPI Application with Swagger and Sqlalchemy",
    version="1.0.0",)

models.Base.metadata.create_all(bind=engine)

@app.exception_handler(Exception)
def validation_exception_handler(request, err):
    base_error_message = f"Failed to execute: {request.method}: {request.url}"
    return JSONResponse(status_code=400, content={"message": f"{base_error_message}. Detail: {err}"})
Define the API endpoints for Items:
- Create a new Item: A POST request to
/itemsthat accepts an ItemCreate schema and returns the created Item. - Get all Items: A GET request to
/itemsthat retrieves a list of all items, with optional filtering by name. - Get a specific Item: A GET request to
/items/{item_id}that retrieves an item by its ID. - Delete an Item: A DELETE request to
/items/{item_id}that removes the item with the specified ID from the database. - Update an Item: A PUT request to
/items/{item_id}that updates the item with the specified ID using the data provided in the Item schema.
@app.post('/items', tags=["Item"],response_model=schemas.Item,status_code=201)
async def create_item(item_request: schemas.ItemCreate, db: Session = Depends(get_db)):
    """
    Create an Item and store it in the database
    """

    db_item = ItemRepo.fetch_by_name(db, name=item_request.name)
    if db_item:
        raise HTTPException(status_code=400, detail="Item already exists!")

    return await ItemRepo.create(db=db, item=item_request)

@app.get('/items', tags=["Item"],response_model=List[schemas.Item])
def get_all_items(name: Optional[str] = None,db: Session = Depends(get_db)):
    """
    Get all the Items stored in database
    """
    if name:
        items =[]
        db_item = ItemRepo.fetch_by_name(db,name)
        items.append(db_item)
        return items
    else:
        return ItemRepo.fetch_all(db)

@app.get('/items/{item_id}', tags=["Item"],response_model=schemas.Item)
def get_item(item_id: int,db: Session = Depends(get_db)):
    """
    Get the Item with the given ID provided by User stored in database
    """
    db_item = ItemRepo.fetch_by_id(db,item_id)
    if db_item is None:
        raise HTTPException(status_code=404, detail="Item not found with the given ID")
    return db_item

@app.delete('/items/{item_id}', tags=["Item"])
async def delete_item(item_id: int,db: Session = Depends(get_db)):
    """
    Delete the Item with the given ID provided by User stored in database
    """
    db_item = ItemRepo.fetch_by_id(db,item_id)
    if db_item is None:
        raise HTTPException(status_code=404, detail="Item not found with the given ID")
    await ItemRepo.delete(db,item_id)
    return "Item deleted successfully!"

@app.put('/items/{item_id}', tags=["Item"],response_model=schemas.Item)
async def update_item(item_id: int,item_request: schemas.Item, db: Session = Depends(get_db)):
    """
    Update an Item stored in the database
    """
    db_item = ItemRepo.fetch_by_id(db, item_id)
    if db_item:
        update_item_encoded = jsonable_encoder(item_request)
        db_item.name = update_item_encoded['name']
        db_item.price = update_item_encoded['price']
        db_item.description = update_item_encoded['description']
        db_item.store_id = update_item_encoded['store_id']
        return await ItemRepo.update(db=db, item_data=db_item)
    else:
        raise HTTPException(status_code=400, detail="Item not found with the given ID")
Define the API endpoints for Stores:
- Create a new Store: A POST request to
/storesthat accepts a StoreCreate schema and returns the created Store. - Get all Stores: A GET request to
/storesthat retrieves a list of all stores, with optional filtering by name. - Get a specific Store: A GET request to
/stores/{store_id}that retrieves a store by its ID. - Delete a Store: A DELETE request to
/stores/{store_id}that removes the store with the specified ID from the database.
@app.post('/stores', tags=["Store"],response_model=schemas.Store,status_code=201)
async def create_store(store_request: schemas.StoreCreate, db: Session = Depends(get_db)):
    """
    Create a Store and save it in the database
    """
    db_store = StoreRepo.fetch_by_name(db, name=store_request.name)
    print(db_store)
    if db_store:
        raise HTTPException(status_code=400, detail="Store already exists!")

    return await StoreRepo.create(db=db, store=store_request)

@app.get('/stores', tags=["Store"],response_model=List[schemas.Store])
def get_all_stores(name: Optional[str] = None,db: Session = Depends(get_db)):
    """
    Get all the Stores stored in database
    """
    if name:
        stores =[]
        db_store = StoreRepo.fetch_by_name(db,name)
        print(db_store)
        stores.append(db_store)
        return stores
    else:
        return StoreRepo.fetch_all(db)

@app.get('/stores/{store_id}', tags=["Store"],response_model=schemas.Store)
def get_store(store_id: int,db: Session = Depends(get_db)):
    """
    Get the Store with the given ID provided by User stored in database
    """
    db_store = StoreRepo.fetch_by_id(db,store_id)
    if db_store is None:
        raise HTTPException(status_code=404, detail="Store not found with the given ID")
    return db_store

@app.delete('/stores/{store_id}', tags=["Store"])
async def delete_store(store_id: int,db: Session = Depends(get_db)):
    """
    Delete the Item with the given ID provided by User stored in database
    """
    db_store = StoreRepo.fetch_by_id(db,store_id)
    if db_store is None:
        raise HTTPException(status_code=404, detail="Store not found with the given ID")
    await StoreRepo.delete(db,store_id)
    return "Store deleted successfully!"
Run the FastAPI application using Uvicorn with a specified port and reload option.
if __name__ == "__main__":
    uvicorn.run("main:app", port=9000, reload=True)
Running the app
Now we have a functioning CRUD API for our headless e-commerce app, let’s try to run the app by typing the following command in the terminal:
python main.py
And we can access a running dev server on http://127.0.0.1:9000. With this setup, clients can easily interact with the resources using standard HTTP methods.

The Swagger UI provides a user-friendly interface for interacting with the API and exploring its endpoints, request parameters, and responses. You can use it to test API requests and ensure that your API is functioning as expected.
To be able to create an item in our e-commerce app, we first need to create a store. We can POST the /stores endpoint to create one. In this example, I will create a store called GearGenius, which is a store for tech gadgets.
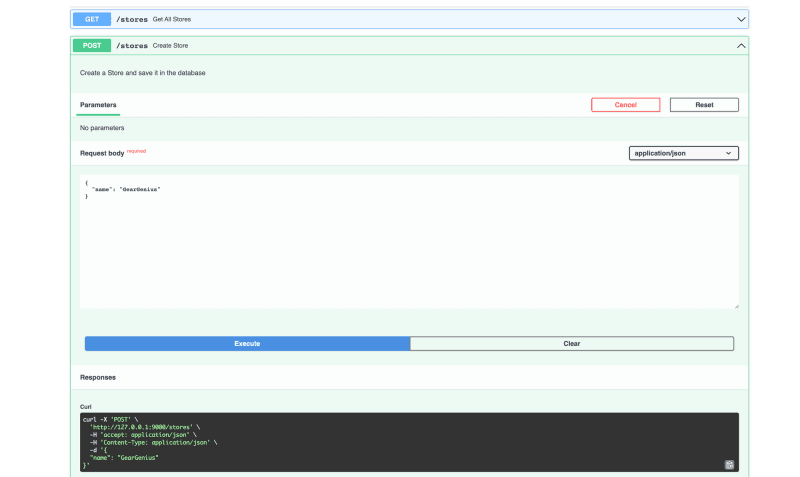
Then we can use the GET method in the /stores endpoint to get all stores in the e-commerce app. Each store has a store ID, which can be used when we add items to the store.

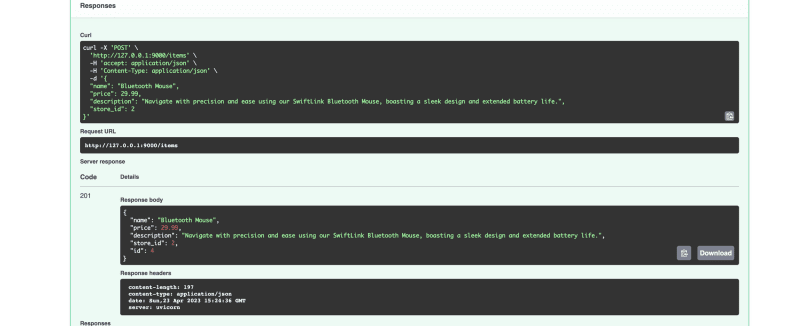
Now we can create an item in a specific store by using the POST method in the /items endpoint. In previous steps, we have created a store with the id of 2, we can use this number in the store_id property.

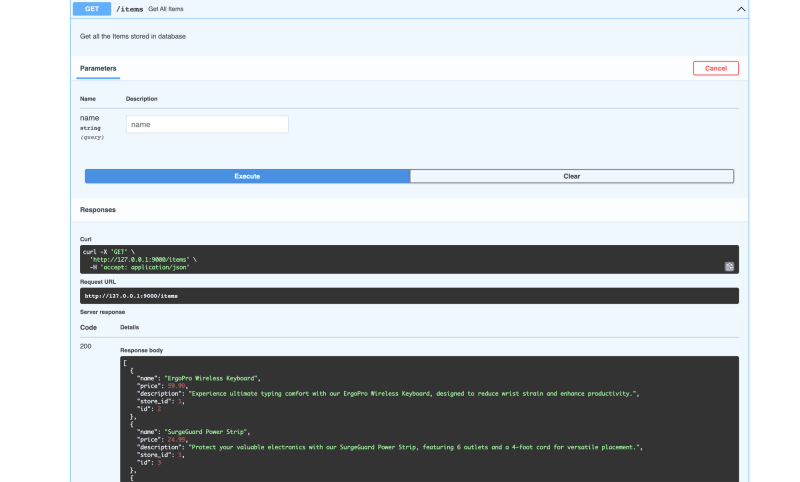
Then we can check all the items in the database by using the GET method in the /items endpoint.
You can also make DELETE and PUT requests to the /items/{item_id} method to remove or update an item in the store.

Conclusion
Now we have successfully built a RESTful API using FastAPI, SQLAlchemy, and Uvicorn with an OceanBase database. The API provides endpoints for creating, retrieving, updating, and deleting items and stores in the database. We also explored how to use the Swagger UI to interact with the API and test API requests.
I have uploaded the code of this project to this GitLab repository. You can clone the project and run it in our local environment as a starter for your Python OceanBase application.
To set up, duplicate the .env.example file and rename it to .env, and then substitute the DB_URL variable based on your own database setup.
You can install all the necessary packages by running the following command:
pip install -r requirements.txt
Overall, this tutorial gives an overview of how OceanBase is used in a Python project. Moving forward, you can enhance this e-commerce platform by adding additional features and functionalities such as user management and authentication, payment integration, and searching. You can also start creating other API-based apps for OceanBase based on this boilerplate.

Top comments (0)