This is the main event. What we've been waiting for throughout this series: creating an application that we can deploy on OpenStack and leverage some of OpenStack's services. As part of this exercises, I'm hoping we get to experience:
- deploying a "support" server (we've done this already with our PostgreSQL database).
- write an application that connects to another server (the database).
- integrate the OpenStack SDK to work with an OpenStack Service (we'll be using the Swift Object Storage service).
- deploy this application to our OpenStack cloud (goal for the next post).
We've done the first step, and in the next post we'll set up another "support" server as well as deploy our application. In this post, we're going to focus on the development tasks. I've sped things up a little bit though and already wrote the code. We will review the relevant tasks here. You can find the project here: Object Store Catalogue (github.com/wsidl/openstack_swift_api)

NOTE: Give me a little slack for the lack of anything important (documentation, testing frameworks, build structures, etc). This is for exercise purposes only.
Before we start playing with the code, let's do a quick review of the project. It's a Python Flask project that contains 2 working modules (metadata for database work and object_store for Swift operations). There is also a ui directory which contains a Nuxt.js project for the user interface. This UI connects to the Flask Server via a REST API.
You can review the code for anything you want, but the focus of this project is the use of OpenStack Swift to understand how it works and also to get an understanding of how OpenStack services operate.
How Cloud Services Work
As I hinted at just now, OpenStack (or most other cloud provider) services operate a little differently than traditional servers.
Unlike a server we provision and manage ourselves, cloud services are completely handled behind the scenes by the cloud itself. Something falls apart with your Database on a DBaaS (Database as a Service) and storage has been corrupted, no problem. The service already has replicated storage set up and restarts your instance using the backup. This hides away a lot of the tasks us Developers don't like dealing with like system failovers, hardware exceptions, software updates, etc. This is part of the greater premise to "Everything as a Service" or "XaaS": the service can be used by anyone.
This also means there's a little extra work to accessing the products of these services. For example, the OpenStack DBaaS, Trove provides databases as a service. Unlike our database in our project where you log onto the host serving the database, the Trove service will allow you to programmatically create a database defining the type and other configurations. Once the service has provisioned your database, you can request it's publicly accessible IP address that you can connect to. The major difference here is if you've defined it in the service and provided open permissions, this same database can be accessed by multiple projects and multiple networks. There's also no guarantee the IP address you received one time will be the same address you get next time.
This also leads to another problem with these cloud services, the networking becomes much more complex. OpenStack does a great job of keeping things simple, but other providers try to hide everything into other services, making connecting anything an absolute headache (Azure, I'm looking at you).
Review the Swift Python SDK
Working with a service using the Python SDK requires a single dependency: openstacksdk. This is the library that will give you the most consistent experience across services while also being widely supported by the OpenStack development team.
import openstack
From here, I will review the object_store module in this project to outline the work done.
Connecting
There's a lot of flexibility in how you define your connection credentials when connecting to your cloud's Swift service:
- Specify the connection details directly into the connection method, specifying named keyword arguments with
username,password,project_id,project_domain_id, andauth_url. - Using a multi-cloud environment, you can leverage the use of a
cloud.yamlfile that lists the various clouds, projects, domains, credentials for many projects at once. You can then create different connections for each of the available credentials. More info here. - Implement the environment variables provided by OpenStack, using the downloaded RC File for your project.
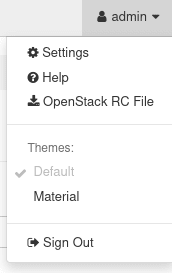
NOTE: The environment variables explained here are prepared as a single file you download from your project's dashboard (found in the top-right menu in the OpenStack dashboard under your user name)
The connection client will then do the necessary work to determine the best protocol to use in order of significance (from top to bottom, using the first set of credentials it can find):
- Added parameters to the connection client
- Environment Variables
-
clouds.yamlfile (if you have multiple identities in your project, the connection will error as you will need to specific which identity you want to use)
_OS_CONNECTION = openstack.connect()
This creates a connection client we can then re-use throughout the module. We also create the missing Swift Container once we have an active connection.
NOTE: Containers (or "buckets" in other cloud platforms) are a way to create segmentation within your data blocks. Swift also has the additional level of segmentation by creating "Folders" within your Containers.
__containers = [
    cont.name
    for cont in _OS_CONNECTION.object_store.containers(prefix=c.SWIFT_CONTAINER)
    if cont.name == c.SWIFT_CONTAINER
]
if not __containers:
    _OS_CONNECTION.object_store.create_container(name=c.SWIFT_CONTAINER)
NOTE: querying can be done to limit the number of data retrieved, but in most cases I can find, this is limited to the
prefixargument.
Making Requests
The SDK provides many ways to work with the underlying services. The API will be dependent on the service you're working with (you can find the API structure here: https://docs.openstack.org/openstacksdk/latest/user/index.html)
These operations when working with Objects look like:
-
Create/Upload Object:
conn.upload_object(container, name, data)object_store.py#L73 -
Drop Object:
conn.delete_object(name, container)object_store.py#L82 -
Query/List Objects:
conn.objects(container, prefix=None)object_store.py#L89 & object_store.py#L96 -
Download Object Content:
conn.download_object(name, container)object_store.py#L104
Working with other SDKs and other languages
There are a large (and increasing) number of OpenStack services that you can connect with to integrate into your applications, but through the same interfaces, also automate project provisions or administrative tasks as system administrators. You can review how these SDKs work using OpenStack's API Documentation page. And if you are working in another language, you're not left out. There are a number of languages supported (since everything is built on a REST API). You can check them out here: OpenStack Wiki/SDKs (a little outdated).
Run the project
Now that we know how the Swift-specific tasks working, let's give it a try. The Git repository already includes the steps for setting up the project locally in the README, but I'll give a quick overview here:
Clone the repo
If you're a member of this forum, you're probably well aware of how to do this, but a quick primer:
git clone https://github.com/wsidl/openstack_swift_api.git
cd openstack_swift_api
Install Project Dependencies
# I do this almost everytime now... solves a lot of problems
pip install --upgrade pip
# If you don't have it installed yet, get Python Poetry
pip install poetry
# Setup a virtual environment, validate dependency versions,
# download and install those dependencies
poetry install
Define Environment Configurations
If you've come from the last post, then you should still have your SSH Tunnel created. Quick refresher on this, you'll SSH into your DevStack VM and run the command:
ssh app@<floating_ip> -L 0.0.0.0:5432:localhost:5432
You're also going to need your OpenStack Credentials for authenticating access to the Swift Service. Easiest way to do this is to download the RC File from your environment (explained above) and copy it into the root of this project, renaming it to .env (the project uses python-dotenv for looking up environment variables by file) and remove anything that doesn't assign a value and the "export " at the beginning of each line.
If you want a simple solution (and you're using a POSIX system):
grep -E "^export" openrc.sh | sed -E 's/^export (.*)="?([^"]*)"?$/\1=\2/g' > .env
This should give you a file that looks like:
OS_AUTH_URL=http://not.a.real.ip/identity
OS_PROJECT_ID=0123456789abcdef0123456789abcdef
OS_PROJECT_NAME=my_app
OS_USER_DOMAIN_NAME=Default
OS_PROJECT_DOMAIN_ID=default
OS_USERNAME=admin
OS_PASSWORD=$OS_PASSWORD_INPUT
OS_REGION_NAME=RegionOne
OS_INTERFACE=public
OS_IDENTITY_API_VERSION=3
Replace $OS_PASSWORD_INPUT with your admin password. You'll also want to add some additional values for connecting to PostgreSQL:
PG_HOST=<DevStack IP>
PG_PORT=<SSH Tunnel Port, defaults 5432>
PG_DBNAME=app
PG_USER=app
PG_PASSWORD=<DB Password>
Start the Server
poe dev
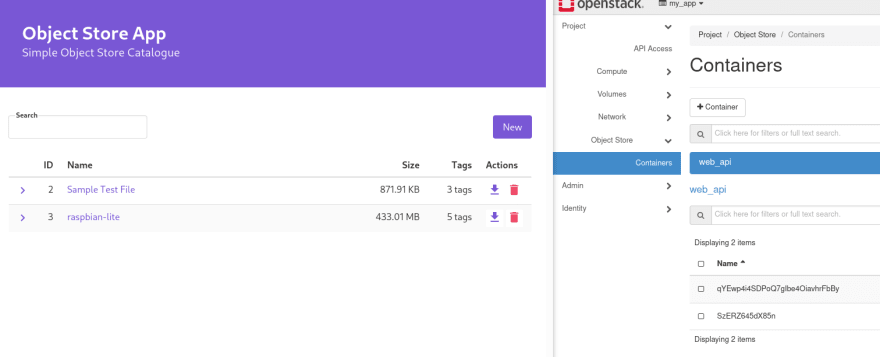
You should now have a server that starts up and an interface ready to be used at http://127.0.0.1:5001. As you play with the interface, keep a window open to your OpenStack dashboard looking into the Object Store section. As you add files, you'll see the database getting populated with metadata and tags while the web_api container is receiving files using unique hashes.
Conclusion
Now that we have a working server that leverages the services on our cloud, the only thing left to do is look at the ways for deploying it. There are a lot of different ways to do this, but this will be a topic for the next post: Deploying to OpenStack.
Thanks for following up to this point and we'll see you in the next post.


Oldest comments (0)