
This tutorial series is now also available as an online video course. You can watch the first hour on YouTube or get the complete course on Udemy. Or you just keep on reading. Enjoy! :)
Advanced Relationships with Entity Framework Core
Introduction
Welcome to the Advanced Relationships with Entity Framework Core section.
So far, we have created a one-to-many relation between the User entity and the Character entity.
Users can have several characters but not the other way around. An RPG character can only have one user.
That way we can make sure that users only see the characters they have created. Pretty obvious, but it’s still important to make this clear.
Apart from one-to-many relations there are also one-to-one and many-to-many relations available in relational databases. So we still got two cases to cover.
We will do that by adding weapons and skills to our example application.
Weapons will be unique, and an RPG character will only be able to have one single weapon. Interesting concept, I know, but it works for our example.
The skills, on the other hand, will be available to all characters and they can have as many as they like. So, yeah, even a knight might be able to throw fireballs. Why not?
But before we add new models and new relations to our application, let’s take care of the relation between users and RPG characters. We are able to get related RPG characters of the user, but there are still some operations missing.
Proper User-Character Relation
So far, when a new character is generated, it doesn’t have a connection to the user. To fix that we have to know who the current user is when we create a new RPG character.
Actually, we need to know the current user for any operation. Think about updating or deleting a character.
It looks like we have to pass the userId from the CharacterController to every single method of the CharacterService.
Well, there’s a better way.
Instead of passing the current user from the controller to the service, we can inject the IHttpContextAccessor in the CharacterService and access the current user from there.
We could have done this before, sorry that you have to change the GetAllCharacters() method again, but that’s how we learn, right?
First, we have to register the IHttpContextAccessor in the Startup class. This time, we register it as a singleton!
services.AddSingleton<IHttpContextAccessor, HttpContextAccessor>();
And we add the Microsoft.AspNetCore.Http library.
Then we go to CharacterService and inject the IHttpContextAccessor in the constructor.
private readonly IHttpContextAccessor _httpContextAccessor;

public CharacterService(IMapper mapper, DataContext context, IHttpContextAccessor httpContextAccessor)
{
    _httpContextAccessor = httpContextAccessor;
    _context = context;
    _mapper = mapper;
}
Since we need the Id of the authenticated user quite often, let’s write a method for that and call it GetUserId().
We access the user via _httpContextAccessor.HttpContext.User and this time let’s use the method FindFirstValue() to get the value we’re looking for. And don’t forget to parse the result to an int.
private int GetUserId() => int.Parse(_httpContextAccessor.HttpContext.User.FindFirstValue(ClaimTypes.NameIdentifier));
Now we can use this method in GetAllCharacters(). Let’s also remove the userId parameter.
public async Task<ServiceResponse<List<GetCharacterDto>>> GetAllCharacters()
{
    ServiceResponse<List<GetCharacterDto>> serviceResponse = new ServiceResponse<List<GetCharacterDto>>();
    List<Character> dbCharacters = await _context.Characters.Where(c => c.User.Id == GetUserId()).ToListAsync();
    serviceResponse.Data = dbCharacters.Select(c => _mapper.Map<GetCharacterDto>(c)).ToList();
    return serviceResponse;
}
We also remove the userId parameter in the interface
Task<ServiceResponse<List<GetCharacterDto>>> GetAllCharacters();
The same for the controller. Here we can even remove the line where we were grabbing the user.
[HttpGet("GetAll")]
public async Task<IActionResult> Get()
{
    return Ok(await _characterService.GetAllCharacters());
}
Alright. Let’s test this real quick with Postman and then we modify all the other methods.
The URL and HTTP method stays the same, just make sure to update the bearer token if you get a 401 Unauthorized as a result. Remember, we gave the token an expiration time of one day. So if you had a break, it’s possible that the token already expired.
Anyways, the result should be the same and we get the RPG characters that are related to our user.
Alright, now let’s fix the other methods.
First, we add the current user to a created RPG character.
In the AddCharacter() method, after we map the AddCharacterDto to the Character type, we set the character.User by grabbing the User object from the database with await _context.Users.FirstOrDefaultAsync() and as condition, we want the user with the Id of the authenticated user.
character.User = await _context.Users.FirstOrDefaultAsync(u => u.Id == GetUserId());
We can already test that. The URL of the POST call is http://localhost:5000/character and in the body, I’d like to create a mage called “Raistlin”, this time with different attributes for his intelligence, strength, and defense.
{
    "name":"Raistlin",
    "class": 2,
    "intelligence": 20,
    "strength" : 5,
    "defense" : 5
}
In the database, we can now see that our new mage was created and the UserId was properly set.

We can also see that our second character still has no related user. Let’s just enter the id 1 to fix that.

Another thing we should add is the returning result of the AddCharacter() method. We get all characters back, regardless of the related user. We got three characters back, although only two were related to the authorized user.
To illustrate this, we can create a new user and then a new character with that user.
So we start with the registration in Postman, URL is http://localhost:5000/auth/register. Let’s get really creative with the username.
{
    "username":"testuser",
    "password": "123456"
}
After that, let’s log the user right in to grab the proper token. We use that token now to create a new character.
We can leave the body empty to create our default character Frodo.
As you can see, we get all characters from the database back, although only one character is related to the current user.
{
    "data": [
        {
            "id": 1,
            "name": "Frodo",
            "hitPoints": 200,
            "strength": 20,
            "defense": 10,
            "intelligence": 10,
            "class": 2
        },
        {
            "id": 2,
            "name": "Sam",
            "hitPoints": 100,
            "strength": 10,
            "defense": 10,
            "intelligence": 10,
            "class": 1
        },
        {
            "id": 4,
            "name": "Raistlin",
            "hitPoints": 100,
            "strength": 5,
            "defense": 5,
            "intelligence": 20,
            "class": 2
        },
        {
            "id": 5,
            "name": "Frodo",
            "hitPoints": 100,
            "strength": 10,
            "defense": 10,
            "intelligence": 10,
            "class": 1
        }
    ],
    "success": true,
    "message": null
}

To fix this, we go back to the AddCharacter() method and filter the returning characters with Where(c => c.User.Id == GetUserId()).
public async Task<ServiceResponse<List<GetCharacterDto>>> AddCharacter(AddCharacterDto newCharacter)
{
    ServiceResponse<List<GetCharacterDto>> serviceResponse = new ServiceResponse<List<GetCharacterDto>>();
    Character character = _mapper.Map<Character>(newCharacter);
    character.User = await _context.Users.FirstOrDefaultAsync(u => u.Id == GetUserId());

    await _context.Characters.AddAsync(character);
    await _context.SaveChangesAsync();

    serviceResponse.Data = (_context.Characters.Where(c => c.User.Id == GetUserId()).Select(c => _mapper.Map<GetCharacterDto>(c))).ToList();
    return serviceResponse;
}
When we create another Frodo now, we only get the two Frodos of the current user back.
{
    "data": [
        {
            "id": 5,
            "name": "Frodo",
            "hitPoints": 100,
            "strength": 10,
            "defense": 10,
            "intelligence": 10,
            "class": 1
        },
        {
            "id": 6,
            "name": "Frodo",
            "hitPoints": 100,
            "strength": 10,
            "defense": 10,
            "intelligence": 10,
            "class": 1
        }
    ],
    "success": true,
    "message": null
}
Alright, now the methods UpdateCharacter(), GetCharacterById() and DeleteCharacter() are left.
In essence, we want to check if the current user is allowed to see, delete or update the RPG character with the given id. As always, there are several ways to do this.
Let’s start with the GetCharacterById() method.
We can fix this one real quick by simply adding a second condition to the predicate so that we not only check the Id of the character, but also the Id of the related User.
Character dbCharacter = await _context.Characters.FirstOrDefaultAsync(c => c.Id == id && c.User.Id == GetUserId());
Now we only get our own RPG characters.
If the user is not allowed to see a particular character, the result is null.
Deleting a character works similarly. But let’s make some more changes. First I’d like to use the method FirstOrDefaultAsync() and then we add the second condition c.User.Id == GetUserId().
After that, we check if the resulting character is not null and only then we remove it, save the changes to the database and then only return all characters that belong to the current user. So we add another condition with Where(c => c.User.Id == GetUserId()).
If, however, the character is null we return a failing serviceResponse with a Message like Character not found.
public async Task<ServiceResponse<List<GetCharacterDto>>> DeleteCharacter(int id)
{
    ServiceResponse<List<GetCharacterDto>> serviceResponse =
        new ServiceResponse<List<GetCharacterDto>>();
    try
    {
        Character character =
            await _context.Characters.FirstOrDefaultAsync(c => c.Id == id && c.User.Id == GetUserId());
        if (character != null)
        {
            _context.Characters.Remove(character);
            await _context.SaveChangesAsync();
            serviceResponse.Data = (_context.Characters.Where(c => c.User.Id == GetUserId())
                .Select(c => _mapper.Map<GetCharacterDto>(c))).ToList();
        }
        else
        {
            serviceResponse.Success = false;
            serviceResponse.Message = "Character not found.";
        }
    }
    catch (Exception ex)
    {
        serviceResponse.Success = false;
        serviceResponse.Message = ex.Message;
    }
    return serviceResponse;
}
When we now want to delete an RPG character that doesn’t belong to the current user, we get the corresponding error message back.
{
    "data": null,
    "success": false,
    "message": "Character not found."
}
When we delete a correct character, we get the rest back.
{
    "data": [
        {
            "id": 5,
            "name": "Frodo",
            "hitPoints": 100,
            "strength": 10,
            "defense": 10,
            "intelligence": 10,
            "class": 1
        }
    ],
    "success": true,
    "message": null
}
Last but not least is the UpdateCharacter() method. In essence, we could add the exact same condition as before.
But I want to emphasize a certain behavior of Entity Framework here.
Include Entities with Entity Framework
Instead of adding another condition, we could also check the UserId of the character after receiving it from the database, right? Let’s try that.
We add an if-condition with character.User.Id == GetUserId(), and regarding the else case we can return the same serviceResponse we also returned in the DeleteCharacter() method.
public async Task<ServiceResponse<GetCharacterDto>> UpdateCharacter(UpdateCharacterDto updatedCharacter)
{
    ServiceResponse<GetCharacterDto> serviceResponse = new ServiceResponse<GetCharacterDto>();
    try
    {
        Character character = await _context.Characters.FirstOrDefaultAsync(c => c.Id == updatedCharacter.Id);
        if (character.User.Id == GetUserId())
        {
            character.Name = updatedCharacter.Name;
            character.Class = updatedCharacter.Class;
            character.Defense = updatedCharacter.Defense;
            character.HitPoints = updatedCharacter.HitPoints;
            character.Intelligence = updatedCharacter.Intelligence;
            character.Strength = updatedCharacter.Strength;
            _context.Characters.Update(character);
            await _context.SaveChangesAsync();
            serviceResponse.Data = _mapper.Map<GetCharacterDto>(character);
        }
        else
        {
            serviceResponse.Success = false;
            serviceResponse.Message = "Character not found.";
        }
    }
    catch (Exception ex)
    {
        serviceResponse.Success = false;
        serviceResponse.Message = ex.Message;
    }
    return serviceResponse;
}
Back to Postman, we get a single character first and then grab the result to overwrite the character with similar values.
Remember to use the PUT HTTP method and the URL http://localhost:5000/character without an Id.
What do we get? A NullReferenceException.
{
    "data": null,
    "success": false,
    "message": "Object reference not set to an instance of an object."
}
But why? Let’s debug our Web API for that. We stop the current process with Ctrl + C, set a breakpoint into the UpdateCharacter() method and then start the debugger.
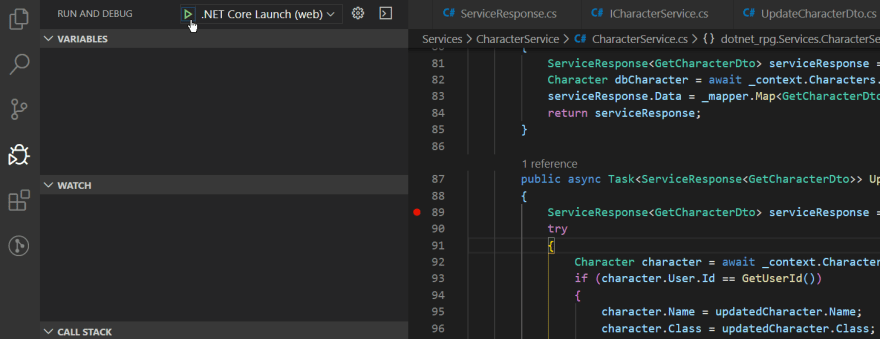
When the debugger is running, we send another request with Postman and then step through the method.
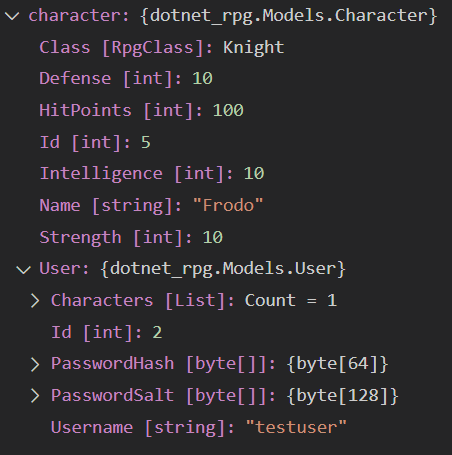
After receiving the character from the database, under “Variables” we can see that the User object of the character is indeed null.

Entity Framework did not include the related object to the character. It works when we add a second condition to the FirstOrDefaultAsync() method because the DbContext is still available there. But after that, we only got the RPG character with no relations.
Of course, we can tell Entity Framework to act differently. After _context.Characters we add the Include() function and the small lambda expression to include the User property.
Character character = await _context.Characters.Include(c => c.User).FirstOrDefaultAsync(c => c.Id == updatedCharacter.Id);
When we save that, restart the debugger and send the request again, we finally get the User with all its properties, so that we can check the Id.
And we also get the updated RPG character.
{
    "data": {
        "id": 5,
        "name": "Frodo",
        "hitPoints": 200,
        "strength": 10,
        "defense": 10,
        "intelligence": 10,
        "class": 1
    },
    "success": true,
    "message": null
}
Great. So keep that in mind, if you want to access related objects. You might have to include them first.
That's it for the 9th part of this tutorial series. I hope it was useful for you. To get notified for the next part, simply follow me here on dev.to or subscribe to my newsletter. You'll be the first to know.
See you next time!
Take care.
Next up: One-to-One Relationship with Entity Framework Core
Image created by cornecoba on freepik.com.
But wait, there’s more!
- Let’s connect on Twitter, YouTube, LinkedIn or here on dev.to.
- Get the 5 Software Developer’s Career Hacks for free.
- Enjoy more valuable articles for your developer life and career on patrickgod.com.

Top comments (2)
Some comments may only be visible to logged-in visitors. Sign in to view all comments.