
This tutorial series is now also available as an online video course. You can watch the first hour on YouTube or get the complete course on Udemy. Or you just keep on reading. Enjoy! :)
Advanced Relationships with Entity Framework Core (continued)
One-To-One Relation with Weapons
Now let’s add a new model to our Web API - the Weapon. The idea behind this is that every Character will only have one Weapon and vice versa.
I know, this is not your typical role-playing game. Usually, you would have several weapons in your inventory and equip one or two, but for this example, your RPG character only gets one weapon and if you want to change it, you have to drop the other.
So, we create a new C# class called Weapon with the properties Id, Name, Damage and the related Character.
namespace dotnet_rpg.Models
{
    public class Weapon
    {
        public int Id { get; set; }

        public string Name { get; set; }

        public int Damage { get; set; }

        public Character Character { get; set; }
    }
}
After that, we have to add another property to the Character class, namely the Weapon. Do you already see how to create a one-to-one relation?
public Weapon Weapon { get; set; }
Since we added a new model we also want to see it as a table in the database. So, we have to add the Weapon class as DbSet to the DataContext.
public DbSet<Weapon> Weapons { get; set; }
Alright, it looks like we already got everything ready for the migration. So, in the terminal we type dotnet ef migrations add Weapon and hit return.
What’s that? We get an error!
The error says:
The child/dependent side could not be determined for the one-to-one relationship between 'Character.Weapon' and 'Weapon.Character'. To identify the child/dependent side of the relationship, configure the foreign key property. If these navigations should not be part of the same relationship configure them without specifying the inverse.

Okay. So, this means that we have to define an explicit foreign key property. With the help of the foreign key, the database knows where to look for the related entity.
In our example, we want the Weapon to be the dependent side of the relationship. There must be a Character for this Weapon. It cannot exist without one. The Character on the other hand can exist without a Weapon.
We realize that by adding another property to the Weapon class, and that would be the property CharacterId as an int. With the help of that convention - using the C# class name and the text “Id” - Entity Framework knows that this is the corresponding foreign key for the Character property. That’s it already.
public int CharacterId { get; set; }
Let’s give it another try and add the migration again with dotnet ef migrations add Weapon.
This time everything should work just fine.
In the Up() method of the migration file, we see the creation of the new Weapons table and the definition of the foreign key constraint.
protected override void Up(MigrationBuilder migrationBuilder)
{
    migrationBuilder.CreateTable(
        name: "Weapons",
        columns: table => new
        {
            Id = table.Column<int>(nullable: false)
                .Annotation("SqlServer:Identity", "1, 1"),
            Name = table.Column<string>(nullable: true),
            Damage = table.Column<int>(nullable: false),
            CharacterId = table.Column<int>(nullable: false)
        },
        constraints: table =>
        {
            table.PrimaryKey("PK_Weapons", x => x.Id);
            table.ForeignKey(
                name: "FK_Weapons_Characters_CharacterId",
                column: x => x.CharacterId,
                principalTable: "Characters",
                principalColumn: "Id",
                onDelete: ReferentialAction.Cascade);
        });
    migrationBuilder.CreateIndex(
        name: "IX_Weapons_CharacterId",
        table: "Weapons",
        column: "CharacterId",
        unique: true);
}
The Down() method simply drops the Weapons table.
protected override void Down(MigrationBuilder migrationBuilder)
{
    migrationBuilder.DropTable(
        name: "Weapons");
}
In the migration design file, we also see the definition of the relation between Character and Weapon. With the methods HasOne() and WithOne() Entity Framework defines the one-to-one relation. Additionally, you can see the definition of the foreign key and also what will happen if a Character gets removed. With OnDelete(DeleteBehavior.Cascade) the Weapon will be removed together with the Character.
modelBuilder.Entity("dotnet_rpg.Models.Weapon", b =>
                {
                    b.HasOne("dotnet_rpg.Models.Character", "Character")
                        .WithOne("Weapon")
                        .HasForeignKey("dotnet_rpg.Models.Weapon", "CharacterId")
                        .OnDelete(DeleteBehavior.Cascade)
                        .IsRequired();
I’d say we run this migration now with dotnet ef database update.
Now we can happily see the new table in the database with the SQL Server Management Studio.
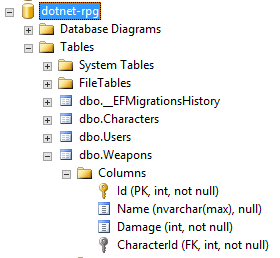
Perfect. We got the Weapon entity, now it’s time to add some weapons with our Web API.
Add Weapons to RPG Characters
We start with creating a new folder for our WeaponService and then create the interface IWeaponService. This interface only gets one method called AddWeapon(), returning a GetCharacterDto and taking an AddWeaponDto.
public interface IWeaponService
{
     Task<ServiceResponse<GetCharacterDto>> AddWeapon(AddWeaponDto newWeapon);
}
As you can see we have to add some using directives and we have to create the new DTO.
For that, we create a new Weapon folder in the Dtos folder and create the C# class AddWeaponDto with the properties Name, Damage and CharacterId.
namespace dotnet_rpg.Dtos.Weapon
{
    public class AddWeaponDto
    {
        public string Name { get; set; }

        public int Damage { get; set; }

        public int CharacterId { get; set; }
    }
}
Now we should be able to add the last missing using directive in the IWeaponService interface.
Next, we create the WeaponService implementation class and implement the corresponding interface and add the async keyword to the AddWeapon() method.
namespace dotnet_rpg.Services.WeaponService
{
    public class WeaponService : IWeaponService
    {
        public async Task<ServiceResponse<GetCharacterDto>> AddWeapon(AddWeaponDto newWeapon)
        {
            throw new System.NotImplementedException();
        }
    }
}
We also need a constructor injecting the DataContext, the IHttpContextAccessor to get the currently authorized user and an IMapper. We need the user to verify the given CharacterId later.
private readonly DataContext _context;
private readonly IHttpContextAccessor _httpContextAccessor;
private readonly IMapper _mapper;

public WeaponService(DataContext context, IHttpContextAccessor httpContextAccessor, IMapper mapper)
{
    _mapper = mapper;
    _httpContextAccessor = httpContextAccessor;
    _context = context;
}
Regarding the implementation of the AddWeapon() method we first initialize the ServiceResponse, return this response and already create a try/catch block where we set the proper values in the case of an exception.
public async Task<ServiceResponse<GetCharacterDto>> AddWeapon(AddWeaponDto newWeapon)
{
    ServiceResponse<GetCharacterDto> response = new ServiceResponse<GetCharacterDto>();
    try
    {
    }
    catch (Exception ex)
    {
        response.Success = false;
        response.Message = ex.Message;

    }
    return response;
}
Now for the try block, we first get the correct Character from the database. We access the Characters from the _context, find the first entity with the given CharacterId and also the correct User so that we know this character really belongs to the currently authorized user.
Just to recap, we get the Id of the current user by accessing the NameIdentifier claims value from the JSON web token.
Character character = await _context.Characters
    .FirstOrDefaultAsync(c => c.Id == newWeapon.CharacterId &&
    c.User.Id == int.Parse(_httpContextAccessor.HttpContext.User.FindFirstValue(ClaimTypes.NameIdentifier)));
Alright. When the character is null, something is wrong and we return a failing response.
if (character == null)
{
    response.Success = false;
    response.Message = "Character not found.";
    return response;
}
However, if we got the proper character, we can create a new Weapon instance, with the given Name and Damage value and also set the Character property of this new Weapon instance to the character object we got from the database.
By the way, we could have added a new mapping from the AddWeaponDto to the Weapon type, or we just set these two properties manually here.
Weapon weapon = new Weapon
{
    Name = newWeapon.Name,
    Damage = newWeapon.Damage,
    Character = character
};
After that, we add this new weapon to the database, save the changes and return the character.
await _context.Weapons.AddAsync(weapon);
await _context.SaveChangesAsync();

response.Data = _mapper.Map<GetCharacterDto>(character);
The last piece of the puzzle is a WeaponController. So, let’s create one.
It derives from ControllerBase and we also have to add the attributes [Route("[controller]")], [ApiController] and [Authorize] together with the corresponding using directives.
using Microsoft.AspNetCore.Authorization;
using Microsoft.AspNetCore.Mvc;

namespace dotnet_rpg.Controllers
{
    [Authorize]
    [ApiController]
    [Route("[controller]")]
    public class WeaponController : ControllerBase
    {

    }
}
Then we need a constructor that is injecting the IWeaponService. As always we can initialize this field from the parameter.
private readonly IWeaponService _weaponService;
public WeaponController(IWeaponService weaponService)
{
    _weaponService = weaponService;
}
After that, we only need one POST method, which is AddWeapon() with an AddWeaponDto as a parameter and returning the result of the AddWeapon() method of the _weaponService.
[HttpPost]
public async Task<IActionResult> AddWeapon(AddWeaponDto newWeapon)
{
    return Ok(await _weaponService.AddWeapon(newWeapon));
}
Did we forget something?
Yes. We have to register the WeaponService in the Startup.cs.
In the ConfigureServices() method we can add this new service with services.AddScoped<IWeaponService, WeaponService>();.
Now that was a lot. Let’s test this with Postman.
Make sure to log in a user first to get a valid token.
After that we try to create a new weapon with the URL http://localhost:5000/weapon, the HTTP method is POST and don’t forget the Authorization key in the header with the proper bearer token.
Regarding the body, make sure to use a cool name for your weapon and a correct characterId for your logged-in user.
{
    "name" : "The Master Sword",
    "damage" : 10,
    "characterId" : 5
}
Running the call results in a successful response. But it’s not very satisfying. We don’t see the weapon of the character. Well, of course, we don’t see it, because we haven’t added the weapon to the GetCharacterDto.
But let’s have a look at the weapons table in the SQL Server Management Studio.

There it is, the beautiful Master Sword.
What happens now, if we try to add another weapon to the same character?
{
    "data": null,
    "success": false,
    "message": "An error occurred while updating the entries. See the inner exception for details."
}
We get an exception! Not very helpful. But when we have a closer look at the Terminal in Visual Studio Code, we can see the following error message.
Microsoft.Data.SqlClient.SqlException (0x80131904): Cannot insert duplicate key row in object 'dbo.Weapons' with unique index 'IX_Weapons_CharacterId'.
And it even tells us the Id of the character. So the one-to-one relation works just fine. To add another weapon, we first have to remove the Master Sword from the database table.
But first, let’s fix the GetCharacterDto. This can be done real quick.
We create a new GetWeaponDto class that only consists of the Name and the Damage of the Weapon. No need for an Id or the Character here.
namespace dotnet_rpg.Dtos.Weapon
{
    public class GetWeaponDto
    {
        public string Name { get; set; }
        public int Damage { get; set; }
    }
}
Then we add the Weapon property of type GetWeaponDto to the GetCharacterDto.
public class GetCharacterDto
{
    public int Id { get; set; }
    public string Name { get; set; } = "Frodo";
    public int HitPoints { get; set; } = 100;
    public int Strength { get; set; } = 10;
    public int Defense { get; set; } = 10;
    public int Intelligence { get; set; } = 10;
    public RpgClass Class { get; set; } = RpgClass.Knight;
    public GetWeaponDto Weapon { get; set; }
}
And finally, we create a new map in the AutoMapperProfile - from Weapon to GetWeaponDto.
public AutoMapperProfile()
{
    CreateMap<Character, GetCharacterDto>();
    CreateMap<AddCharacterDto, Character>();
    CreateMap<Weapon, GetWeaponDto>();
}
That’s it. When we now delete the weapon of our character in the database first and then create it again with Postman, we get the complete character back - with the related weapon.
{
    "data": {
        "id": 5,
        "name": "Frodo",
        "hitPoints": 200,
        "strength": 10,
        "defense": 10,
        "intelligence": 10,
        "class": 1,
        "weapon": {
            "name": "The Master Sword",
            "damage": 10
        }
    },
    "success": true,
    "message": null
}
That's it for the 10th part of this tutorial series. I hope it was useful for you. To get notified for the next part, simply follow me here on dev.to or subscribe to my newsletter. You'll be the first to know.
See you next time!
Take care.
Next up: Many-to-Many Relationship with Entity Framework Core
Image created by cornecoba on freepik.com.
But wait, there’s more!
- Let’s connect on Twitter, YouTube, LinkedIn or here on dev.to.
- Get the 5 Software Developer’s Career Hacks for free.
- Enjoy more valuable articles for your developer life and career on patrickgod.com.

Top comments (4)
So curious about something. I used this to get as far as the migrations then tried to implement the rest without help. Ended up pretty close, but the big difference is instead of creating a separate controller for weapons, since they maintain a 1to1 relationship, it made sense to add the add weapon to the character controller and specify the characterId in the url so the completed character controller now has:
The only drawback that I can see immediately is using a separate weapon controller keeps the weapon/character logic more separate where as mine introduces uses a service from a different class in the character controller.
Am I missing anything else that would come back to bite me with this implementation?
Ran through this and couldn't figure out why theAddWeapon returned a character with a proper weapon, but even with the changes to GetCharacterDto, GET /character/{id} and GET /character both have null for weapon.
Turns out it needs to be 'loaded' from the DB in order to be referenced.
Was able to get the GetAll route to return weapon info by adding an Include() to the chain.
More info here:
The Include() call is what does it.
More info here:
docs.microsoft.com/en-us/ef/ef6/qu...
edit - so this is covered a bit in the next section fyi.
It would be nice to see some patterns of many to many relationships, since they are not included in EF
Hey Antonio,
You'll find many-to-many relationships in the upcoming part. :)
Take care & stay healthy,
Patrick