
Originally published on my blog here and full code on github.
Table Of Contents
What's this about? A quick project overview
Whenever I need inspiration on new IoT projects ideas to work on I phone my colleague Ramiro and in less than 10 minutes we have 4 or 5 ideas on the table.
During our last conversation, he told me about an idea he had that caught my attention. "If your bike or motorbike were stolen, wouldn't it be nice to be able to know in that precise instant where it is, or what was its last known position?".
Imagine having a small device that you could use to track any of your most valuable things: your bike, your laptop, your backpack, even your wallet. Or at least, small enough to carry it yourself in your pocket or your jacket.
I spent a couple of days thinking about this concept, about how I could develop it, what technologies to use, what devices, etc. At that moment, the only thing I had clear was that I wanted this device to be autonomous and therefore not dependent on being able to connect to a WiFi network or use a SIM card for data communication.
After looking at several options I ended up deciding that I was going to use a radiofrequency module to transmit my GPS position to a receiver that I would have connected to a Raspberry Pi in my house, where I could process and visualize the data.

And now, let's build it!
Reading GPS data with an ESP8266 and the Neo-6M
The Neo-8M odyssey
This whole project revolves around monitoring my GPS position remotely. It is clear then that the main piece, the only sensor, will be the GPS module.
Well, looking for examples of how to read GPS data using an Arduino board, I saw that almost everyone used the same module: the Ublox Neo-6M. So when I went to Aliexpress to buy a unit I saw that there were two more models available, the Neo-7M and the Neo-8M. My first and only thought was: "The newer the better, I don't care if I haven't seen any examples using the Neo-8M, that's the one I'm going to buy. I'll figure out how to work with it later". WRONG!
After two weeks of waiting, the package finally arrives, I hook it up to my ESP8266... it doesn't work, there is no way to receive data no matter what I do. I change to Windows 10, I connect the Neo-8M to try debugging it with the u-center software and nothing, for some reason it didn't work.
Just considering the idea that I would have to wait another two weeks to receive it, made me rethink whether to discard the project and get on with something else. So I went out for a walk and on my way home I convinced myself to buy the Neo-6M and that, in the meantime, it would be a good idea to work on the visualization. And so I did.
But first, let's check how you can use a Neo-6M with an ESP8266.
Getting GPS data out of the Neo-6M
This module is quite simple to use. Apart from the power pins, it has two more pins to transmit and receive data. You have to be careful with this though, because you have to connect the RX pin of the Neo-6M to the pin of your board that you have configured as TX, and the TX of the Neo-6M to the pin configured as RX of the board.
What I mean is that we are not using the built-in RX/TX pins of the board, but rather we will configure a couple of digital pins (D2 and D3) to interface with the Neo-6M.
It is much easier to express this with an image:

As you can see below, we will use the SoftwareSerial library to read the Neo-6M data and the TinyGPS++ library to parse the readings. You can see a full lastminuteengineers.com tutorial on how Neo-6M works here.
# check out the full code at: https://github.com/adrianbenavides/arduino-helpers
static TinyGPSPlus gpsParser;
static TinyGPSPlus emptyGpsParser;
static SoftwareSerial gpsSerial(NEO6M_RX_PIN, NEO6M_TX_PIN);

void Neo6m::setup()
{
    Serial.print("Setting up Neo-6M GPS module... ");
    gpsSerial.begin(NEO6M_BAUD);
    Serial.println("done");
}

TinyGPSPlus Neo6m::read()
{
    while (gpsSerial.available() > 0)
        if (gpsParser.encode(gpsSerial.read()))
            return gpsParser;

    return emptyGpsParser;
}

void Neo6m::print(TinyGPSPlus gpsParser)
{
    if (gpsParser.location.isValid())
    {
        Serial.print("Latitude: ");
        Serial.println(gpsParser.location.lat(), 6);
        Serial.print("Longitude: ");
        Serial.println(gpsParser.location.lng(), 6);
        Serial.print("Altitude: ");
        Serial.println(gpsParser.altitude.meters());
    }
    else
    {
        Serial.println("Location: Not Available");
    }

    ...
}
Communicating two nodes with radio frequency using the LoRa-02
LoRa-02 wiring with an ESP8266 and the MISO/MOSI nightmare
Now that we have our GPS module working, it is time to work on the transmission of this data for later analysis and visualization.
Remember that we will carry the GPS sensor connected to a battery and that we are working under the limitation of not being able to connect to the internet or use a SIM card to transmit data.
This is where the Ra-02 LoRa (Long-range Radio) module comes into play. Developed by Ai-Thinker, the manufacturer behind the ESP modules, this radio frequency module improves the previous version providing a larger bandwidth, increasing interference resistance, minimizing current consumption, and increasing security. The LoRa-02 mounts an SX1278 IC and works on a 433MHz frequency.
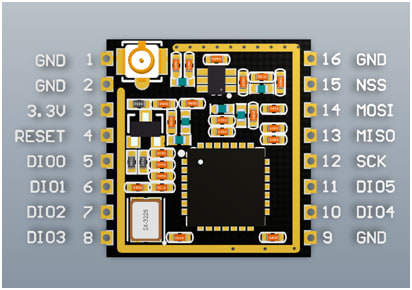
Before jumping into code, I would like to tell you a couple of details about the wiring of this module, something that took me several hours of desperation to resolve... largely because of my ignorance and lack of experience, as you will soon see.
One example after another, I couldn't find a single well-documented one that used an ESP8266 in any of its variants. So I tried to make the simplest example work: setting up the module and send a message... but I just couldn't, something was wrong and I didn't know what it was.
After a considerable period of monkey testing, I had the first good idea of the day: "man, let's take a look at the pinouts of the LoRa and the ESP8266 modules to see if we are missing something". It didn't take me too long to realize the problem: the MISO and MOSI pins of the LoRa module must be connected to the MISO and MOSI pins of the microcontroller. Makes sense right? Believe it or not, I haven't seen ANYONE specifying this "little" detail in any of the examples, implying that the pins used are arbitrary when in fact they are not.
In case you need it, here are the pins that you want to use:
| NodeMcu | UNO, Nano | |
|---|---|---|
| PIN_SPI_SCK | (14) -> D5 | D13 |
| PIN_SPI_MISO | (12) -> D6 | D12 |
| PIN_SPI_MOSI | (13) -> D7 | D11 |
| PIN_SPI_SS | (15) -> D8 | D10 |
And here is the complete wiring:

Sending and receiving data with the LoRa-02
To work with the SX1278, we have a couple of libraries.
The first one I found was Arduino LoRa, which I didn't get to test, as it doesn't specify what arduino-like boards it supports and I didn't feel like I would be in the mood to find it out by myself.
After searching a little further I found what it seems to be the standard library to work with radio frequency modules: the Radio Head library. It offers a wide set of interfaces for different radio modules, including support for the SX1278 with the class RH_RG95. The only problem is that it's not distributed through GitHub, but don't worry, the guys at Adafruit have us covered with a github'ified version.
Working with the Radio Head library is pretty straightforward: a simple method to set up the module with some configuration options and a couple of methods to receive and send messages.
Again, here are a couple of tricky details that I found interesting to highlight:
1. The maximum message length is 255 characters
2. The message passed to the send() method must be of type uint8_t
As I did in the previous project where I experimented with the MQTT protocol, I've created a wrapper to avoid having the GPS code and LoRa cluttering the main.cpp file, making it easier to read. You can check the complete code here.
# check out the full code at: https://github.com/adrianbenavides/arduino-helpers
RH_RF95 rf95(PIN_SPI_SS, RFM95_INT);
uint8_t rf95_buf[RH_RF95_MAX_MESSAGE_LEN];
uint8_t rf95_buf_len = sizeof(rf95_buf);

void LoRa::setup()
{
    ...

    while (!rf95.init())
    {
        Serial.println(" failed");
        while (1)
            ;
    }

    // Defaults after init are 434.0MHz, modulation GFSK_Rb250Fd250, +13dbM
    if (!rf95.setFrequency(RF95_FREQ))
    {
        Serial.println("setFrequency failed");
        while (1)
            ;
    }

    ...
}

std::string LoRa::receive()
{
    if (!rf95.available())
    {
        delay(100);
        return "";
    }

    if (!rf95.recv(rf95_buf, &rf95_buf_len))
    {
        Serial.println("LoRa - No message received");
        return "";
    }

    ...

    return std::string((char *)rf95_buf);
}

void LoRa::send(std::string &message)
{
    const uint8_t messageLength = message.length() + 1;
    assert(messageLength <= 256);

    rf95.send((uint8_t *)message.c_str(), messageLength);
    rf95.waitPacketSent();

    ...
}
Mounting the GPS receiver!
It turned out to be a bit bigger than I expected but, you know, it's a prototype...
![]()
![]()
![]()
Data aggregation and visualization with Balena and MQTT
Customizing the Balena Sense project to handle any sensor data
In this section, I'm going to detail how to leverage the power of Balena to create an MQTT gateway with a customized data visualization using grafana. The power this ecosystem gives to IoT developers is awesome, especially because it saves you from creating the frontend, database, and visualization engine. And that's a LOT of boilerplate and saved time.
To tell telegraf that it must listen to MQTT messages we need to add the following code to the telegraf.conf file.
[[inputs.mqtt_consumer]]
  ## MQTT broker URLs to be used.
  ## The format should be scheme://host:port, schema can be tcp, ssl, or ws.
  servers = ["tcp://mqtt:1883"]

  ## Topics that will be subscribed to.
  topics = [
    "sensor/#",
  ]

  ## Data format to consume.
  ## Each data format has its own unique set of configuration options, read
  ## more about them here:
  ## https://github.com/influxdata/telegraf/blob/master/docs/DATA_FORMATS_INPUT.md
  data_format = "influx"
Note that the data_format key is set to "influx", which is the default InfluxDB format, also known as line protocol. An example of a valid message would be: gps lat=41.1234,lng=2.4321, where gps defines the influxdb table and the rest of the message the columns and values to be assigned. Here is the official documentation of this data format.
As for the provisioned dashboards, you can remove the default Balena Sense dashboard, which is defined in the grafana/provisioning/dashboards directory.
Finally, if you need to install any additional grafana plugins, like the trackmap-panel I'm using in this project, you can add them in the balena-mqtt-gateway/grafana/entry.sh file, right before initializing the grafana server.
For further information on how to set up a balena project using a raspberry pi, check out their official documentation here.
GPS data visualization with grafana
At this point, we have every physical piece of the system doing its job, sending, receiving and processing GPS data.
The only thing that is left to do is set up the visualization. To do this we will be using the map plugin I mentioned earlier, and luckily for us, it works out of the box with the provided query:
SELECT median("latitude"), median("longitude")
FROM "location"
WHERE $timeFilter
GROUP BY time($interval)
This is what we'll see in the grafana dashboard if the whole system is working properly:

Summary
It took me a while, but it's working just as I expected! Frankly, I have enjoyed a lot and I have learned a lot of new things working on this project. The satisfaction of seeing a remote device interacting with an RPi that I have in my room is indescribable.
Sometimes, I can't help myself but think about electronics and communication technologies as if it were black magic. Actually, I think is exactly this "childish" feeling that pushes me to keep experimenting and keep looking for new ideas to implement.
I hope you enjoyed this guide, see you next time!

Top comments (0)