

{"id":352,"date":"2026-09-30T01:02:03","date_gmt":"2026-09-30T01:02:03","guid":{"rendered":"https://aiflowpm.com/wp-content/uploads/2026/09/the-problem-with-the-flat-product-backlog-diagram.jpg","raw":"https://aiflowpm.com/wp-content/uploads/2026/09/the-problem-with-the-flat-product-backlog-diagram.jpg"},"modified":"2026-09-30T01:02:03","modified_gmt":"2026-09-30T01:02:03","slug":"the-problem-with-the-flat-product-backlog-workflow-diagram","status":"inherit","type":"attachment","link":"https://aiflowpm.com/the-problem-with-the-flat-product-backlog-workflow-diagram/","title":{"raw":"The Problem with the Flat Product Backlog - Workflow Diagram","rendered":"The Problem with the Flat Product Backlog – Workflow Diagram"},"author":1,"featured_media":0,"comment_status":"","ping_status":"closed","template":"","meta":[],"permalink_template":"https://aiflowpm.com/?attachment_id=352","generated_slug":"the-problem-with-the-flat-product-backlog-workflow-diagram","class_list":["post-352","attachment","type-attachment","status-inherit","hentry"],"description":{"raw":"","rendered":"
"},"caption":{"raw":"","rendered":""},"alt_text":"The Problem with the Flat Product Backlog - Architecture & Framework","media_type":"image","mime_type":"image/jpeg","media_details":{"width":1152,"height":928,"file":"2026/09/the-problem-with-the-flat-product-backlog-diagram.jpg","filesize":828927,"sizes":{"medium":{"file":"the-problem-with-the-flat-product-backlog-diagram-300x242.jpg","width":300,"height":242,"filesize":19961,"mime_type":"image/jpeg","source_url":"https://aiflowpm.com/wp-content/uploads/2026/09/the-problem-with-the-flat-product-backlog-diagram-300x242.jpg"},"large":{"file":"the-problem-with-the-flat-product-backlog-diagram-1024x825.jpg","width":1024,"height":825,"filesize":153439,"mime_type":"image/jpeg","source_url":"https://aiflowpm.com/wp-content/uploads/2026/09/the-problem-with-the-flat-product-backlog-diagram-1024x825.jpg"},"thumbnail":{"file":"the-problem-with-the-flat-product-backlog-diagram-150x150.jpg","width":150,"height":150,"filesize":7870,"mime_type":"image/jpeg","source_url":"https://aiflowpm.com/wp-content/uploads/2026/09/the-problem-with-the-flat-product-backlog-diagram-150x150.jpg"},"medium_large":{"file":"the-problem-with-the-flat-product-backlog-diagram-768x619.jpg","width":768,"height":619,"filesize":101432,"mime_type":"image/jpeg","source_url":"https://aiflowpm.com/wp-content/uploads/2026/09/the-problem-with-the-flat-product-backlog-diagram-768x619.jpg"},"full":{"file":"the-problem-with-the-flat-product-backlog-diagram.jpg","width":1152,"height":928,"mime_type":"image/jpeg","source_url":"https://aiflowpm.com/wp-content/uploads/2026/09/the-problem-with-the-flat-product-backlog-diagram.jpg"}},"image_meta":{"aperture":"0","credit":"","camera":"","caption":"","created_timestamp":"0","copyright":"","focal_length":"0","iso":"0","shutter_speed":"0","title":"","orientation":"0","keywords":[],"alt":""}},"post":null,"source_url":"https://aiflowpm.com/wp-content/uploads/2026/09/the-problem-with-the-flat-product-backlog-diagram.jpg","missing_image_sizes":[],"filename":"the-problem-with-the-flat-product-backlog-diagram.jpg","filesize":828927,"exif_orientation":1,"image_output_format":null,"image_save_progressive":false,"image_quality":{"default":82,"sizes":[]},"_links":{"self":[{"href":"https://aiflowpm.com/wp-json/wp/v2/media/352","targetHints":{"allow":["GET","POST","PUT","PATCH","DELETE"]}}],"collection":[{"href":"https://aiflowpm.com/wp-json/wp/v2/media"}],"about":[{"href":"https://aiflowpm.com/wp-json/wp/v2/types/attachment"}],"author":[{"embeddable":true,"href":"https://aiflowpm.com/wp-json/wp/v2/users/1"}],"replies":[{"embeddable":true,"href":"https://aiflowpm.com/wp-json/wp/v2/comments?post=352"}],"wp:action-unfiltered-html":[{"href":"https://aiflowpm.com/wp-json/wp/v2/media/352"}],"wp:action-assign-author":[{"href":"https://aiflowpm.com/wp-json/wp/v2/media/352"}],"curies":[{"name":"wp","href":"https://api.w.org/{rel}","templated":true}]},"post_title":"User Story Mapping: Escaping the Flat Backlog Feature Factory","post_content":"
The Problem with the Flat Product Backlog
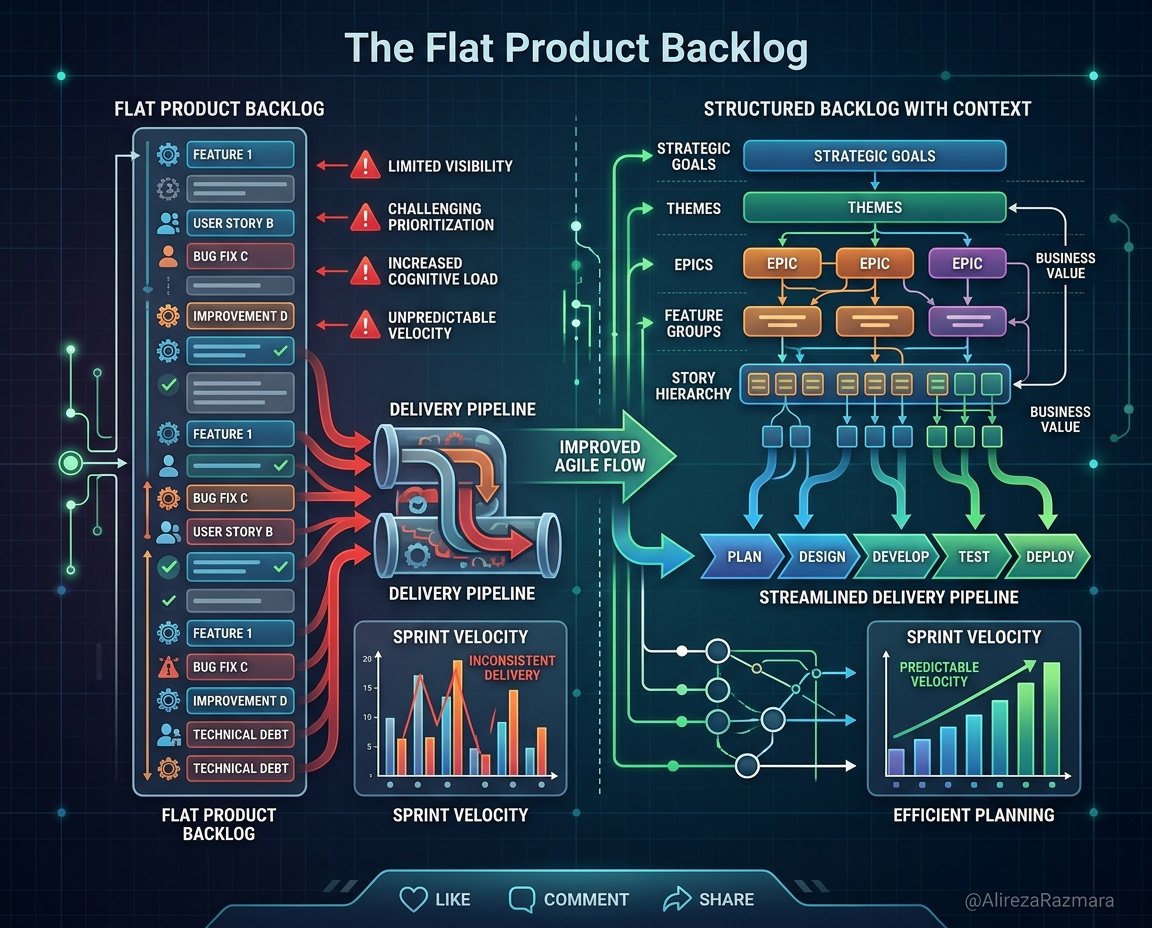
Flat product backlogs fail because they strip away context, making it nearly impossible to see the end-to-end user experience. When engineers and designers look at an isolated ticket buried in a list of hundreds, they lose the narrative of what the user is actually trying to achieve.
If you look at your backlog right now, what do you see? You probably see a long, prioritized list of Jira tickets. A database migration sits right above a UI tweak for the login screen. Below that, there are three bug fixes and a massive epic for a new payment gateway. Your team is picking up tickets, writing code, and closing them out. Velocity looks great.
But if you ask an engineer how their current ticket fits into the user's journey, they might stare at you blankly. You are operating a feature factory. A flat backlog tells you exactly what to build, but it completely fails to tell you why, for whom, and in what order it creates real value.
When context goes to die in a flat list, product delivery suffers. You end up building disconnected features that technically satisfy acceptance criteria but result in a clunky, disjointed user experience.
What is User Story Mapping?
User Story Mapping is a visual exercise that organizes product backlogs into a two-dimensional grid based on the user journey. Pioneered by Jeff Patton, it replaces a one-dimensional list of tickets with a horizontal narrative of user steps and a vertical list of tasks prioritized by value.
Instead of throwing stories into a single column sorted by a vague priority score, you map them out spatially. This creates a literal map of your product that everyone in the room can immediately understand.
The map is built on two primary axes:
- The Horizontal Axis (The Backbone): This maps the user’s step-by-step narrative from start to finish. Think of it as the chronological flow of the user journey. For an e-commerce app, this might be: Search for Product ➔ View Details ➔ Add to Cart ➔ Checkout ➔ Track Order.
- The Vertical Axis (Depth & Priority): Underneath each step in the backbone, you break down the specific user stories or features required to complete that step. These are arranged from top to bottom, from the absolute essential components required for a Minimum Viable Product (MVP) down to the "nice-to-have" enhancements.
Why High-Performing Teams Swear By Story Mapping
High-performing agile teams use story mapping because it forces shared understanding, exposes critical gaps early, and ensures every release delivers a usable end-to-end experience. It completely shifts the daily conversation from output to outcomes.
As an agile coach, I see the exact same lightbulb moment happen every time a team builds their first map. Here is exactly why this technique is a game-changer for tech leaders and development teams:
1. Radical Shared Understanding
We have all sat through sprint reviews where a stakeholder says, "Wait, that’s not what I meant." Story mapping eliminates this disconnect. Engineers, UX designers, product managers, and stakeholders are finally looking at the exact same mental model. The map visually communicates the scope and flow in a way that reading a Jira ticket simply cannot.
2. Smarter Release Slicing
Traditional backlogs often lead to building half-baked features across five sprints. You might build an incredibly robust product search feature, but forget to build the checkout page, meaning the user cannot actually buy anything. Story mapping allows you to carve out thin, horizontal slices across the backbone. You deliver a complete, testable, end-to-end user journey in a single release, even if every step is incredibly basic at first.
3. From Output to Outcomes
Teams get addicted to closing tickets. Story mapping breaks the habit of blindly chasing velocity. When a developer pulls a ticket from a story map, they immediately see how it connects to the steps before and after it. They understand the outcome the user needs, not just the technical output required.
4. Identifying Critical Gaps Instantly
Visualizing the flow organically reveals missing steps, technical dependencies, and edge cases long before a single line of code is written. If there is a massive cluster of stories under "Checkout" but nothing under "Payment Confirmation," the gap stares you right in the face.

How to Build a User Story Map in 4 Steps
To build a user story map, you need to define your target user, map their high-level journey horizontally, break those steps down into specific stories vertically, and then slice the map into viable releases. Do not do this in a silo; get the delivery team and stakeholders into a room with sticky notes or a digital whiteboarding tool.
Step 1: Frame the Journey (The Who and Why)
Before placing a single sticky note, define who you are building for and what their ultimate goal is. If you are building a food delivery app, are you mapping the hungry customer's journey, the restaurant kitchen's journey, or the delivery driver's journey? Pick one persona and state their goal clearly.
Step 2: Build the Backbone
Map out the high-level steps the user takes to achieve their goal. Keep this broad. Place these steps horizontally across the top of your board. Use verbs. Examples: Register Account, Browse Restaurants, Select Meal, Pay, Track Delivery. This is your horizontal narrative.
Step 3: Add Detail and Depth
Now, brainstorm the specific actions, features, or user stories that fall under each step on the backbone. Place these vertically under the relevant high-level step. Under "Pay," you might list Pay with Credit Card, Pay with Apple Pay, Use Promo Code, Save Card for Later. Do not worry about priority yet—just get the ideas on the board.
Step 4: Slice for Releases
Once you have a deep map, start dragging the most critical stories to the top of their respective vertical columns. Draw a horizontal line across the board. Everything above that line represents your first release or MVP. This slice must contain at least one story from every column to ensure a complete, functioning journey. Move the enhancements and edge cases below the line into future slices.
Common Pitfalls to Avoid
The most common pitfalls in story mapping are mapping the system architecture instead of the user journey, making the backbone too granular, and treating the map as a static artifact rather than a living document.
Mapping the System, Not the User: I frequently catch teams writing backbone steps like Trigger API Webhook or Update Database Schema. Your user does not trigger webhooks; they click buttons to save their preferences. Keep the map entirely focused on the user's perspective. Technical tasks should live as sub-tasks or implementation details attached to the user-facing stories.
Getting Bogged Down in Minutiae: Do not spend three hours debating the exact wording of a sticky note in the fourth release slice. The goal of the initial mapping session is broad alignment and scoping the immediate next steps. The map will evolve.
Abandoning the Map: A story map is not a one-off workshop activity you export to a PDF and forget. It should be the living centerpiece of your backlog refinement sessions. As you learn more about your users, add, remove, and shift stories on the map.
Stop Prioritizing in a Vacuum
To transition from a flat backlog to a story map, start small. Take the next major epic or feature your team is about to build, and map it out instead of just listing the requirements in a document.
Agile product development is about adapting to user needs and delivering real value incrementally. A flat backlog is a terrible tool for that job. It treats product development like an assembly line, where context is lost and engineers are treated as order-takers.
Story mapping restores the narrative. It reminds everyone on the team that you are not just writing code; you are building an experience. Start mapping those experiences today, and watch your team's engagement and product quality dramatically improve.
","post_slug":"user-story-mapping-guide","category_id":9}Originally published at https://aiflowpm.com/user-story-mapping-guide/


Top comments (0)