Starting out in web development is not easy, especially when you don't have a space where you can show off the projects you've worked on.
In this tutorial, I'll show you how to create a simple personal portfolio that looks like this, which you can easily customize/expand upon to fit your needs. The project will use Nuxt v2, Bootstrap-vue and Google Fonts.
I'll be partitioning this portfolio page into several Vue components and going through them one at a time. I won't regurgitate concepts in this tutorial if there's a link for its documentation. For any unmentioned bootstrap component attributes, please check its component reference from the appropriate link.
Installation
First, we need to install Nuxt by typing out the following command into the terminal:
npm init nuxt-app personal-portfolio-nuxt
It will ask you some questions.
- Name: [Type whichever name you want or leave it blank to use its default, 'personal-portfolio-nuxt']
- Programming language: JavaScript
- Package manager: npm
- UI Framework: Bootstrap
- Nuxt JS modules: None (you can always add them later if you want)
- Rendering mode: Universal (SSR / Static)
- Deployment target: Static (Static/JAMStack hosting)
- Development tools: jsconfig.json
- Continuous Integration: None
After successfully creating the app, you can delete the Store folder. Then, install Google Fonts:
npm install --save-dev @nuxtjs/google-fonts
Then, add the following edit:
nuxt.config.js
googleFonts: {
    families: {
      Arvo: true,
      'Open+Sans': true,
      'Roboto+Slab' : true,
    }
  }
The above is an example of the fonts I used, feel free change fonts by reading its documentation here, the fonts available can be searched for here.
You should be starting out with the following directory structure:
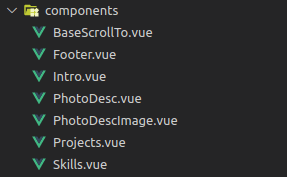
Now, we'll be creating our vue components as such:
Now copy the code below and put it into each of the newly created component files.
<template>

</template>

<script>
export default {

}
</script>

<style>

</style>
With that done, I ask that you type out the code for each component and read the documentation on anything you're unsure of. It goes without saying that the code mentioned below is a starting point, so feel free to play around with it to better your understanding.
index.vue
<template>
  <b-container tag="main" fluid class="px-0" style="overflow-x: hidden">
    <Intro />
    <Skills />
    <PhotoDesc />
    <Projects />
    <Footer />
  </b-container>
</template>

<style>

.title-text {
  font-size: 3rem;
  font-family: 'Arvo';
}

.regular-text {
  font-family: 'Open Sans';
}

.link-text {
  font-family: "Roboto Slab";
}

.purple {
  color: purple;
}

</style>
Once you have all of your components and "index.vue" as shown above, we're going to start simple and add as a basic layout element of our project.
As an aside, knowing what are HTML tags is important as well, more info here.
b-container attributes are:
-
tag="main", (why a main tag?) -
class="px-0", to remove default padding -
style="overflow-x: hidden", to remove the horizontal overflow from using the above px-0
As for the CSS styles that I used, feel free to change them if you want to use different fonts, font sizing or font color.
For more information on CSS scopes, read here.
Intro.vue
  <template>
    <header>
      <b-row class="vh-100 text-center justify-content-center" >
        <b-col md="6" sm="10" cols="12" class="align-self-center">
            <p class="name-container">
              Hello, my name is <span class="purple">YOUR NAME HERE</span>, web
              developer.
            </p>
            <!--- <BaseScrollTo desc="Would you like to know more?" variantColor="outline-dark" descendTo="skills"/> --->
        </b-col>
      </b-row>
    </header>
  </template>

  <style scoped>

  .name-container {
    font-family: 'Arvo';
    font-size: 250%;
  }
  </style>
Regarding b-row and b-col, if you're starting out with Bootstrap, I recommend that you read their grid documentation here to better understand their grid row and column system. Same for its Flex utilities here, useful for layout, alignments and more (example: justify-content-center).
Since each component is its own page section, we'll be adding the approriate tag to each one. For a header, it's <header>
b-row attributes are:
-
vh-100, for making the vertical size of the row 100% of the browser window, which is useful because this component is rather empty, so there's not much content to make it bigger vertically without it.
b-cols attributes are:
-
cols,sm,md,xl, click here for more info. The column size gets bigger the smaller the screen is for a better viewing experience on smaller screens.
Ignore the commented <BaseScrollTo> tag for now, it'll be explained at a later point.
Skills.vue
<template>
  <section class="skills-container">
    <b-row>
      <b-col class="text-center">
        <p class="title-text pb-3" id="skills">Skills</p>
        <p class="regular-text p-2">
          Besides the usual JavaScript, HTML and CSS skills...
        </p>
      </b-col>
    </b-row>
    <b-row class="justify-content-center">
      <b-col lg="6" md="8" sm="10" cols="12" class="text-center">
        <div class="d-flex flex-wrap">
          <div v-for="skill in skills" :key="skill.title" class="m-auto">
            <b-link target="_blank" class="p-3" :href="skill.web">
              <b-img
                height="100"
                weight="100"
                :src="require(`../assets/images/${skill.title}.webp`)"
                :alt="skill.alt"
                :title="skill.alt"
              />
            </b-link>
            <p class="p-2 font-weight-bold">{{ skill.alt }}</p>
          </div>
        </div>
        <!--- <BaseScrollTo desc="Who Am I?" variantColor="primary" descendTo="photo" /> --->
      </b-col>
    </b-row>
  </section>
</template>

<script>
export default {
  data() {
    return {
      skills: [
        { title: 'vue', alt: 'Vue.js', web: 'https://vuejs.org/v2/guide/' },
        { title: 'bootstrap-vue', alt: 'BootstrapVue', web: 'https://bootstrap-vue.org/' },
        { title: 'git', alt: 'Git', web: 'https://git-scm.com/' },
      ],
    }
  },
}
</script>

<style scoped>
.skills-container {
  background-color: orange;
  padding: 200px 0 100px;
  -webkit-clip-path: polygon(0 12%, 100% 0%, 100% 100%, 0 100%);
  clip-path: polygon(0 12%, 100% 0%, 100% 100%, 0 100%);
}
</style>
For more information regarding clip-path, read here, and use the link, here, for an easy way to get the clip path you want. I used them mainly because of their look but YMMD.
You can use v-for if you're repeating something, such as a list of information, but don't want to repeat the code for each one. For more information regarding v-for, read here.
As a reminder, any attribute with a colon beforehand (such as :src) is a v-bind shorthand, read here, to dynamically fill in information from the object being iterated. As for ${}, those are JavaScript template literals, you can find out more here. Finally, if you're using local files for your images, you need to use require plus the source file between parentheses, read here.
You can observe above, that the images necessary for the v-for directive are stored in the assets/images directory.
Photodesc.vue
<template>
  <section class="hero" id="photo">
    <p class="text-center title-text text-white">Who am I?</p>
    <b-row class="d-flex justify-content-center">
      <b-col lg="3" md="5" sm="6" cols="6" class="d-flex justify-content-center justify-content-md-end py-4">
        <PhotoDescImage />
      </b-col>
      <b-col lg="4" md="6" sm="8" cols="10" class="d-flex align-items-center">
        <p class="font-weight-bold text-white regular-text">Write small biography about yourself and your web development skills here.</p>
      </b-col>
    </b-row>
    <!--- <BaseScrollTo desc="Check out my projects" variantColor="outline-light" descendTo="projects"/> --->
  </section>
</template>

<style scoped>
.hero {
  background-color: black;
  padding-bottom: 200px;
  padding-top: 100px;
  -webkit-clip-path: polygon(0 0, 100% 0%, 100% 100%, 0 79%);
  clip-path: polygon(0 0, 100% 0%, 100% 100%, 0 79%);
}
</style>
Compared to the last component, there are only a couple of new things to take into account.
First, PhotoDescImage, which I'm using as a way to show how you can use components within components.
PhotoDescImage.vue
<template>
  <b-img
    thumbnail
    class="p-2"
    rounded="circle"
    src="../assets/images/myself.jpg"
    style="height: 175px; width: 175px"
  />
</template>
It's a component containing a simple image. I really don't need to separate it as such, but it's for demonstration purposes. You'd just need to put the proper image in the appropriate directory.
Second, the columns are arranged in such a way that when reducing the screen size, the columns will expand their sizes until they together they go over the layout limit and the second column will be pushed underneath. This is a wanted behavior to more property arrange contents for tablets or mobile.
Projects.vue
<template>
  <section class="Projects px-5">
    <b-row class="justify-content-center">
      <b-col lg="6" md="8" sm="10" cols="12">
        <p class="text-center title-text pb-3" id="projects">
          Projects and/or Experience
        </p>
      </b-col>
    </b-row>
    <b-row v-for="box in boxes" :key="box.name" class="boxes pb-5 justify-content-center">
      <b-col lg="5" md="6" cols="12">
        <div class="font-size-biggish purple">
          {{ box.title }}
        </div>
        <div class="regular-text">
          <p>
            {{ box.desc }}
          </p>
          <p>
            Technologies used: <span> {{ box.tech }}</span>
          </p>
        </div>
        <div class="d-flex align-items-center">
          <div v-if="box.link">
            <b-button variant="outline-dark" class="link-text mr-2 mr-lg-5 purple" :href="box.link" target="_blank">Live demo</b-button>
          </div>
          <div v-if="box.source">
            <b-button variant="link" class="font-size-biggish link-text text-decoration-none" :href="box.source" target="_blank">
              Source Code
            </b-button>
          </div>
        </div>
      </b-col>
      <b-col lg="5" md="6" sm="12" cols="12" class="pt-3">
        <div class="">
          <a :href="box.link" target="_blank">
            <b-img
              fluid-grow
              rounded
              :src="require(`../assets/images/${box.name}.png`)"
              alt=""
            />
          </a>
        </div>
      </b-col>
    </b-row>
  </section>
</template>

<script>
export default {
  data() {
    return {
      boxes: [
        {
          id: 1,
          name: 'recipe',
          title: 'Project 1',
          link: 'https://google.com',
          source: 'https://google.com',
          tech: 'VueJS, Firebase, Auth0',
          desc: 'Project 1 description',
        },
        {
          id: 2,
          name: 'reciperest',
          title: 'Project 2',
          link: 'https://google.com',
          source: 'https://google.com',
          tech: 'Django, Postgres, Rest',
          desc: 'Project 2 description',
        },
        {
          id: 3,
          name: 'portfolio',
          title: 'Project 3',
          link: 'https://google.com',
          source: 'https://google.com',
          tech: 'VueJS, Boostrap-vue',
          desc: 'Project 3 description',
        },
      ],
    }
  },
}
</script>

<style scoped>
.font-size-biggish {
  font-size: 1.3rem;
}
</style>
This may seem like a lot of code, but if you've read on all the attributes from the previous components, hardly anything new beyond v-if, more info here.
BaseScrollTo.vue
<template>
  <b-button :variant="variantColor" class="mx-auto d-flex justify-content-center link-text text font-weight-bold" @click="scroll(descendTo)">
    {{ desc }}
  </b-button>
</template>

<script>
export default {
  props: {
    desc: String,
    descendTo: String,
    variantColor: String
  },
  methods: {
    scroll(descendTo) {
      document.getElementById(descendTo).scrollIntoView({
        behavior: 'smooth',
      })
    },
  },
}
</script>
Finally, we get to the mystery component. It's a button customizable by props, that scrolls down to the following component. For more information on props, read here.
Showing the BaseScrollTo from Intro.vue, can you infer where the prop strings below fit into the code above?
<BaseScrollTo desc="Would you like to know more?" variantColor="outline-dark" descendTo="skills"/>
The answer is as follows:
-
desc, it's simple text interpolation using double curly braces,{{ desc }}. -
variantColor, it uses the value coming from the parent component into the dynamic child component. -
descendTo, same as above but using it as a value function for a JavaScript method. For more information on methods, read here. On getElementById, read here. Finally, on scrollIntoView, read here.
Test this out by uncommenting the "propable" BaseScrollTo component in the components above.
Footer.vue
<template>
  <footer class="footer">
    <b-row class="justify-content-center">
      <b-col class="d-flex justify-content-center">
        <div class="py-5">
          <div @click="scroll()">
            <b-img
              class="footer-icons"
              src="../assets/images/up-arrow.png"
              alt=""
            />
          </div>
        </div>
      </b-col>
    </b-row>
    <b-row class="justify-content-center">
      <b-col class="d-flex justify-content-center">
        <div>
          <a
            :href="bottomLink.href"
            target="_blank"
            v-for="bottomLink in bottomLinks"
            :key="bottomLink.title"
            ><img
              class="px-lg-5 px-2"
              :src="require(`../assets/images/${bottomLink.srcImage}.webp`)"
              :title="bottomLink.title"
          /></a>
        </div>
      </b-col>
    </b-row>
  </footer>
</template>

<script>
export default {
  data() {
    return {
      bottomLinks: [
        {
          title: 'Github',
          srcImage: 'github',
          href: 'https://github.com/username',
        },
        {
          title: 'Resumé',
          srcImage: 'cv',
          href: 'resume link here',
        },
        {
          title: 'LinkedIn',
          srcImage: 'linkedin',
          href: 'https://www.linkedin.com/in/username',
        },
      ],
    }
  },
  methods: {
    scroll() {
      window.scrollTo({
        top: 0,
        behavior: 'smooth',
      })
    },
  },
}
</script>

<style scoped>
.footer {
  background-color: black;
}

.footer-icons {
  cursor: pointer;
}
</style>
Finally, we end with the footer. The differences here being that we're using a footer tag instead of a section and an image that scrolls you to the top when clicked instead of the BaseScrollTo component we've been using.
We can still reuse BaseScrollTo here, but we'd need to do some changes. Do you know what to change? (hint: we'd need to add an additional prop for it being a button or an image and a v-if that takes this additional prop into account).
Conclusion
And we're done. You only need to deploy it with your favorite online hosting, such as Netlify here.
There are certainly some changes that can be made to improve upon this portfolio, maybe adding a navigation bar, having the images be hosted in a CDN instead of being served alongside the website, having separate pages instead of a single one or using try catch to prevent the website from crashing during build if the approriate referenced image is not available. I'm keeping it simple, but you're free to improve upon it to your liking as mentioned at the beginning of the article.
It's my first time writing a tutorial, so let me know any feedback you may have through private message.


Oldest comments (0)